22
GB
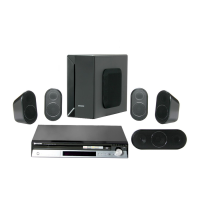
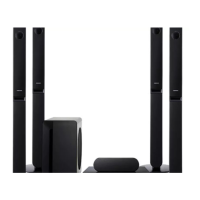
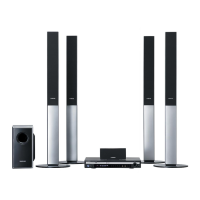
CONNECTIONS
23
Connecting Audio from External Components
ASC IN
RADIO ANT.
KARAOKE MIC
MIC 1 MIC 2
SYSTEM CONNECTOR
COMPONENT OUT
AUX IN
VIDEO OUT
WIRELESS
FRONT R CENTER FRONT L
REAR LREAR R
LR
SPEAKERS OUT
Connecting an External Digital Component
Digital signal components such as a Set-Top/Cable Box.
Connect the Digital Input (OPTICAL 1 or 2) on the Home Theater to the Digital Output of the external
digital component.
Press the AUX button on the remote control to select <D.IN1> <D.IN2> input.
You can also use the FUNCTION button on the main unit.
The mode switches as follows : <DVD> <USB> <HDMI> <D.IN 1> <D.IN 2> <AUX> <FM>.
Connecting an External Analog Component
Analog signal components such as a VCR.
Connect the AUX (Audio) In on the subwoofer to the Audio Out of the external analog component.
Be sure to match connector colors.
Press the AUX button on the remote control to select <AUX> input.
You can also use the FUNCTION button on the main unit.
The mode switches as follows : <DVD> <USB> <HDMI> <D.IN 1> <D.IN 2> <AUX> <FM>.
To listen to the audio from the TV in 5.1 channel through the main unit, press the Dolby Pro Logic II or the SUPER 5.1
button.
You can connect the Video Output jack of your VCR to the TV, and connect the Audio Output jacks of the VCR to this
product.
•
•
1
2
1
2
Optical Cable
(not supplied)
Audio Cable (not supplied)
If the external analog component has
only one Audio Out, connect either
left or right.
ASC IN
RADIO ANT.
KARAOKE MIC
MIC 1 MIC 2
SYSTEM CONNECTOR
COMPONENT OUT
AUX IN
VIDEO OUT
WIRELESS
FRONT R CENTER FRONT L
REAR LREAR R
LR
SPEAKERS OUT
Connect the FM antenna supplied to the FM 75Ω COAXIAL Jack.
Slowly move the antenna wire around until you find a location where reception is good, then fasten it to a
wall or other rigid surface.
This unit does not receive AM broadcasts.
•
Cooling Fan
The cooling fan supplies cool air to the subwoofer to prevent overheating.
Please observe the following cautions for your safety.
Make sure the unit is well-ventilated. If the unit has poor ventilation, the temperature inside the unit may
rise and may damage it.
Do not obstruct the cooling fan or ventilation holes. (If the cooling fan or ventilation holes are covered with
a newspaper or cloth, heat may build up inside the unit and fire may result.)
Connecting Microphone
You can enjoy the feeling of a karaoke bar in the comfort of your home. Watch the video and sing along the lyrics
displayed on the TV screen against the accompaniment.
1
Connect the microphone to the MIC jack.
You can connect up to two microphones.
2
Press the MIC VOL button to adjust the voice
volume of the microphone.
3 Press the ECHO button to adjust the echo
level of the microphone.
If you hear strange noises (squealing or howling) while using the Karaoke
feature, move the microphone away from the speakers. Turning down the
microphone volume or the speaker volume is also effective.
Microphone doesn't work while HDMI mode and HDMI AUDIO ON.
1
2
•
•
FM Antenna (supplied)
Connecting the FM Antenna
ASC IN
RADIO ANT.
KARAOKE MIC
MIC 1 MIC 2
SYSTEM CONNECTOR
COMPONENT OUT
AUX IN
VIDEO OUT
WIRELESS
FRONT R CENTER FRONT L
REAR LREAR R
LR
SPEAKERS OUT
ASC IN
RADIO ANT.
KARAOKE MIC
MIC 1 MIC 2
SYSTEM CONNECTOR
COMPONENT OUT
AUX IN
VIDEO OUT
WIRELESS
FRONT R CENTER FRONT L
REAR LREAR R
LR
SPEAKERS OUT
 Loading...