2
The LA240 Loop System provides a practical solution for hearing aid users to listen more easily to their TV or Audio
equipment via the “T” or “Loop” program of their hearing aid.
With no direct connection between the user and a TV or Audio equipment the user is able to move freely within the looped
area and listen comfortably to a TV or audio equipment without the distractions of normal listening.
The Loop System is used in conjunction with a hearing aid with a “T” or “Loop” program found on many ‘behind the ear’ or
‘in the ear’ hearing aids. The Loop system picks up the sound from a TV via a direct connection or microphone and feeds it
to the amplier. The sound is then passed to a loop of wire around the listening area, which in turn transmits the sound
inductively, “magnetic sound waves”, to a hearing aid with the loop facility. The user may then adjust the loop volume or
tone to suit their own hearing preference without aecting others.
The Loop System is supplied with either Loop Cable or Loop Pad.
Loop cable is placed around a room that you want to listen in. The sound can be heard anywhere inside the “looped” area
and sometimes just outside the loop as well.
A Loop Pad is an alternative to loop cable and is used to create a localised or portable system to avoid interference with
other systems or where condentiality is required.
1. Check contents of package.
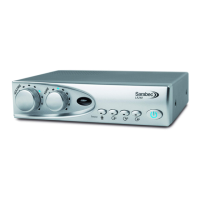
2. Place amplier near TV or Audio equipment with or without stand.
3. Connect audio leads between TV or Audio system and Loop Amplier.
4. Place loop cable around room and connect both ends of wire to the loop cable connectors on the rear of the loop
amplier.
5. Plug the power supply unit lead into the amplier. Connect the mains lead to the power supply unit and place the
mains plug into a convenient mains socket
6. Switch on TV / Audio equipment and Loop Amplier.
7. Select the source button(s) on front of amplier corresponding to your audio inputs
8. Switch hearing aid to “T” or Loop program
9. Adjust loop amplier volume/tone to suit listening level.
Quick Setup
Introduction