7
Power
Plug the power supply lead into the socket (10) on the rear of the amplier. Connect the mains lead to the power supply
and then plug into a mains outlet. Switch on the power at the outlet.
This amplier may also be used with DC power supplies directly connected to the amplier such as those found in buses
and coaches.
Operation
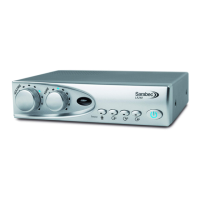
When connecting power for the rst time to your amplier the power button (8) will illuminate blue and the amplier
will be “On”. This is normal operation and is useful where remote switching of the system is required such as in buses and
coaches.
Pressing the power button will change the colour to red and the amplier will be in the standby mode which uses low
power and no signal will be passed to the loop. In order to remove all power from the unit the power supply must be
disconnected from the amplier and the mains outlet.
Press the button power again and it will light up blue. The system is now ready for use.
• Set the television or other audio equipment to the normal listening level for other members of your household.
• Select the sound source required from the buttons (4) - (7).
• Set the volume control to minimum.
• Set the tone control to the normal position ( 12 o’clock).
• Switch your hearing aid to the ‘T’ or loop function.
• Adjust the volume and tone to suit your listening.
Pressing the power button will turn the amplier o and the light will go red. The next time the power is turned on the
volume, tone and source selections from the previous session will be restored.
Volume control (1)
Use to adjust the volume of the signal received by the hearing aid. As the signal increases the blue light will travel around
the control indicating the volume level in use.