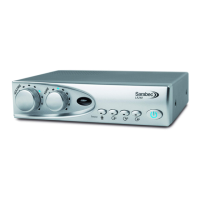
8
Tone control (2)
Use to vary the tone of the signal. Turned in the clockwise direction the higher frequencies will be emphasised and in the
anti-clockwise direction the lower frequencies will be emphasised. As the tone control is moved the blue light will travel
around the control indicating the tone position in use.
Loop level Indicator (3)
This indicates that a signal is being transmitted by the loop cable. It ickers with a low volume and remains steady
with louder volumes. Testing the system can be done by speaking into a microphone and seeing the light ash, this will
indicate that a signal is owing round the cable.
Sound source selections (4-7)
Pressing one of these buttons will select the sound source connected to the amplier in the corresponding sockets 13-19
on the rear of the amplier. One or more of these can be selected at any one time. When the channel is selected a blue
light will show in the button. Press the button again and the light will go out showing that channel is o.
Microphone (4)
Selecting this will allow sound from microphones connected to sockets (18) and/or (19). If a microphone is plugged into
socket B (19) then if the priority button (17) is pushed in any sound received by this microphone will override all the other
sounds connected to the loop system. This can be useful when used to monitor a doorbell or telephone bell or if a partner
wants to talk to the hearing aid wearer through the loop.
Analogue Line Input A (5) and Analogue Line Input B (6)
Allows the selection of the line input signals from channel A (16) or B (15). Useful to connect to a TV and DVD player so
that either may be simply selected from the front panel. Either or both channels may be selected simultaneously.
Digital Audio (7)
Allows the selection of digital audio from sockets (13) or (14) but not both at the same time. When selected the button
light will be blue. Should the light show red then there is no audio being received by the digital equipment.
Headphone socket (12)
The Headphone socket may be used with headphones that have a stereo 3.5mm plug tted. This may be used by a non-
hearing aid user to receive amplied sound. It can also be used to test that the loop system is set up correctly. Headphones
used in this way will not aect the performance of the loop system for hearing aid users. The headphone socket may be
used without a loop cable being connected but the loop level indicator will not show.
 Loading...