

J
Jason RobersonSep 10, 2025
Why does the drill anneal when using the Scheppach DP19Vario?
- Bbrian21Sep 10, 2025
If the drill anneals when using the Scheppach Drill, the speed is likely wrong. Change the speed.
Why does the drill anneal when using the Scheppach DP19Vario?
If the drill anneals when using the Scheppach Drill, the speed is likely wrong. Change the speed.
What to do if the workpiece snaps out of my hand while using the Scheppach DP19Vario Drill?
If the workpiece snaps out of your hand when using the Scheppach Drill, it indicates that there is no suitable base under the workpiece, or it is not firmly fixed. Reline the workpiece or fasten it.
Why does my Scheppach DP19Vario cause wood splinters at the opening of the drill?
If wood splinters appear at the opening of the drill with your Scheppach Drill, it's likely that there is no suitable base under the workpiece. Use a suitable and stable base.
Why is there strong noise during Scheppach DP19Vario Drill operation?
Strong noise during operation can occur due to several reasons: * Incorrect V-belt tension: Set the V-belt tension according to the manual. * The spindle may be too dry: Test the spindle and lubricate it if necessary. * A loose pulley on the spindle: Check the nut on the pulley and tighten if needed. * A loose pulley on the motor: Tighten the set screw on the motor pulley.
Why does my Scheppach Drill block the workpiece?
If the Scheppach Drill blocks the workpiece, it may be because the workpiece and drill are tilted, or the speed is too high. Reline or fix the workpiece. Another reason may be inadequate V-belt tension, so set the V-belt tension.
What to do if the chuck keeps loosening from the spindle of my Scheppach DP19Vario Drill?
If the chuck keeps loosening from the spindle of your Scheppach Drill, it might be due to dirt, grease, or oil on the inside of the spindle or chuck. Clean the surface of the spindle and drill chuck using a household detergent.
Why is my Scheppach DP19Vario making so much noise during operation?
If the Scheppach Drill is making a lot of noise, there are several potential causes. The V-belt tension might be incorrect, so you should set the V-belt tension. The spindle could be too dry, in which case you should test the spindle. Also, the pulley on the spindle or motor might be loose. Check the nut on the pulley for firm seating and tighten it if necessary, or tighten the set screw on the motor pulley.
Why does Scheppach DP19Vario axis return too quickly or slowly?
The axis might return to its starting position too quickly or slowly if the spring tension is set incorrectly. Adjust the spring tension; refer to the section on 'Spindle return spring'.
What to do if feed is too low on Scheppach Drill?
Increase the feed.
What to do if there are no chips coming out of the Scheppach Drill borehole?
To ensure chips come out of the borehole, regularly drive the drill out of the drill hole to remove the chips.
Symbols for general danger, reading instructions, personal protective equipment (eye, hearing, respiratory), and hair/glove safety.
Symbol indicating caution regarding laser radiation and required viewing precautions.
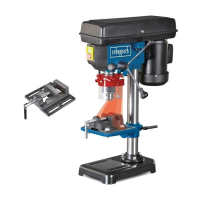
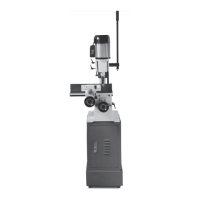
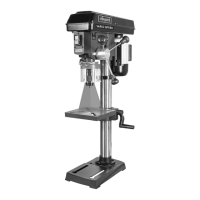
Detailed description of the machine's components with reference to figures 1 and 2.
List of all items included in the product packaging.
Guidelines for maintaining a safe and clean work environment to prevent accidents.
Precautions for safe electrical connections and usage to prevent electric shock.
Recommendations for operator alertness, protective equipment, and preventing unintentional starting.
Instructions on how to use and maintain the power tool to ensure optimal performance and longevity.
Specific safety precautions and procedures for operating the drilling machine.
Guidelines and warnings for the safe handling and disposal of batteries.
Details on the laser class, wavelength, and power output.
Information on noise levels and vibration emission values according to EN 62841.
Step-by-step instructions for assembling the drilling machine and its components.
Instructions for attaching the column to the machine foot and installing the base plate.
Steps for installing the drilling table holder, machine head, and related components.
Instructions for fitting handles, speed lever, swarf protector, and securing the drill chuck.
Instructions for battery installation or replacement for laser operation.
Procedures for mounting the drill on a solid surface for stable operation.
Important checks and precautions to take before operating the machine.
Basic steps for switching the machine on/off, general operational advice, and laser control.
Procedure for correctly inserting drill bits and tools into the chuck and handling the quick-action chuck.
How to adjust the spindle speed continuously while operating the machine.
Steps for setting the drilling depth stop for precise hole depths.
Procedures for adjusting the drilling table's inclination and height.
Instructions for adjusting the spindle return spring tension.
Guidelines for securely clamping workpieces and selecting appropriate working speeds.
Guidance on using the drill for countersinking and pilot drilling operations.
Details about the AC motor's power requirements and extension cable specifications.
Warnings and checks for damaged power cables to prevent electrical hazards.
General advice on maintenance, specialist work, and using original parts.
Steps for cleaning the machine, including ventilation holes and moving parts.
Details on parts subject to wear and consumables.
Information on the WEEE directive and proper disposal of electrical equipment.
Troubleshooting incorrect spindle return speed, likely due to spring tension settings.
Resolving issues with the chuck becoming loose from the spindle.
Addressing problems related to strong noise development during operation.
Solutions for splinters, workpiece snapping, and ensuring stable workpiece mounting.
Troubleshooting drill annealing, chip removal, and off-center holes.
Resolving issues where the drill blocks the workpiece or exhibits excessive run and wobbling.
| Drilling | Yes |
|---|---|
| Chuck type | Keyless |
| Hammer drilling | No |
| Adjustable torque | - |
| Product color | Black, Blue, Red |
| Idle speed (max) | 2580 RPM |
| Idle speed (min) | 440 RPM |
| Chuck capacity (max) | 16 mm |
| Chuck capacity (min) | 1 mm |
| Drilling diameter in wood (max) | - mm |
| Input power | 550 W |
| Depth | 730 mm |
|---|---|
| Width | 500 mm |
| Height | 300 mm |
| Weight | 31400 g |