www.scheppach.com / service@scheppach.com / +(49)-08223-4002-99 / +(49)-08223-4002-58
GB
|
31
Spare parts/accessories
Lawn mower blade - Article no.: 7911200617
Service information
Please note that the following parts of this product
are subject to normal or natural wear and that the fol-
lowing parts are therefore also required for use as
consumables.
Wear parts*: spark plug, air lter, petrol lter, knife,
belt
* Not necessarily included in the scope of delivery!
10. Storage
• Never store the mower (with petrol in the tank) in-
side a building in which petrol fumes could come
into contact with open ames or sparks.
• Allow the motor to cool before you put the lawn
mower in an enclosed area.
• In order to avoid re hazards, keep the engine, ex-
haust and the area around the fuel tank free from
grass, leaves and leaking grease (oil).
Preparing the mower for long-term storage
Caution: Do not empty the petrol tank in enclosed
areas, near re or when smoking. Petrol fumes can
cause explosions and re.
• Empty the petrol tank with a petrol suction pump.
• Start the engine and let it run until any remaining
petrol has been used up.
• Change the oil at the end of every season. To do
so, remove the used engine oil from a warm engine
and rell with fresh oil.
• Remove the spark plug from the cylinder head. Fill
the cylinder with approx. 20 ml of oil from an oil can.
Slowly pull back the starter handle, which will bathe
the cylinder wall with oil. Screw the spark plug back in.
• Clean the cooling ns of the cylinder and the housing.
• Be sure to clean the entire machine to protect the
paint.
• Store the machine in a well-ventilated place.
Preparing the mower for transportation (Fig. 22)
• Empty the petrol tank.
• Always let the engine run until it has used up the
remainder of petrol in the tank.
• Empty the engine oil from the warm engine.
• Remove the spark plug boot from the spark plug.
• Clean the cooling ns of the cylinder and the housing.
• Remove the start tension cable (17) from the hook.
Loosen the quick-release lever (5) and fold the up-
per push bar down.
Make sure the cables are not bent during this pro-
cess.
• Wedge a few layers of corrugated cardboard be-
tween the upper and lower push bars and the en-
gine in order to prevent any chang.
If the air is very dusty the air lter should be checked
more regularly.
Unclip the air lter cover and remove the sponge lter
element. To avoid objects falling into the air intake,
replace the air lter cover. (Fig. 20).
Important: Never clean the air lter with petrol or in-
ammable cleaning agents. Clean the air lter with
compressed air or simply by knocking out any soiling.
Maintenance of the spark plug (Fig. 21)
Check the spark plug for dirt and grime after 10 hours
of operation and if necessary clean it with a copper
wire brush. Thereafter service the spark plug after
every 50 hours of operation.
Pull off the spark plug boot with a twist. Remove the
spark plug (10) with a spark plug wrench.
Using a feeler gauge, set the gap to 0.75 mm( 0.030”).
Ret the spark plug taking care not to overtighten.
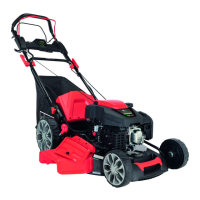
Engine brake lever (Fig. 1)
The engine is equipped with a mechanical brake (3)
which has to be checked regularly. When releasing
the brake lever, the blade must come to a halt within
7 seconds. If this is not the case, the machine must
not be used. Contact an authorised specialist retailer.
Ensure that the machine is in a awless condition for
its entire service life. Improper maintenance may lead
to life-threatening injuries.
Repairs
After any repair or maintenance work, check that all
safety-related parts are in place and in proper work-
ing order. All parts which may cause injury must be
kept where they are inaccessible to children or oth-
ers.
Important: In accordance with product liability legis-
lation we are not liable for any damages caused by
improper repairs or the use of spare parts that are not
original spare parts or parts approved by us.
In addition, we are also not liable for any damages aris-
ing from improper repairs. Such work should be per-
formed by a customer services workshop or author-
ized specialist. The same applies to accessory parts.
Times of use
Please comply with statutory regulations, which may
vary from location to location.
Important hint in case of sending the equipment
to a service station:
Due to security reasons please see to it that the
equipment is sent back free of oil and gas!
Ordering replacement parts
Please quote the following data when ordering re-
placement parts:
• Type of machine
• Article number of the machine
 Loading...