Do you have a question about the Schlage Connect BE469ZP and is the answer not in the manual?
Access online interactive instructions, warranty, and reference information.
Lists the necessary tools for installation, including a Phillips screwdriver.
Provides phone numbers for customer support in the U.S.A., Canada, and Mexico.
Guide on adjusting and installing the deadbolt mechanism into the door.
Instructions for installing the strike plate and reinforcement plate into the door frame.
Steps for routing the cable and mounting the touchscreen assembly onto the door.
Mounting the interior backplate, routing the cable, and securing it with screws.
Instruction to remove the battery cover before installing batteries.
Connecting the internal cable from the touchscreen to the main assembly.
Proper alignment and securing of the lock assembly to the door.
Guidance on installing the final screws to secure the lock assembly.
Instructions for inserting batteries and reattaching the battery cover.
Steps for initial setup, including entering default user codes.
Procedures to verify the lock's functionality after installation.
Process for connecting the smart lock to a smart home system.
Explains how to lock and unlock the door using the logo or user codes.
Step-by-step guide on how to add or remove user access codes.
Instructions to restore the lock to its factory default settings.
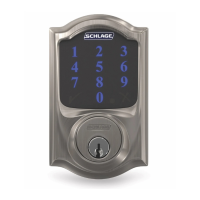
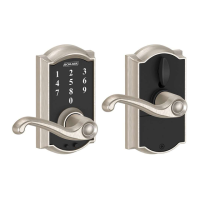
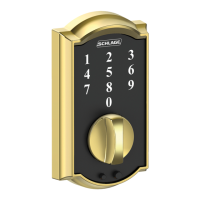
The Schlage Connect Smart Deadbolt is a keyless entry system designed to enhance the security and convenience of your home. This smart deadbolt combines a traditional key entry with a modern touchscreen keypad, allowing for multiple methods of access and control.
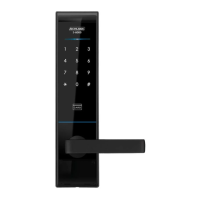
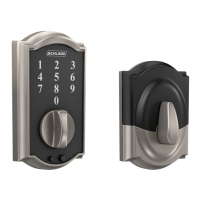
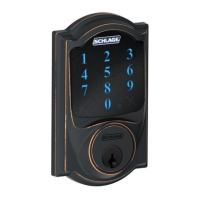
The primary function of the Schlage Connect Smart Deadbolt is to provide secure access to your home. It operates as a deadbolt, offering a robust locking mechanism. The device features a touchscreen assembly on the exterior, which includes a numbered keypad (1-9, 0) and a Schlage logo button. This keypad allows users to lock and unlock the door using personalized user codes. On the interior side, the device has an inside assembly with a thumbturn, providing a quick and easy way to manually lock or unlock the door from within.
The "smart" aspect of this deadbolt comes from its ability to connect with smart home systems. This connectivity allows for remote control and monitoring of the lock, depending on the capabilities of your smart home hub. For instance, you might be able to lock or unlock your door from your smartphone, receive notifications about door activity, or integrate the lock into broader home automation routines.
The deadbolt supports user codes ranging from 4 to 8 digits in length, with a default setting of 4 digits. It also includes a programming code, which is a 6-digit code used to add or delete user codes. This hierarchical code structure ensures that only authorized individuals can manage access to the lock.
In case of a forgotten programming code or a need to reset the lock's settings, a factory default reset feature is available. This process restores the lock to its original default codes and settings, making it ready for a fresh setup. This is particularly useful if you move the lock to a different door or need to reconfigure its access parameters.
Using the Schlage Connect Smart Deadbolt is designed to be straightforward and intuitive.
Installation: The installation process involves several steps, starting with installing the bolt into the door. The bolt's length may need adjustment to ensure the slot is centered in the hole, and the "TOP" indicator on the bolt must face upwards. Next, the strike and reinforcement plate are installed into the door frame, with longer wood screws provided for enhanced security. The touchscreen assembly is then installed on the exterior of the door, ensuring the cable is routed correctly below the bolt and the tailpiece aligns with the bolt's slot. The inside backplate is secured, again ensuring the cable is properly routed and the "TOP" indicator faces outwards.
Powering the Lock: After the main components are installed, the battery cover is removed, and the cable connecting the touchscreen to the inside assembly is connected. This cable is designed to fit only one way, preventing incorrect connections. The inside assembly is then secured to the door, making sure the thumbturn is vertical and the wire is tucked into its channel. Finally, batteries are installed, and the battery cover is slid back on.
Initial Setup: Once physically installed and powered, the lock requires an initial setup routine. This involves opening the door and entering one of the default user codes (found on the back of the guide or the inside assembly). The lock will then enter a setup routine, and setup is complete when the bolt stops moving.
Testing the Lock: After setup, it's crucial to test the lock's functionality. This includes closing the door, extending and retracting the bolt using the inside thumbturn to ensure smooth operation, opening the door, extending the bolt with the thumbturn, and finally, entering a user code at the touchscreen to confirm that the bolt retracts. If the bolt doesn't extend or retract properly, troubleshooting steps involve checking the online instructions and ensuring the spindle is aligned.
Enrolling with a Smart Home System: To integrate the deadbolt with a smart home system, you place your system or panel into enrollment mode. Then, with the battery cover removed, you press and release a button on the inside assembly. A yellow flashing light indicates enrollment is in progress, and a solid green light signifies successful enrollment. A red light indicates an enrollment issue, prompting a retry of the enrollment steps.
Adding and Deleting Codes: Managing user codes is a key feature. To add or delete codes:
The Schlage Connect Smart Deadbolt is designed for relatively low maintenance, primarily focusing on power management and occasional resets.
Battery Replacement: The lock is powered by batteries, which will eventually need replacement. The manual indicates how to access the battery compartment by removing the battery cover. While not explicitly detailed in the provided pages, smart deadbolts typically provide low battery warnings, either through the lock itself (e.g., a specific light pattern or sound) or through the connected smart home system.
Factory Default Reset: This is a crucial maintenance feature for troubleshooting or reconfiguring the lock. If you forget your programming code or need to move the lock to a different door, a factory default reset can be performed. This involves disconnecting the batteries, pressing and holding down the Schlage logo on the touchscreen, and then reconnecting the batteries while still holding the logo. After the reset, you would then set up the lock again as if it were new, including entering a default user code to initiate the setup routine. This ensures that the lock is fully functional and ready for new programming.
Troubleshooting: The guide frequently points to "online instructions" for more detailed troubleshooting, indicating that Schlage provides comprehensive support beyond the quick start guide. This suggests a commitment to helping users resolve issues that may arise during installation or operation. For example, if the bolt doesn't extend or retract during testing, users are directed to online resources to check spindle alignment. Similarly, if the touchscreen is hard to install or the tailpiece isn't fitting, the online instructions might suggest removing a spacer.
The use of a Phillips screwdriver for installation, with a strong recommendation not to use a power drill, highlights a design choice that prioritizes careful, manual installation to prevent damage to the lock. This is a subtle maintenance-related instruction, as improper installation can lead to operational issues and premature wear.
Overall, the Schlage Connect Smart Deadbolt offers a blend of traditional security and modern smart home integration, with user-friendly features for installation, daily use, and essential maintenance.
| Lock Type | Deadbolt |
|---|---|
| Connectivity | Z-Wave Plus |
| Keypad | Yes |
| Battery | 4 AA batteries |
| User Codes | Up to 30 |
| Alarm | Yes |
| ANSI Grade | Grade 1 |
| Bolt Throw | 1" |
| Voice Alerts | No |
| Finish Options | Satin Nickel, Bright Brass |
| Backset | 2-3/8" or 2-3/4" |
| Keyway | Schlage C |
| Alarm Features | Tamper |
| Finish | Satin Nickel, Aged Bronze |
| Weight | 3 lbs |