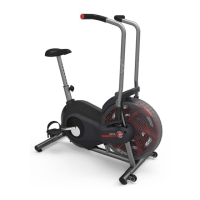
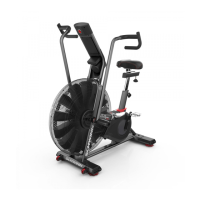
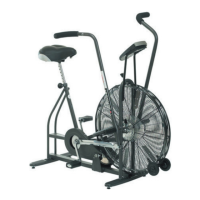
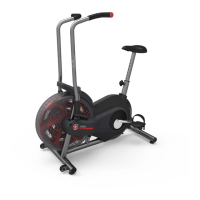
Schwinn Schwinn
Schwinn
® ®
®
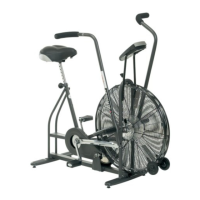
AD4 AD4
AD4
Airdyne Airdyne
Airdyne
Assembly Assembly
Assembly
Manual Manual
Manual
003–3240.021510.A
Important Important
Important
Safety Safety
Safety
Instructions Instructions
Instructions
Thisiconmeansapotentiallyhazardoussituationwhich,ifnotavoided,couldresultindeathorseriousinjury.Obeythefollowingwarnings:
• •
•
Readandunderstandallwarningsonthismachine.• •
•
CarefullyreadandunderstandtheAssemblyManual.• •
•
Keepbystandersandchildrenawayfromtheproductyouare
assemblingatalltimes.• •
•
Donotassembleequipmentinawetordamplocation.• •
•
Makesureassemblyisdoneinanappropriateworkspaceawayfromfoottrafficand
exposuretobystanders.• •
•
Somecomponentsofthemachinecanbeheavyorawkward.Useasecondpersonwhendoingtheassemblystepsinvolvingtheseparts.Donotdo
stepsthatinvolveheavyliftingorawkwardmovementsonyourown.• •
•
Donottrytochangethedesignorfunctionalityofthismachine.Thiscouldcompromisethesafetyand
canvoidthewarranty.• •
•
IfreplacementpartsarenecessaryuseonlygenuineSchwinn®replacementpartsandhardwaresuppliedbyNautilus.Failuretousegenuine
replacementpartscancausearisktousers,keepthemachinefromoperatingcorrectlyorvoidthewarranty.• •
•
Donotuseuntilthemachinehasbeenfullyassembledand
inspectedforcorrectperformanceinaccordancewiththeOwner’sManual.• •
•
ReadandunderstandthecompleteOwner’sManualsuppliedwiththismachinebeforefirstuse.
KeeptheOwner’sManualforfuturereference.• •
•
Doallassemblystepsinthesequencegiven.Incorrectassemblycanleadtoinjury.
Nautilus,Inc.,(800)NAUTILUS/(800)628-8458,www.NautilusInc.com-CustomerService:NorthAmerica(800)605-3369,
customerservice@schwinnfitness.com|Europe,MiddleEast&Africa490220320200,technics-EMEA@nautilus.com|Germany&Austria+490220320200,Switzerland+41264607766,UnitedKingdom
+441908267345,AsiaPacific&LatinAmerica(360)859-5180,technics-APLA@nautilus.com|Patentinformation:ThisproductmaybecoveredbyUSandForeignPatentsandPatentsPending.See
Productformoreinformation.|PrintedinTaiwan|©2010Nautilus,Inc.,Allrightsreserved.™and®indicateatrademarkorregisteredtrademark.Nautilus,Inc.(www.nautilus.com)trademarksinclude
NAUTILUS®,BOWFLEX®,SCHWINN®andUNIVERSAL®andrespectivelogos.Othertrademarksarethepropertyoftheirrespectiveowners.
Before Before
Before
Assembly Assembly
Assembly
Selecttheareawhereyouaregoingtosetupandoperateyourmachine.Forsafeoperation,thelocationmustbeonahard,levelsurface.Allowaworkoutareaof
minimum64.4”x96.9”(163.6cmx246.1cm).
Followthesebasicpointswhenyouassembleyourmachine:
1.Readandunderstandthe“ImportantSafetyInstructions”beforeassembly.
2.Collectallthepiecesnecessaryforeachassemblystep.
3.Usingtherecommendedwrenches,turntheboltsandnutstotheright(clockwise)totighten,andtheleft(counterclockwise)toloosen,unlessinstructedotherwise.
4.Whenattaching2pieces,lightlyliftandlookthroughtheboltholestohelpinserttheboltthroughtheholes.
5.Theassemblyrequires2people.
Specifications Specifications
Specifications
and and
and
T T
T
ools ools
ools
Not Not
Not
Included Included
Included
1/4”
5/16”
15mm
(recommended)
#2
(recommended)
1 1
1