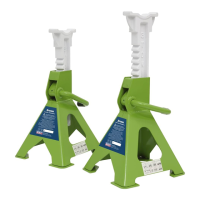
EasyManua.ls Logo

Sealey VS2002HV - User Manual

Sealey VS2002HV
2 pages
Print Icon
To Next Page IconTo Next Page
Loading...
AXLE STANDS (PAIR)
2TONNE CAPACITY PER STAND
MODEL NO: VS2002HV, VS2002BL, VS2002OR
Thank you for purchasing a Sealey product. Manufactured to a high standard, this product will, if used according to these
instructions, and properly maintained, give you years of trouble free performance.
IMPORTANT: PLEASE READ THESE INSTRUCTIONS CAREFULLY. NOTE THE SAFE OPERATIONAL REQUIREMENTS, WARNINGS & CAUTIONS. USE
THE PRODUCT CORRECTLY AND WITH CARE FOR THE PURPOSE FOR WHICH IT IS INTENDED. FAILURE TO DO SO MAY CAUSE DAMAGE AND/OR
PERSONAL INJURY AND WILL INVALIDATE THE WARRANTY. KEEP THESE INSTRUCTIONS SAFE FOR FUTURE USE.
1. SAFETY
WARNING! DO NOT OVERLOAD AXLE STANDS BEYOND RATED CAPACITY. OVERLOADING CAN CAUSE DAMAGE TO, OR
FAILURE OF, THE AXLE STANDS. POSITION LOAD ON CENTRE OF CRUTCH/SADDLE ONLY. ALWAYS USE STANDS IN PAIRS
ON HARD LEVEL SURFACE CAPABLE OF SUSTAINING THE LOAD. USE OF STANDS ON OTHER THAN HARD LEVEL SURFACES
CAN RESULT IN LOAD INSTABILITY AND POSSIBLE LOSS OF LOAD. DO NOT USE ON TARMACADAM. FAILURE TO FOLLOW
THESE INSTRUCTIONS MAY RESULT IN DAMAGE TO AXLE STANDS, LOSS OF LOAD RESULTING IN PROPERTY DAMAGE,
SERIOUS PERSONAL INJURY OR LOSS OF LIFE.
DANGER! GREAT CARE MUST BE TAKEN TO ENSURE YOU LOWER THE VEHICLE (OR OTHER LOAD)
SLOWLY AND CAREFULLY ONTO THE CENTRES OF THE CRUTCH/SADDLE OF THE AXLE STANDS.
9 Use only as specified by the manufacturer.
9 Ensure the load does not exceed the maximum capacity as marked on the axle stand, per pair.
9 Use no more than a single pair of stands either on the front, rear or one side of the vehicle. Use in pairs.
9 No alterations or modifications shall be made to this product.
9 Use on a hard, level surface, e.g. concrete. DO NOT use on uneven ground or tarmacadam.
9 Securely chock wheels in contact with the ground. Before jacking and placing the stands, apply vehicle handbrake
(put automatics in ‘Park’).
9 Make sure that each stand is securely located under a strong point on the vehicle; consult the vehicle manufacturer’s
handbook for guidance. Ensure that height adjust locking mechanism is fully located before applying any load to
the axle stand.
9 Ensure that the load is located centrally on the saddle, and that the weight is directed through the vertical axis of
the stand.
9 Exercise extra care when using with a three wheeled vehicle or a trailer. Refer to vehicle manufacturer’s
instructions.
9 Once vehicle is supported, ensure that the vehicle and stands are stable before starting work. Ensure that it is not possible for the
vehicle to move before commencing any work.
9 Inspect stands before each use. DO NOT use if they show signs of damage. DO NOT use if it is suspected that they have been
overloaded.
9 Before commencing any work or going beneath the vehicle, undertake a risk assessment. Ensure that a responsible person is aware of
the work about to be undertaken.
9 Replace any labels on the axle stand should they become unreadable. This applies in particular to any warning or operation instruction
labels. If replacement labels are required, contact your Sealey stockist.
8 DO NOT use axle stands on the highway, or anywhere else if it is deemed to be unsafe.
8 DO NOT push or twist the vehicle/load whilst it is supported on stands.
8 DO NOT mix components between stands. Use only as supplied.
8 DO NOT allow children or animals in the vicinity of a vehicle supported on axle stands.
8 DO NOT leave a vehicle on axle stands in an area that could be considered a hazard to others or property.
9 FOLLOW STEPS 1, 2, AND 3 TO CORRECTLY PLACE VEHICLE / LOAD ONTO AXLE STANDS.
VS2002HV, BL,OR Issue 1 31/05/18
Original Language Version
© Jack Sealey Limited
Refer to
instructions
Question and Answer IconNeed help?

Do you have a question about the Sealey VS2002HV and is the answer not in the manual?

Summary

Axle Stand Safety Guidelines

Great Care and Load Positioning

Ensure careful lowering of loads onto axle stand centres. Avoid overloading and always use stands in pairs on hard, level surfaces.

General Safety Instructions and Precautions

Follow all safety directives, including proper use, inspection, and avoiding unsafe conditions or modifications.

Correct Axle Stand Placement Procedure

Detailed steps for correctly placing vehicles or loads onto axle stands, including visual examples of correct and incorrect methods.

Axle Stand Technical Specifications

Axle Stand Assembly Instructions

Axle Stand Operation and Usage

Safe Operation and Load Engagement

Instructions for safely operating the axle stands, including height adjustment and ensuring load is centered.

Critical Warnings During Operation

Important warnings regarding load centering, stability, and potential dangers during operation.

Axle Stand Maintenance and Inspection

Pre-Use Checks and Stand Integrity

Essential checks before each use to ensure stands are free from damage or missing parts.

Owner Responsibility and Limitations

Owner's responsibility to ensure operators understand uses, limitations, and safety features.

Overview

This document describes the Sealey Axle Stands (Pair), specifically models VS2002HV, VS2002BL, and VS2002OR. These are 2-tonne capacity axle stands designed for supporting vehicles or other loads.

Function Description:

The primary function of these axle stands is to safely support a vehicle or other heavy load after it has been lifted by a jack. They are designed to be used in pairs on a hard, level surface. The stands feature a ratchet-type mechanism with a cast iron support post and a tough steel plate welded base. An important safety feature is the angled teeth in the post, which prevent accidental release of the load; the more weight applied, the tighter the post is locked. This design ensures stability and prevents the load from shifting or falling, which could lead to property damage, serious personal injury, or loss of life.

Important Technical Specifications:

  • Model Numbers: VS2002HV, VS2002BL, VS2002OR
  • Capacity (each stand): 2 tonnes (2000 kg)
  • Capacity (pair): 4 tonnes (4000 kg)
  • Minimum Working Height: 276mm
  • Maximum Working Height: 435mm
  • Type: Ratchet type axle stand
  • Construction: Cast iron support post, tough steel plate welded base.

Usage Features:

Safety First:

  • Overload Warning: Never overload the axle stands beyond their rated capacity (2 tonnes per stand, 4 tonnes per pair). Overloading can cause damage or failure.
  • Load Placement: Always position the load on the centre of the crutch/saddle.
  • Surface Requirements: Use stands only in pairs on a hard, level surface capable of sustaining the load. Uneven ground or tarmacadam can lead to instability and load loss.
  • Vehicle Preparation: Securely chock wheels in contact with the ground. Apply the vehicle handbrake (or put automatics in 'Park') before jacking and placing the stands.
  • Support Points: Ensure each stand is securely located under a strong point on the vehicle, consulting the vehicle manufacturer's handbook for guidance.
  • Locking Mechanism: Ensure the height adjust locking mechanism (pawl) is fully located into the central column teeth before applying any load.
  • Load Stability: Once the vehicle is supported, ensure it is stable and cannot move before commencing work.
  • Three-Wheeled Vehicles/Trailers: Exercise extra care and refer to the vehicle manufacturer's instructions when using with three-wheeled vehicles or trailers.
  • Avoid Misuse: Do not push or twist the vehicle/load while supported. Do not mix components between stands. Do not allow children or animals near a supported vehicle. Do not leave a vehicle on axle stands in an area that could be considered a hazard.
  • Highway Use: Do not use axle stands on the highway or anywhere deemed unsafe.

Assembly and Operation Steps:

  1. Assembly:
    • Insert the centre column into the base frame and stand.
    • Ensure the toothed side of the column engages with the locking lever mechanism.
    • Bend in the locking tab using a punch or similar and a hammer to secure it.
    • Check the base frame and stand for any damage from transit.
  2. Operation:
    • Refer to the vehicle manufacturer's instructions for recommended jacking/support points.
    • Check jacking/support points for good condition.
    • Position the stands beneath their support points.
    • Adjusting Height: Hold the control lever up while lifting the centre column to the required height. Push the control lever down to lock the pawl into the central column teeth. WARNING! Ensure the pawl is fully engaged with the teeth.
    • Carefully and slowly lower the vehicle onto the stands.
    • Ensure load-bearing points sit in the centre of the saddles and that the stands are stable.
    • Ensure no objects or persons impede the safe lowering of the vehicle.
    • DANGER! Do not load the stands off-centre. Failure to adhere to these warnings may cause damage, injury, or loss of life.
    • Insert the locking pin to store the stands in their lowest position when not in use.

Maintenance Features:

  • Pre-Use Inspection: Before each use, check the stands and stand welds for cracks, and ensure no parts are missing or damaged.
  • Damage Protocol: Any suspect axle stands must be removed from service immediately.
  • Modifications: Do not misuse or make any modifications to the stands or components.
  • Labels: Replace any unreadable labels, especially warning or instruction labels. Contact your Sealey stockist for replacements.
  • Owner Responsibility: The owner is responsible for ensuring the operator has read these instructions and is aware of the stand's uses and limitations.

Environmental Protection:

  • Recycle unwanted materials. Tools, accessories, and packaging should be sorted and taken to a recycling centre.
  • When the product becomes unserviceable, drain any fluids (if applicable) into approved containers and dispose of the product and fluids according to local regulations.

Warranty:

  • A 12-month guarantee from the purchase date is provided, requiring proof of purchase for any claim.
  • No liability is accepted for incorrect use of the product.

Sealey VS2002HV Specifications

General IconGeneral
BrandSealey
ModelVS2002HV
CategoryJacks
LanguageEnglish

Related product manuals