TA Operation/Maintenance Instructions Page 22 of 36
length of time, lightly oil any surface that may rust before storing. The oil can be removed
later with mineral spirits or other solvent.
Always check that the table insert is correctly seated on the keeper plates when carrying
out maintenance, or when changing blade. The insert should sit level with the tabletop
without any rock in it. Too high at the front and timber will catch on the front edge of the
insert before entering the blade, too low at the back and timber is in danger of catching
on the inside lip of the table and being kicked back by the saw blade. The underside of
the table has been precision machined, negating the need for adjusting screws. Should
the insert not sit properly after a thorough clean it may have become twisted and should
be replaced. Similarly, replace the four screws preventing the insert from lifting as
necessary.
Clean the inside of the saw stand regularly. A build-up of dust or chips around the motor
and controls can cause motor failure and will impair movement of the rise & fall and tilt
controls.
When lubricating the control mechanisms first check them for sawdust accumulation. Use
a pitch remover and a wire brush to remove any build-up. Once clean, lubricate moving
parts using a lubricant that does not pick up a lot of sawdust. Powdered graphite, hard
wax or white lithium sprays are ideal. Do not use an oil-based product. These will collect
sawdust and congeal into a gummy substance, making working parts hard to operate.
Drive belts will also deteriorate if they come into contact with oil.
To remove the tilt screw, simply undo the two bolts fastening the bearing housing to the
side of the machine and unwind the screw completely. Remember to replace the black
plastic sheath when re-assembling.
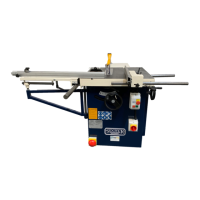
The procedure for removing the rise and fall screw is as follows:
4) Wind hand-wheel. Screw should unwind out of the machine.
3) Remove pin and ensure collar will slide etc.
2) Loosen the collar used for fixing minimum saw projection
and ensure it will slide along the screw (file top of screw
if
it won’t).
1) Remove collar.
The tilt quadrant bolted to the underside of the machine table will require no
maintenance provided that the saw is properly looked after. If it becomes necessary to
access the quadrant either to maintain or replace it we recommend that an engineer
undertake the following procedure:
1. Isolate the machine.
2. Disconnect the incoming supply and the motor/footswitch wiring/conduit from the
starter.
3. Unfasten the machine’s foundation bolts.
4. Remove all extension tables together with the rolling table and support rail if fitted.