1
Check Included Items
The following items are included with the meter in the package.
Please be sure that everything is included. If any item is missing,
please contact the reseller that sold the meter or the distributor.
•
Batteries are not included in the package. Please prepare two AAA before
use.
Startup Guide
(this document)
Thank you for purchasing the LITEMASTER PRO L-478D,L-478DR Series.
This Startup Guide introduces the basic operating functions of this light
Manual on the CD-ROM (accompanying accessory).
1
Check Included Items
The following items are included with the meter in the package.
Please be sure that everything is included. If any item is missing,
please contact the reseller that sold the meter or the distributor.
* Batteries are not included in the package. Please prepare two AAA before
use.
Startup Guide
(this document)
Safety Precaution CD-ROM
(Operating Manual and
Data Transfer Software)
Strap Soft case Anti-glare sheet for
LCD Screen
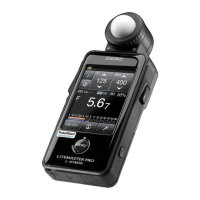
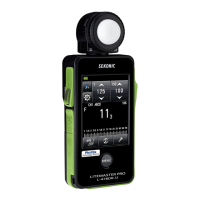
2
L-478D,L-478DR
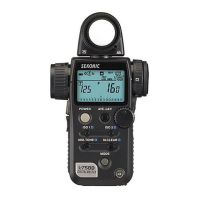
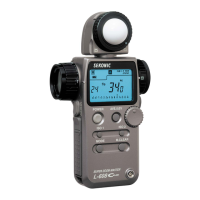
Component Names
The followings are the names of the buttons and parts on the meter.
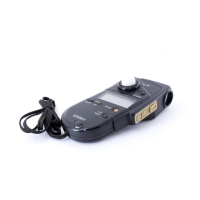
Bottom view
Strap eyelet
Synchro terminal
Battery cover open
Battery
compartment
Front view Rear view
L-478D
JR10-000001
MODEL
SEKONIC CORPORATION
MADE IN PHILIPPINES
Lock lever
Touch
panel
Memory
button*
USB
port
Menu
button
Lumisphere
retracting ring
Lumisphere
Measuring
button*
Battery
cover latch
Power
button
Battery cover
* When using the Spot Meter attachment (separate accessory), you
Measuring button functions. For details to do this, please see the
Custom Settings function section in the Operating Manual on the
included CD-ROM.
3
Turning the Power ON
After inserting the batteries according to the “+” and “-” symbol in
the battery compartment, press and hold the Power Button for about
1 second to start up meter.
* The startup screen will be displayed, followed by the measuring
screen.
* Press and hold the Power Button for about 1 second to turn the
meter off.
Startup screens
Or
Measuring screen
Power Button
*Please wait 3 seconds between repeated power on and power off
sessions.
*
SEKONIC logo in blue will be displayed as the meter starts up.
*For explanation purpose, the LCDs illustrated here show the displays of
L-478D or L-478DR.
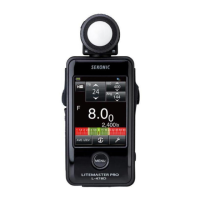
4
Screen Operations
This section explains how the touch panel on the meter is operated.
Measuring screen
Sliding:
setting value areas to change setting
values.
Touch Operations:
◆Setting value increases when the up arrow (▲) is touched.
◆ Setting value decreases when the down arrow (▼) is touched.
◆ Touch icon/buttons on the screen to activate their function.
5
Measuring Preparations
(Selecting Measuring Mode)
This example explains how to measure light using the ambient light
T value (shutter speed) priority mode.
1) Touch the Measuring Mode icon at the top left of the Measuring screen to
enter the Measuring Mode Selection Screen.
2) Touch the ambient T icon to select the ambient light T (shutter speed)
priority mode and return to the Measuring screen.
* The above screen example shows all of the Measuring Mode visible.
3) Set the ISO sensitivity and shutter speed corresponding to the camera
settings for shooting.
Shutter speed
ISO sensitivity
6
Measuring Preparations
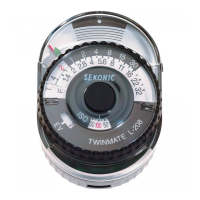
(Setting Lumisphere)
The Lumisphere can be extended or retracted to obtain the best
light measurements for different types of subjects.
Selecting Lumisphere setting
•
Turn the Lumisphere retracting ring to set the aligning mark with the
corresponding symbol (extended /retracted ) until it clicks into
place.
Extended Lumisphere
Retracted Lumisphere
(Lumidisc)
Extended lumisphere is used to
measure illumination of people,
buildings, and other three
dimensional subjects.
Retracted Lumisphere is used
subjects such as manuscripts,
paintings, difference of one or
more light sources for ratio lighting
and illumination in Lux or Foot-
candle.
* Models sold in some countries do not display “Foot-candle” due to legal
restrictions
Extended (
) Retracted ( )
Extended
Lumisphere
Lumisphere
Aligning mark
Retracted
Lumisphere
7
Measuring Light
This section explains how to take an incident-light measurement
using the extended Lumisphere and a reflected-light measurement
using the optional 5-degree Viewfinder attachment.
1) Incident Light
Position the meter in front of the subject with the extended Lumisphere
facing towards the camera’s lens axis. Press the measuring button to
measure the light falling on the subject.
2)
desired area to be measured within the yellow circle and press the
Startup Guide
LITEMASTER PRO
L-478D Series
L-478DR Series
Light Meter
®
Measuring screen
Measuring Mode
Selection screen
Safety Precaution
For Proper Operation
Before using this product, please read this "Safety Precautions" for
proper operation.
WARNING
The WARNING symbol indicates the
possibility of death or serious injury if the
product is not used properly.
CAUTION
The CAUTION symbol indicates the
possibility of minor to moderate personal
injury or product damage if the product is
not used properly.
NOTICE
The NOTICE symbol indicates cautions
or restrictions when using the product.
Please read all notes to avoid errors in
operation.
General Safety Information
• Read the Operating Manual before use.
• Keep the Operating Manual on hand for reference at any
time.
• Stop using this product when there are any abnormalities.
•
• Do not attempt to repair this product by yourself.
• This product is intended only for persons with expert
knowledge.
• Monitor children so that they do not touch this product.
• Use this product in a usage environment described in the
Operating Manual.
• This product is not waterproof.
WARNING
There is a danger of electrical shock when using high
voltage strobes.
Avoid contacting the terminals.
This product emits electromagnetic waves.
Do not bring this product close to persons with
pacemakers.
Do not use this product in an explosive atmosphere.
Use of devices emitting electromagnetic waves is
prohibited in hospitals.
CAUTION
• Check the material of the neck strap to see if there is any
risk of allergy.
• Be careful of sudden emission of lights from strobes.
NOTICE
• Do not leave this product on car dashboards in hot weather.
This may damage the product.
• Remove the batteries when this product is not in use for a
long period of time.
• When the desired performance is not achieved, stop using
this product and contact the service center.
Information for Users on Collection and
Disposal of Old Equipment
To protect environment, do not through this device
and batteries away with the normal household waste
at the end of those life, but bring them in at an
English
Safety Precaution CD-ROM
(Operating Manual and
Data Transfer Software)
Strap Soft case Anti-glare sheet for
LCD Screen
2
L-478D,L-478DR
Component Names
The followings are the names of the buttons and parts on the meter.
Bottom view
Strap eyelet
Synchro terminal
Battery cover open
Battery
compartment
Front view Rear view
L-478D
JR10-000001
MODEL
SEKONIC CORPORATION
MADE IN PHILIPPINES
Lock lever
Touch
panel
Memory
button*
USB
port
Menu
button
Lumisphere
retracting ring
Lumisphere
Measuring
button*
Battery
cover latch
Power
button
Battery cover
* When using the Spot Meter attachment (separate accessory), you
may nd operation more comfortable by switching the Memory and
Measuring button functions. For details to do this, please see the
Custom Settings function section in the Operating Manual on the
included CD-ROM.
3
Turning the Power ON
After inserting the batteries according to the “+” and “-” symbol in
the battery compartment, press and hold the Power Button for about
1 second to start up meter.
* The startup screen will be displayed, followed by the measuring
screen.
* Press and hold the Power Button for about 1 second to turn the
meter off.
Startup screen
Or
Measuring screen
Power Button
*Please wait 3 seconds between repeated power on and power off
sessions.
* When rst starting or after replacing batteries, a white screen with the
SEKONIC logo in blue will be displayed as the meter starts up.
*For explanation purpose, the LCDs illustrated here show the displays of
L-478D or L-478DR.
4
Screen Operations
This section explains how the touch panel on the meter is operated.
Measuring screen
Sliding:
Slide a nger up or down on the
setting value areas to change setting
values.
Touch Operations:
◆Setting value increases when the up arrow (▲) is touched.
◆ Setting value decreases when the down arrow (▼) is touched.
◆ Touch icon/buttons on the screen to activate their function.
5
Measuring Preparations
(Selecting Measuring Mode)
This example explains how to measure light using the ambient light
T value (shutter speed) priority mode.
1) Touch the Measuring Mode icon at the top left of the Measuring screen to
enter the Measuring Mode Selection Screen.
2) Touch the ambient T icon to select the ambient light T (shutter speed)
priority mode and return to the Measuring screen.
* The above screen example shows all of the Measuring Mode visible.
3) Set the ISO sensitivity and shutter speed corresponding to the camera
settings for shooting.
Shutter speed
ISO sensitivity
6
Measuring Preparations (Setting Lumisphere)
The Lumisphere can be extended or retracted to obtain the best
light measurements for different types of subjects.
Selecting Lumisphere setting
•
Turn the Lumisphere retracting ring to set the aligning mark with the
corresponding symbol (extended /retracted ) until it clicks into
place.
Extended Lumisphere
Retracted Lumisphere
(Lumidisc)
Extended lumisphere is used to
measure illumination of people,
buildings, and other three
dimensional subjects.
Retracted Lumisphere is used
to measure illumination of at
subjects such as manuscripts,
paintings, difference of one or
more light sources for ratio lighting
and illumination in Lux or Foot-
candle.
* Models sold in some countries do not display “Foot-candle” due to legal
restrictions.
Extended ( ) Retracted ( )
Extended
Lumisphere
Lumisphere
Aligning mark
Retracted
Lumisphere
7
Measuring Light
This section explains how to take an incident-light measurement
using the extended Lumisphere and a reected-light measurement
using the optional 5-degree Viewnder attachment.
1) Incident Light
Position the meter in front of the subject with the extended Lumisphere
facing towards the camera’s lens axis. Press the measuring button to
measure the light falling on the subject.
2) Reected Light (with 5-degree viewnder attachment sold separately)
Look through the nder eyepiece from the position of camera, place the
desired area to be measured within the yellow circle and press the measuring
button to measure the light reected from the subject.
Measuring screen
Measuring Mode
Selection screen
Safety Precaution
For Proper Operation
Before using this product, please read this "Safety Precautions" for
proper operation.
WARNING
The WARNING symbol indicates the
possibility of death or serious injury if the
product is not used properly.
CAUTION
The CAUTION symbol indicates the
possibility of minor to moderate personal
injury or product damage if the product is
not used properly.
NOTICE
The NOTICE symbol indicates cautions
or restrictions when using the product.
Please read all notes to avoid errors in
operation.
General Safety Information
• Read the Operating Manual before use.
• Keep the Operating Manual on hand for reference at any
time.
• Stop using this product when there are any abnormalities.
•
• Do not attempt to repair this product by yourself.
• This product is intended only for persons with expert
knowledge.
• Monitor children so that they do not touch this product.
• Use this product in a usage environment described in the
Operating Manual.
• This product is not waterproof.
WARNING
There is a danger of electrical shock when using high
voltage strobes.
Avoid contacting the terminals.
This product emits electromagnetic waves.
Do not bring this product close to persons with
pacemakers.
Do not use this product in an explosive atmosphere.
Use of devices emitting electromagnetic waves is
prohibited in hospitals.
CAUTION
• Check the material of the neck strap to see if there is any
risk of allergy.
• Be careful of sudden emission of lights from strobes.
NOTICE
• Do not leave this product on car dashboards in hot weather.
This may damage the product.
• Remove the batteries when this product is not in use for a
long period of time.
• When the desired performance is not achieved, stop using
this product and contact the service center.
Information for Users on Collection and
Disposal of Old Equipment
To protect environment, do not through this device
and batteries away with the normal household waste
at the end of those life, but bring them in at an
English