OPERATION
9
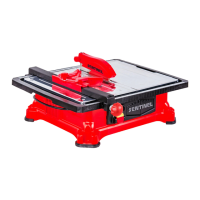
Figure 13B
225
0
45
225
0
Rip Guide Knob
Cutting Wheel
Rip Guide
Miter Guide Knob
Miter Guide
MAKING CUTS
WARNING
Do not make freehand cuts.
Always make a practice run to acquaint yourself with the
path of the blade. Practice on a scrap tile to make sure
you are comfortable with the feel of the cutting operation.
• Draw the line to be cut on the tile using a marker or
grease pencil. Place masking tape on the tile and mark
the tape if the tile is shiny and hard to mark.
• To prevent straying from the cut mark, use the rip guide
when making cross cuts, the miter guide for miter cuts
and the adjustable right side table for making bevel
cuts, whenever possible. NOTE: If you stray from the
mark, do not force the wheel back to the line by twisting
the tile. Instead, back up and re-cut the tile slicing off a
small amount of tile until the wheel is back on track.
TO MAKE A CROSS CUT
See Figure 14
Cross cuts are straight 90° cuts. The material is fed into
the cut at a 90° angle to the wheel.
1. Use a marker or grease pencil to mark the area to be
cut on the tile.
2. Adjust the rip guide to desired position and tighten.
Optional
• Slide miter guide onto rip guide from front. See To
Install the Miter Guide.
• Adjust the rip guide to desired position
and tighten.
• Adjust miter guide to 0° using angle scale and
tighten knob.
3. Place the tile on the table, firmly against the rip guide
(or miter guide). Make sure the mark on the tile is
aligned with the blade.
NOTE: Make sure the material is clear of the cutting wheel
before turning on the saw.
4. Pull the ON/OFF switch out to the ON position. Allow
the cutting wheel build up to full speed and the blade
to be completely covered with water.
5. Hold the material firmly against the rip guide and
slowly feed the material into the cutting wheel.
6. When the cut is made, push the ON/OFF switch in
to the OFF position. Wait for the cutting wheel to
come to a complete stop before removing any part of
the material.
Figure 14
225
0
45
225
0
 Loading...