Do you have a question about the Shark IQ ROBOT SELF-EMPTY XL and is the answer not in the manual?
Introduction to the Shark IQ Robot vacuum cleaner and its components for initial understanding.
Critical safety warnings and precautions for using the robotic vacuum cleaner safely and effectively.
Instructions for setting up the robot vacuum's base station and identifying key components.
Explanation of the indicator lights on the robot's charging base station and their meanings.
Details the buttons and indicator lights on the robot itself for operation and status checks.
Instructions on how to properly charge the robot vacuum using the base station for optimal performance.
Understanding the indicator lights on the robot that display battery status and charging information.
Essential steps and considerations for preparing your home environment before operating the robot.
Instructions on how to use the robot's mapping features for efficient cleaning and navigation.
Guide to downloading and using the SharkClean app for controlling and customizing robot cleaning.
Information on how to use voice commands with the robot vacuum via smart home assistants.
Step-by-step guide on how to clean the robot vacuum, including brushes, sensors, and exterior.
Instructions for cleaning and replacing the robot's filters to maintain optimal suction power.
How to clean the robot's wheels to ensure smooth movement and prevent performance issues.
Instructions on how to clean the robot's brush roll to remove tangled hair and debris.
Guide on how to empty and clean the robot's dust bin after each cleaning cycle.
Common issues, error codes, and solutions for troubleshooting the robot vacuum cleaner.
Details regarding the product's limited warranty period and coverage terms.
Contact information and resources for obtaining customer support and assistance.
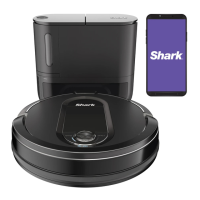
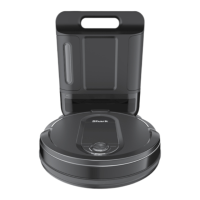
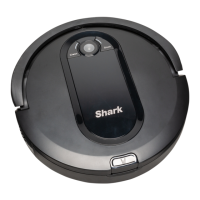
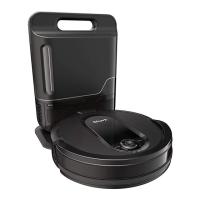
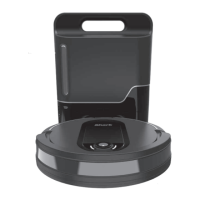
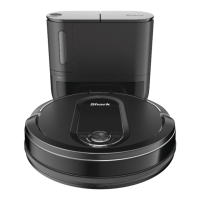
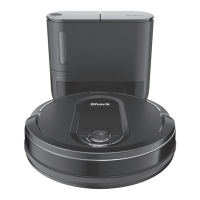
The Shark IQ Robot Self-Empty XL is a robotic vacuum cleaner designed for household use, offering automated cleaning and self-emptying capabilities. It consists of a robotic vacuum unit and a charging base with a power supply. The device is compatible with Amazon Alexa and Google Assistant for voice control.
The primary function of the Shark IQ Robot is to autonomously clean floors. It uses an array of sensors to navigate around walls, furniture legs, and other obstacles, creating a map of your home for efficient cleaning. The robot is equipped with a multi-surface brushroll and side brushes to effectively pick up dirt, dust, and debris from various floor types. After completing a cleaning cycle or when its battery is low, the robot automatically returns to its charging base. A key feature is its self-emptying capability: the base automatically suctions dirt and debris from the robot's dust bin into a larger dust bin within the base, which can hold up to 30 days' worth of debris depending on usage. This minimizes the frequency of manual dust bin emptying. The device also includes "Recharge & Resume" and "Evacuate & Resume" functions, which can be toggled on or off. Recharge & Resume allows the robot to return to the base to recharge and then resume cleaning where it left off, particularly useful for larger homes. Evacuate & Resume, recommended for homes with pets, enables the robot to return to the base to empty its dust bin after 30 minutes of cleaning, then continue cleaning.
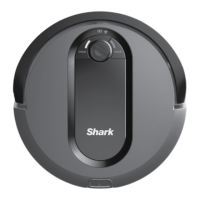
The robot can be operated via a Clean button on the unit itself to start or stop a cleaning session. A Dock button sends the robot back to the charging base. Indicator lights on both the robot and the base provide visual feedback on battery charge, Wi-Fi connectivity, and error status. The robot's battery indicator light shows the remaining charge, flashing blue while charging and illuminating steadily blue when fully charged. The base has a green power indicator light when plugged in and a blue charging indicator light that pulses during charging and illuminates steadily when complete. The Wi-Fi indicator shows connection status (blue for connected, red for not connected, flashing blue for setup mode).
For optimal performance, the charging base should be placed on a level surface in a central area with a good Wi-Fi signal, against a wall, and free of objects within 3 feet from the sides and 5 feet from the front. If placed on carpet, a SharkMat should be used under the base. The robot comes with pre-installed rechargeable battery that requires a full charge (up to 6 hours) before first use. Side brushes are easily snapped onto the robot's bottom.
To prepare your home for cleaning, it is recommended to clear cords and small objects from floors and open interior doors. BotBoundary strips are provided to block off high thresholds (over an inch) or areas where the robot should not go. The robot's cliff sensors prevent falls from ledges, but runners, rugs, or carpets near stairs should be at least 8 inches from the edge. For best results, the robot should be run in well-lit conditions. Moving the robot or the base while it is cleaning can impact its ability to map the home. Scheduling daily cleanings via the app is recommended for consistent maintenance.
Regular maintenance is crucial for the robot's performance. This includes:
Before any maintenance, the robot should be turned off. Only identical replacement parts should be used. The robot and battery should not be stored, charged, or used at temperatures below 50°F (10°C) or above 104°F (40°C).
| Self-Empty Base | Yes |
|---|---|
| Filter Type | HEPA |
| Battery Life | Up to 90 minutes |
| Smartphone App | Yes |
| Navigation Technology | IQ Navigation |
| Battery Type | Lithium-ion |
| Brushroll Type | Self-cleaning brushroll |
| App Control | Yes |
| Voice Control | Yes (Amazon Alexa, Google Assistant) |