AR-M350 SIMULATIONS 10-33
<List of display values>
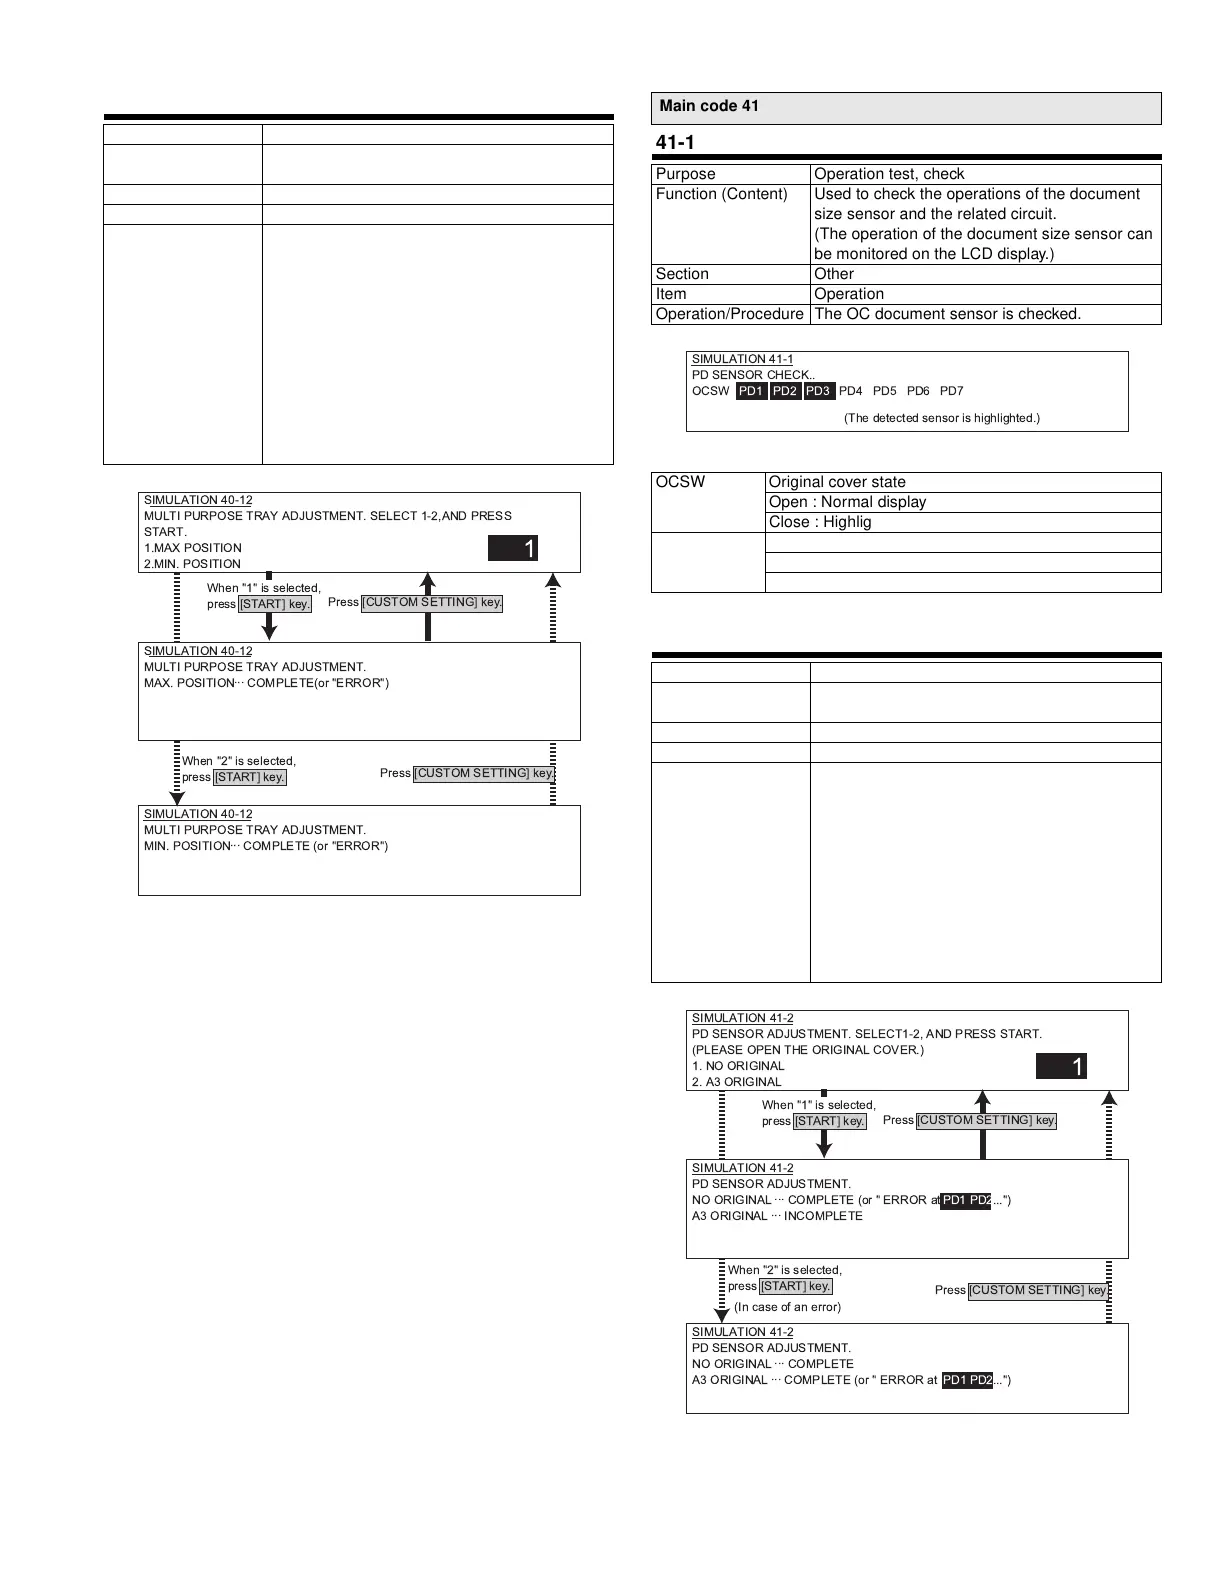
40-12
Purpose Operation test, check
Function (Content) Used to adjust the width detection level of the
multi-purpose tray paper width detector.
Section Paper feed
Item Operation
Operation/Procedure The multi-purpose tray size is adjusted.
1) Extend the guide to the MAX. position.
Select 1 and press START.
When COMPLETE is displayed,
press CUSTOM SETTING to return to the
initial screen.
2) Move the guide to MIN. position.
Select 2 and press START.
When COMPLETE is displayed,
the adjustment is completed.
If ERROR is displayed in procedures 1) - 2),
repeat the adjustment again.
SIMULATION 40-12
MULTI PURPOSE TRAY ADJUSTMENT. SELECT 1-2,AND PRESS
START.
1.MAX POSITION
2.MIN. POSITION
1
SIMULATION 40-12
MULTI PURPOSE TRAY ADJUSTMENT.
MAX. POSITION
...
COMPLETE(or "ERROR")
SIMULATION 40-12
MULTI PURPOSE TRAY ADJUSTMENT.
MIN. POSITION
...
COMPLETE (or "ERROR")
Press [CUSTOM SETTING] key.
Press [CUSTOM SETTING] key.
When "1" is selected,
press [START] key.
When "2" is selected,
press [START] key.
Main code 41
41-1
Purpose Operation test, check
Function (Content) Used to check the operations of the document
size sensor and the related circuit.
(The operation of the document size sensor can
be monitored on the LCD display.)
Section Other
Item Operation
Operation/Procedure The OC document sensor is checked.
OCSW Original cover state
Open : Normal display
Close : Highlighted
PD1 ~ 7 Document sensor state
No document : Normal display
Document loaded : Highlighted
41-2
Purpose Adjustment
Function (Content) Used to adjust the detection level of the
document size sensor.
Section Other
Item Operation
Operation/Procedure The OC document sensor is adjusted.
1) Open the original cover. Press 1 without an
original. Press START, and COMPLETE is
displayed. Press CUSTOM SETTING to
return to the initial screen.
2) Place an A3 (or WLT) paper in the initial
screen. Select 2 and press START.
When COMPLETE is displayed,
the adjustment is completed.
If ERROR is displayed in procedures 1) - 2),
repeat the adjustment again.
SIMULATION 41-1
PD SENSOR CHECK..
OCSW PD1 PD2 PD3 PD4 PD5 PD6 PD7
(The detected sensor is highlighted.)
SIMULATION 41-2
PD SENSOR ADJUSTMENT. SELECT1-2, AND PRESS START .
(PLEASE OPEN THE ORIGINAL COVER.)
1. NO ORIGINAL
2. A3 ORIGINAL
1
SIMULATION 41-2
PD SENSOR ADJUSTMENT.
NO ORIGINAL
...
COMPLETE (or " ERROR at PD1 PD2...")
A3 ORIGINAL
...
INCOMPLETE
SIMULATION 41-2
PD SENSOR ADJUSTMENT.
NO ORIGINAL
...
COMPLETE
A3 ORIGINAL
...
COMPLETE (or " ERROR at PD1 PD2...")
Press [CUSTOM SETTING] key.
Press [CUSTOM SETTING] key.
When "1" is selected,
press [START] key.
When "2" is selected,
press [START] key.
(In case of an error)
!" #$%&