AR-M350 SIMULATIONS 10-52
<List of set values 1>
<List of display values 1>
<List of set values 2>
* The selected tray is registered as an initial set value in the initial
screen.
At the above value + 10, the SPF enters the duplex mode (DD),
making duplex copies.
<List of set values 3>
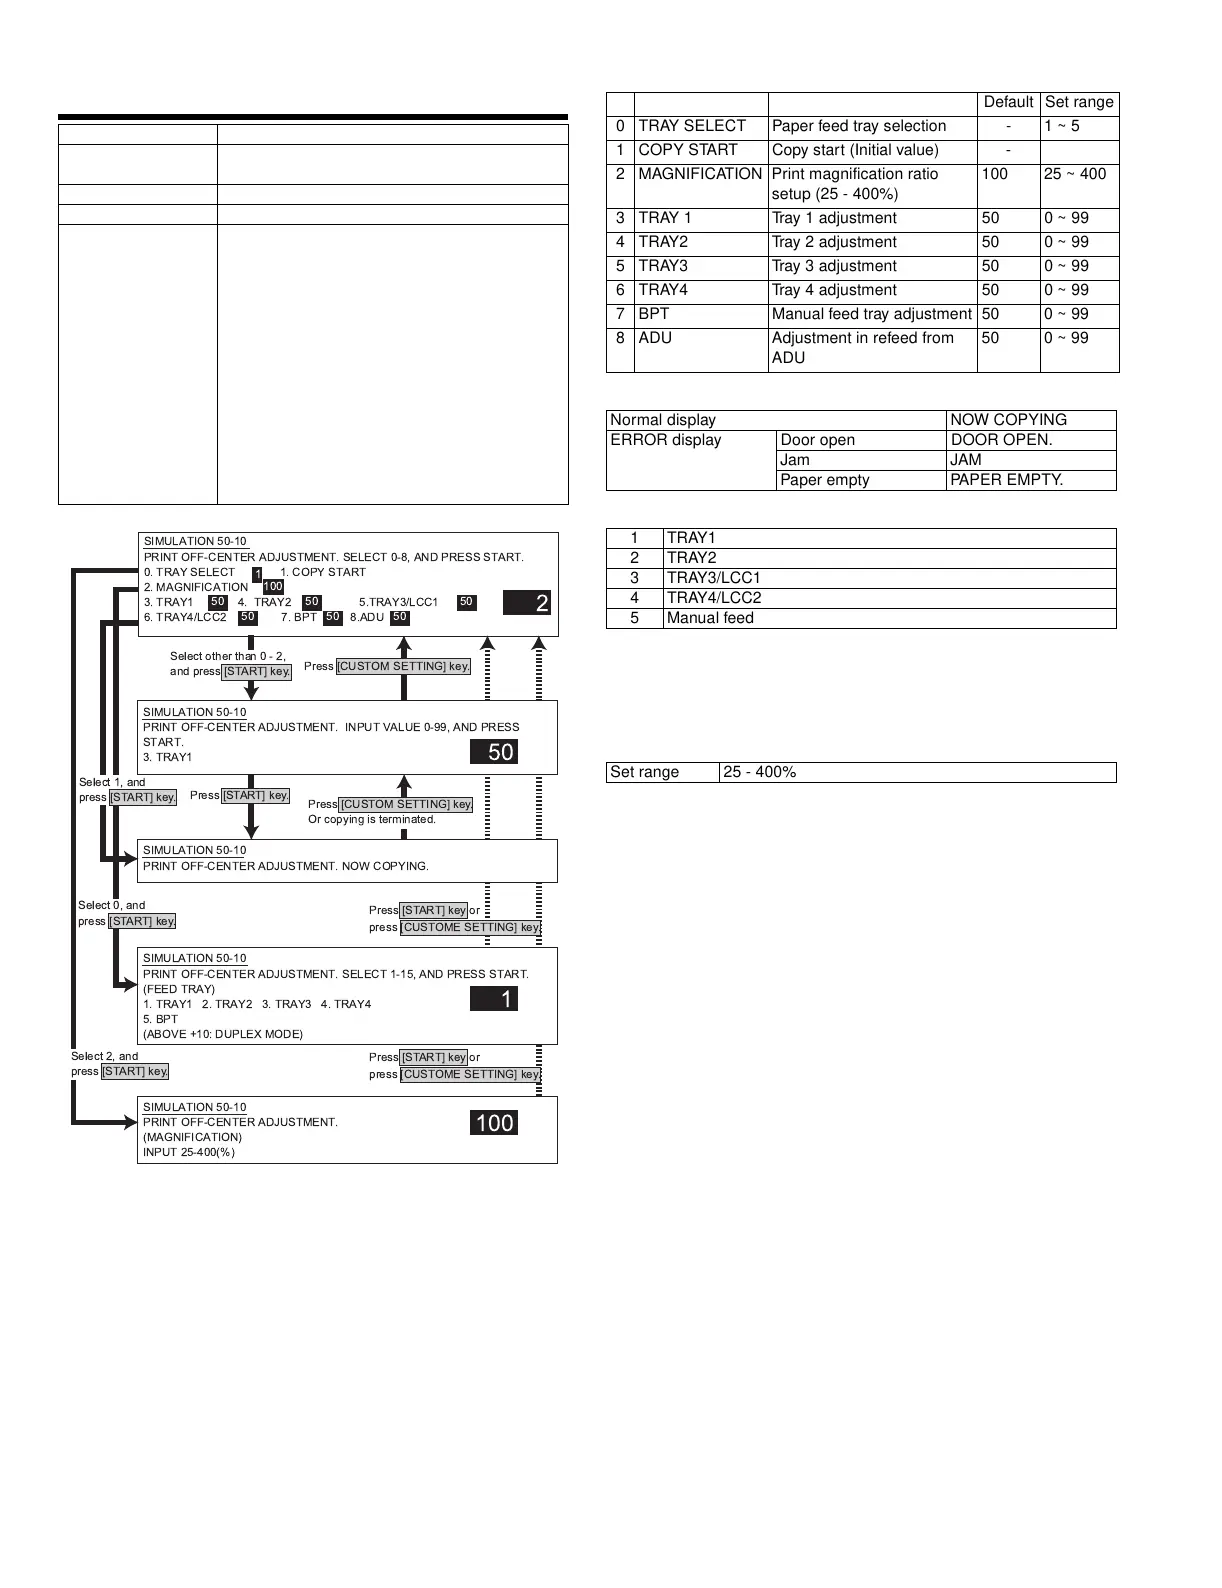
(Adjustment procedure)
1) Select a paper feed tray to be used in the adjustment,
set the magnification ratio, and enter the adjustment item.
2) After entering the adjustment value, press START, and printing is
started.
3) Check the off-center (distance from the paper edge) of the copy.
Repeat procedure 2) until a satisfactory result is obtained.
Note:When adjusting the off-center of LCC1, set only the left tray of LCC.
When adjusting the off-center of LCC2, set only the right tray of
LCC. This is because there is no distinction between right and left
in selection of a tray.
50-10
Purpose Adjustment
Function (Content) Used to adjust the print image center position.
(Adjusted for each paper feed section.)
Section Image process (ICU)
Item Picture quality
Operation/Procedure Perform the print off-center adjustment.
1) The current set value is highlighted on the
right of each item. In this screen, be sure to
select "1: COPY START." (Set value: 1)
2) Enter the correction value with 10 digit key
pad.
Press P to store the set value.
3) When the value of UNIT:0.1mm/STEP is
increased, the image is shifted toward the
rear side.
4) Press START to start copying and store the
set value. (Display value: 1)
5) Select a paper feed tray. (Set value 2)
6) Set the scan magnification ratio. (Set value: 3)
SIMULATION 50-10
PRINT OFF-CENTER ADJUSTMENT. SELECT 0-8, AND PRESS START.
0. TRAY SELECT 1. COPY START
2. MAGNIFICATION
3. TRAY1 4. TRAY2 5.TRAY3/LCC1
6. TRAY4/LCC2 7. BPT 8.ADU
2
SIMULATION 50-10
PRINT OFF-CENTER ADJUSTMENT. INPUT VALUE 0-99, AND PRESS
START.
3. TRAY1
50
SIMULATION 50-10
PRINT OFF-CENTER ADJUSTMENT. SELECT 1-15, AND PRESS START.
(FEED TRAY)
1. TRAY1 2. TRAY2 3. TRAY3 4. TRAY4
5. BPT
(ABOVE +10: DUPLEX MODE)
1
SIMULATION 50-10
PRINT OFF-CENTER ADJUSTMENT. NOW COPYING.
SIMULATION 50-10
PRINT OFF-CENTER ADJUSTMENT.
(MAGNIFICATION)
INPUT 25-400(%)
100
100
1
50 50 50
505050
Press [CUSTOM SETTING] key.
Select other than0-2,
and press [START] key.
Select 1, and
press [START] key.
Select 2, and
press [START] key.
Select 0, and
press [START] key.
Press [START] key.
Press [START] key or
press [CUSTOME SETTING] key.
Press [START] key or
press [CUSTOME SETTING] key.
Press [CUSTOM SETTING] key.
Or copying is terminated.
Default Set range
0 TRAY SELECT Paper feed tray selection - 1 ~ 5
1 COPY START Copy start (Initial value) -
2 MAGNIFICATION Print magnification ratio
setup (25 - 400%)
100 25 ~ 400
3 TRAY 1 Tray 1 adjustment 50 0 ~ 99
4 TRAY2 Tray 2 adjustment 50 0 ~ 99
5 TRAY3 Tray 3 adjustment 50 0 ~ 99
6 TRAY4 Tray 4 adjustment 50 0 ~ 99
7 BPT Manual feed tray adjustment 50 0 ~ 99
8 ADU Adjustment in refeed from
ADU
50 0 ~ 99
Normal display NOW COPYING
ERROR display Door open DOOR OPEN.
Jam JAM
Paper empty PAPER EMPTY.
1TRAY1
2TRAY2
3 TRAY3/LCC1
4 TRAY4/LCC2
5 Manual feed
Set range 25 - 400%
*+ !" #$%&'