GB-3
1
2
3
4
5
Not running wavy.
Not left in water.
No trap
allowed.
Not to rise.
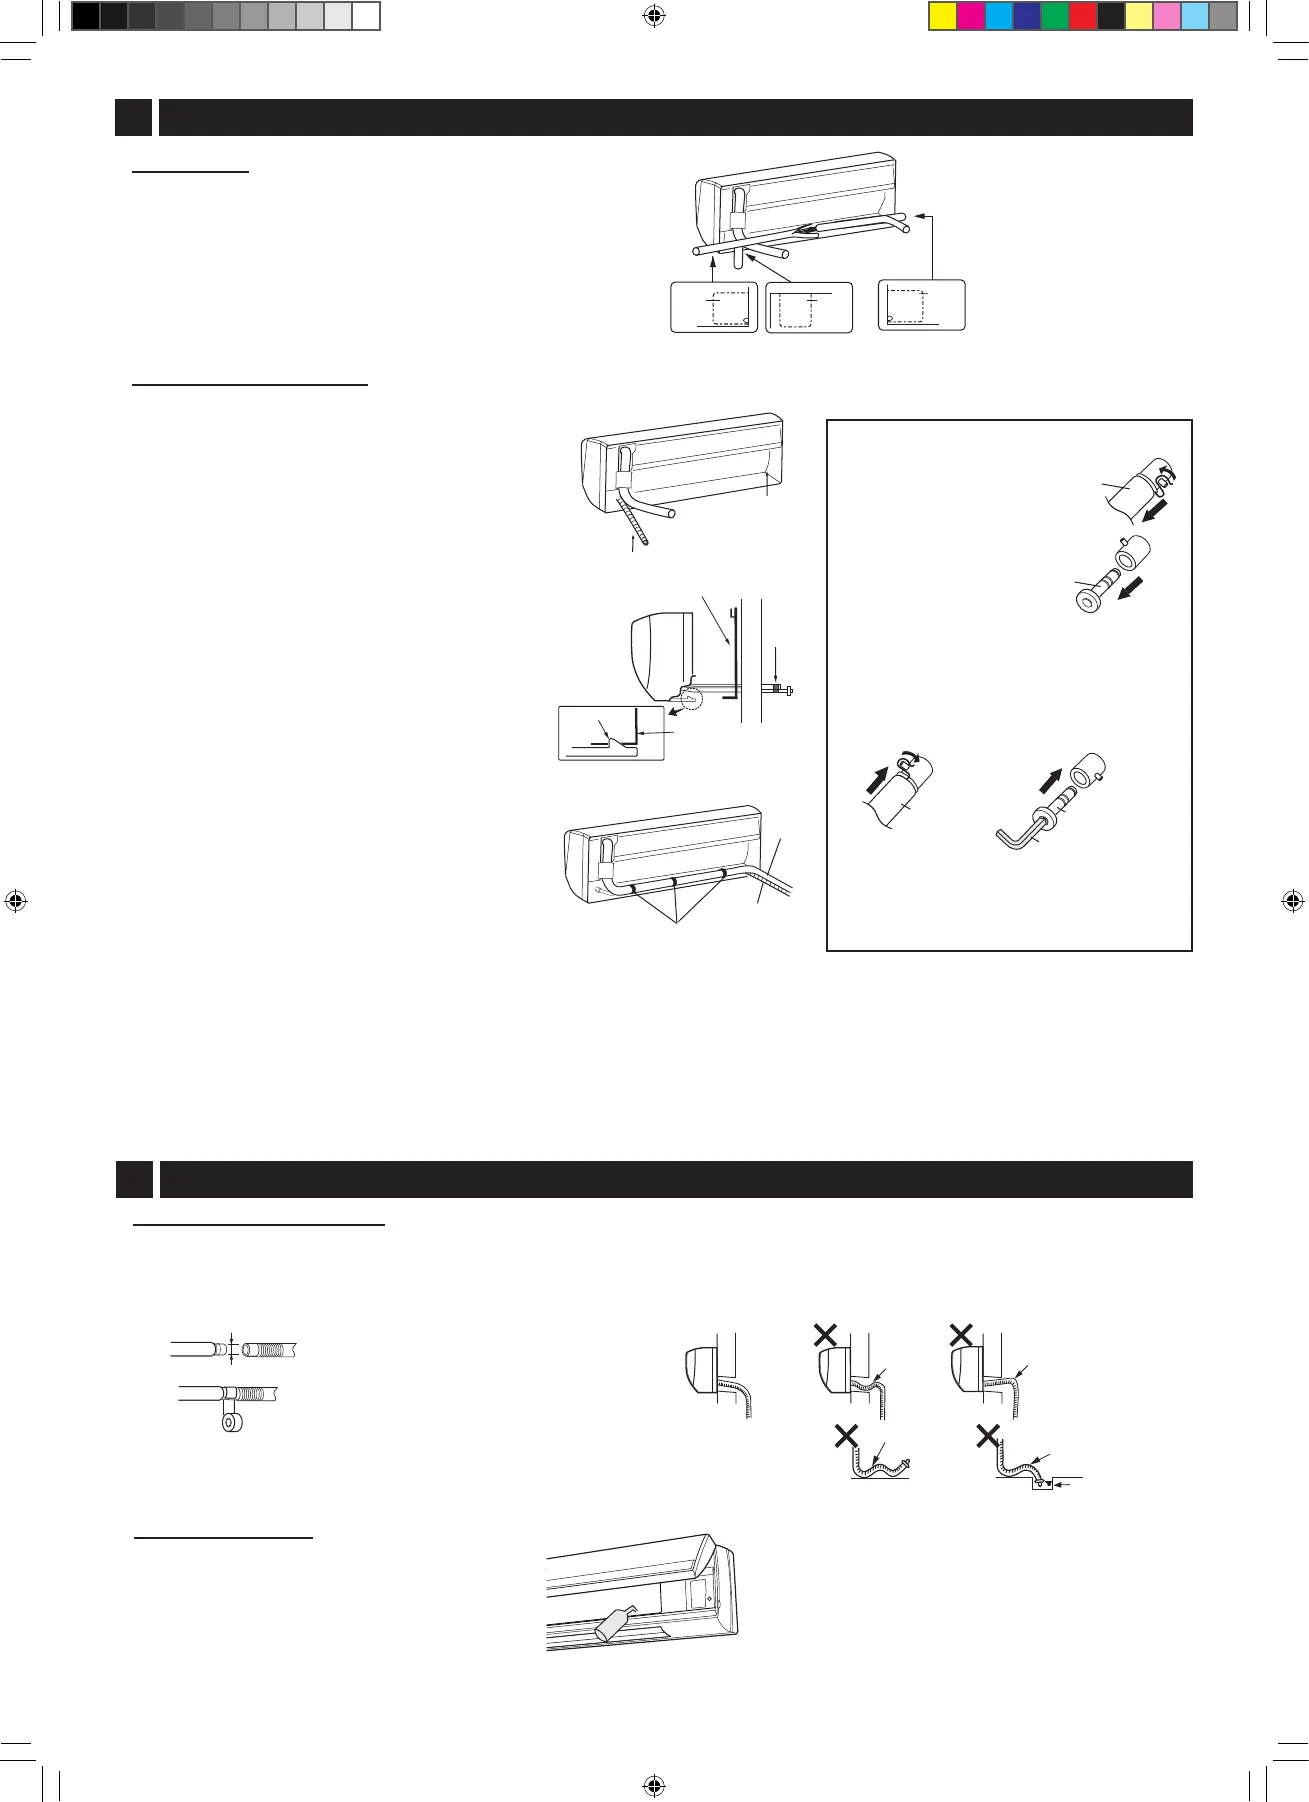
Connectingthedrainhose
(1) Connect a drain hose.
(2) Tape over the connecting part.
ø16 mm
4
CONNECTING THE DRAIN HOSE TO THE INDOOR UNIT
No trap allowed.
Notes:
• Be sure to lay the drain hose downward for smooth drainow.
•
Be careful not to allow the drain hose to rise, form a trap or leave
its end in
water, as shown below.
• Coil thermal insulation around a drain hose extension, if running in
the room.
Checkingdrainage
(1) Open the open panel.
(2) Remove the air lters.
(3) Pour some water into the drain pan.
(4) Check the water drains smoothly.
Drain hose
(Commercially available)
(1) Unhook and pull out
the drain hose.
(2) Pull out the drain cap.
(3) Reconnect the drain hose and the drain
cap.
• Fully insert the drain hose until it stops
and hook on the projection.
• Insert a hexagon wrench into the drain
cap, and press it fully.
Caution:
After replacing, make sure that both the
drain hose and drain cap are rmly inserted.
Mounting the indoor unit
Forrightsidepiping
(1) Reverse the positions of the drain hose and
drain cap. Refer to “Exchangethedrain
hose”.
(2) Pass the pipes, connecting cable and the drain
hose through the piping hole.
(3) Hook the unit onto the mounting plate.
(4) Push the unit and apply the bottom hooks to
the mounting plate's support.
(5) Pull the bottom of the unit to check that the unit
is xed in place.
Forleftsidepiping
(1) Connect the pipes and wrap tape around the
insulation of the piping joints tightly not to be-
come thick.
(2) Bind the pipes and connecting cable with tape.
(3) Set the them along the back of the unit.
(4) Pass the pipes, connecting cable and the drain
hose through the piping hole.
(5) Hook the unit onto the mounting plate.
(6) Push the unit and apply the bottom hooks to
the mounting plate's support.
(7) Pull the bottom of the unit to check that the unit
is xed in place.
Notes:
• Bend the pipes carefully as not to damage them.
• Lay the drain hose below the pipes.
Drain hose
MOUNTING PLATE
Taping
Drain cap
Drain hose
Hexagon wrench
Drain cap
Drain hose
Drain cap
3
SETTING UP THE INDOOR UNIT
Pipingroute
For directions 1, 2 and 5, cut out the specic
zone
without leaving any sharp edge.
(Keep the cut-out plate for possible future use.)
Plate
Cut the plate along notch.
Plate
Plate
Hook
MOUNTING PLATE
Exchangethedrainhose
Drain Hose
Pipes
Tape
AYX36RU_IM_3_lang.indb 3 2014-09-12 07:59:33