8
E
MOUNTING PRECAUTIONS
• Thisproductisforuseindoors.
• AmountingbracketcompliantwithVESAspecicationsis
required.
• Sincethemonitorisheavy,consultyourdealerbefore
installing,removingormovingthemonitor.
• Mountingthemonitoronthewallrequiresspecialexpertise
andtheworkmustbeperformedbyanauthorizedSHARP
dealer.Youshouldneverattempttoperformanyofthis
workyourself.Ourcompanywillbearnoresponsibility
foraccidentsorinjuriescausedbyimpropermountingor
mishandling.
• Usethemonitorperpendiculartoalevelsurface.If
necessary,themonitormaybetiltedupto20degrees
upwardordownward.
• Whenmountingthemonitorhorizontally,theoptionalfan
cover(PN-ZR31)isrequired.Fordetailsalongwiththe
horizontalmountingconditions,consultyourdealer.
• Thismonitorshouldbeusedatanambienttemperature
between32°F(0°C)and104°F(40°C).
• Becarefulofhightemperaturesinthesurroundingarea.
Wheninstallingthemonitorinsideahousing,orifthe
ambienttemperaturemaybeoutsideoftherangeof32ºF
(0ºC)to104ºF(40ºC),installafanortakeothermeasures
tokeeptheambienttemperaturewithintherequiredrange.
• Temperatureconditionmaychangewhenusingthemonitor
togetherwiththeoptionalequipmentsrecommendedby
SHARP.Insuchcases,pleasecheckthetemperature
conditionspecifiedbytheoptionalequipments.
• Donotblockanyventilationopenings.Ifthetemperature
insidethemonitorrises,thiscouldleadtoamalfunction.
• Donotplacethemonitoronadevicewhichgeneratesheat.
• Adheretothefollowingwheninstallingthemonitorinits
portraitorientation.Failingtoadheretothefollowingmay
causemalfunctions.
-Toinstallinlandscapeorientation,rotatethemonitor90
degreestotheright.
-SettheMONITORontheSETUPmenutoPORTRAIT.
(Seepage24.)
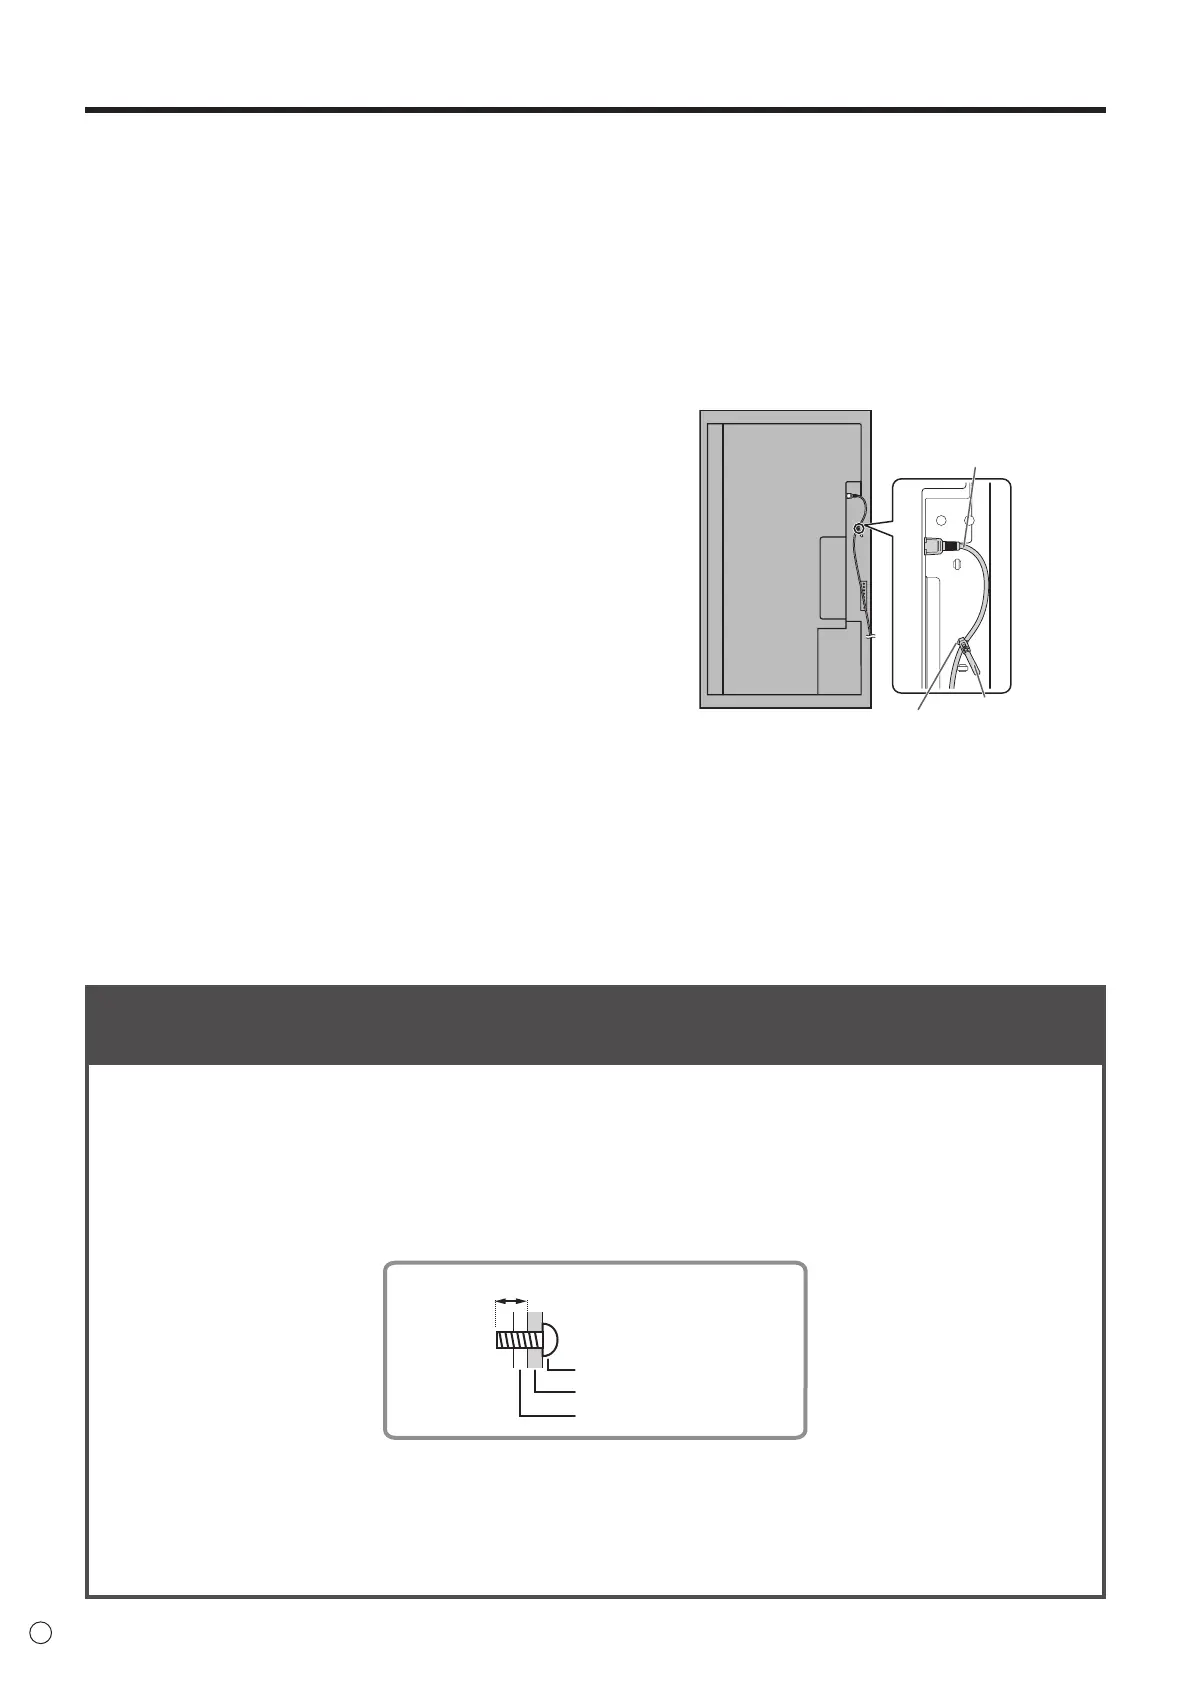
-Besuretosecurethepowercord(supplied)tothecable
clampattachmentwiththesuppliedcableclamp.
Makesurethatthepowercord(supplied)doesnotsupply
powertotheterminalwhenbeingsecuredanddonot
overbendthepowercord(supplied).
Cableclamp
Powercord(Supplied)
Cableclamp
attachment
• Avideowallshouldbeonlybecomposedofidentical
models.Donotusethismonitoraspartofavideowallthat
includesanothermodel.
Mounting Precautions (For SHARP dealers and service engineers)
• Wheninstalling,removingormovingthemonitor,ensurethatthisiscarriedoutbyatleast2people.
• Besuretouseawall-mountbracketdesignedordesignatedformountingthemonitor.
• Thismonitorisdesignedtobeinstalledonaconcretewallorpillar.Reinforcedworkmightbenecessaryforsomematerials
suchasplaster/thinplasticboard/woodbeforestartinginstallation.
Thismonitorandbracketmustbeinstalledonawallwhichcanendureatleast4timesormoretheweightofthemonitor.
Installbythemostsuitablemethodforthematerialandthestructure.
• ToattachaVESA-compliantmountingbracket,useM6screwsthatare5/16inch(8mm)to3/8inch(10mm)longerthan
thethicknessofthemountingbracket.
Screws (M6)
Mounting bracket
Monitor mounting
5/16 - 3/8 inch (8-10 mm)
• Whenmovingthemonitor,besuretoholditwitheitherhandlesorthecornersonthebottomoftheunit.Donotholdthe
LCDpanel.Thismaycauseproductdamage,failure,orinjury.
• Whenperforminganinstallationwherethemonitorisstacked,pleaseinstallitsuchthatloadisnotplacedonthemonitor
frame.
• Aftermounting,pleasecarefullyensurethemonitorissecure,andnotabletocomeloosefromthewallormount.
• DonotuseanyscrewholesotherthanVESAholesforinstallation.