E7
STEP 4 - MAKE ELECTRICAL
CONNECTION
To properly install your oven, you must determine the type of
electrical connection you will be using and follow the instructions
provided for it here.
DIRECT WIRE
WARNING
ELECTRICAL SHOCK HAZARD
Disconnect power before servicing.
Improper connection of aluminum house wiring and copper
appliance leads can result in an electrical hazard or re. If the
home has aluminum wiring, only use connectors designed and
UL listed for joining copper to aluminum and precisely follow
the manufacturer's recommended procedure. Aluminum-to-
Copper connections must conform with local codes.
For Single Oven, use 10 gauge copper or aluminum wire.
For Double Oven, use 8 gauge copper or aluminum wire.
Electrically ground oven.
Failure to do so can result in death, re or electrical shock.
Be sure your appliance is properly installed and grounded by a
qualied technician. Ask your dealer to recommend a qualied
technician or an authorized repair service.
This oven is manufactured with a neutral (white) power supply wire
and a cabinetconnected green (or bare) ground wire twisted together.
After making sure that the power has been turned off, connect
the exible conduit from the oven to the junction box using a UL
listed conduit connector. The Grounded Neutral and Ungrounded
Neutral Graphics on the following pages and the instructions
provided, present the most common way of connecting ovens. Your
local codes and ordinances, of course, take precedence over these
instructions. Complete electrical connections according to local
codes and ordinances.
1 Disconnect power.
2 Remove junction box cover.
3 Install a UL listed or CSA approved conduit connector to the
junction box.
UL or CSA Listed Conduit Connector
4 Route the exible electrical supply conduit from the oven to
the junction box through a UL listed or CSA approved conduit
connector.
5 Tighten screws on conduit connector.
3-WIRE CONNECTION (GROUNDED NEUTRAL) -
U.S . A . O NLY
WARNING
ELECTRICAL SHOCK HAZARD
Grounding through the neutral conductor is prohibited for
new branch-circuit installations (1996 NEC); mobile homes;
and recreational vehicles, or in an area where local codes pro-
hibit grounding through the neutral conductor. For installations
where grounding through the neutral conductor is prohibited,
see the Ungrounded Neutral graphic.
Use grounding terminal or lead to ground unit.
Connect neutral terminal or lead to branch circuit neutral in
usual manner.
Failure to do so could result in death, re or electric shock.
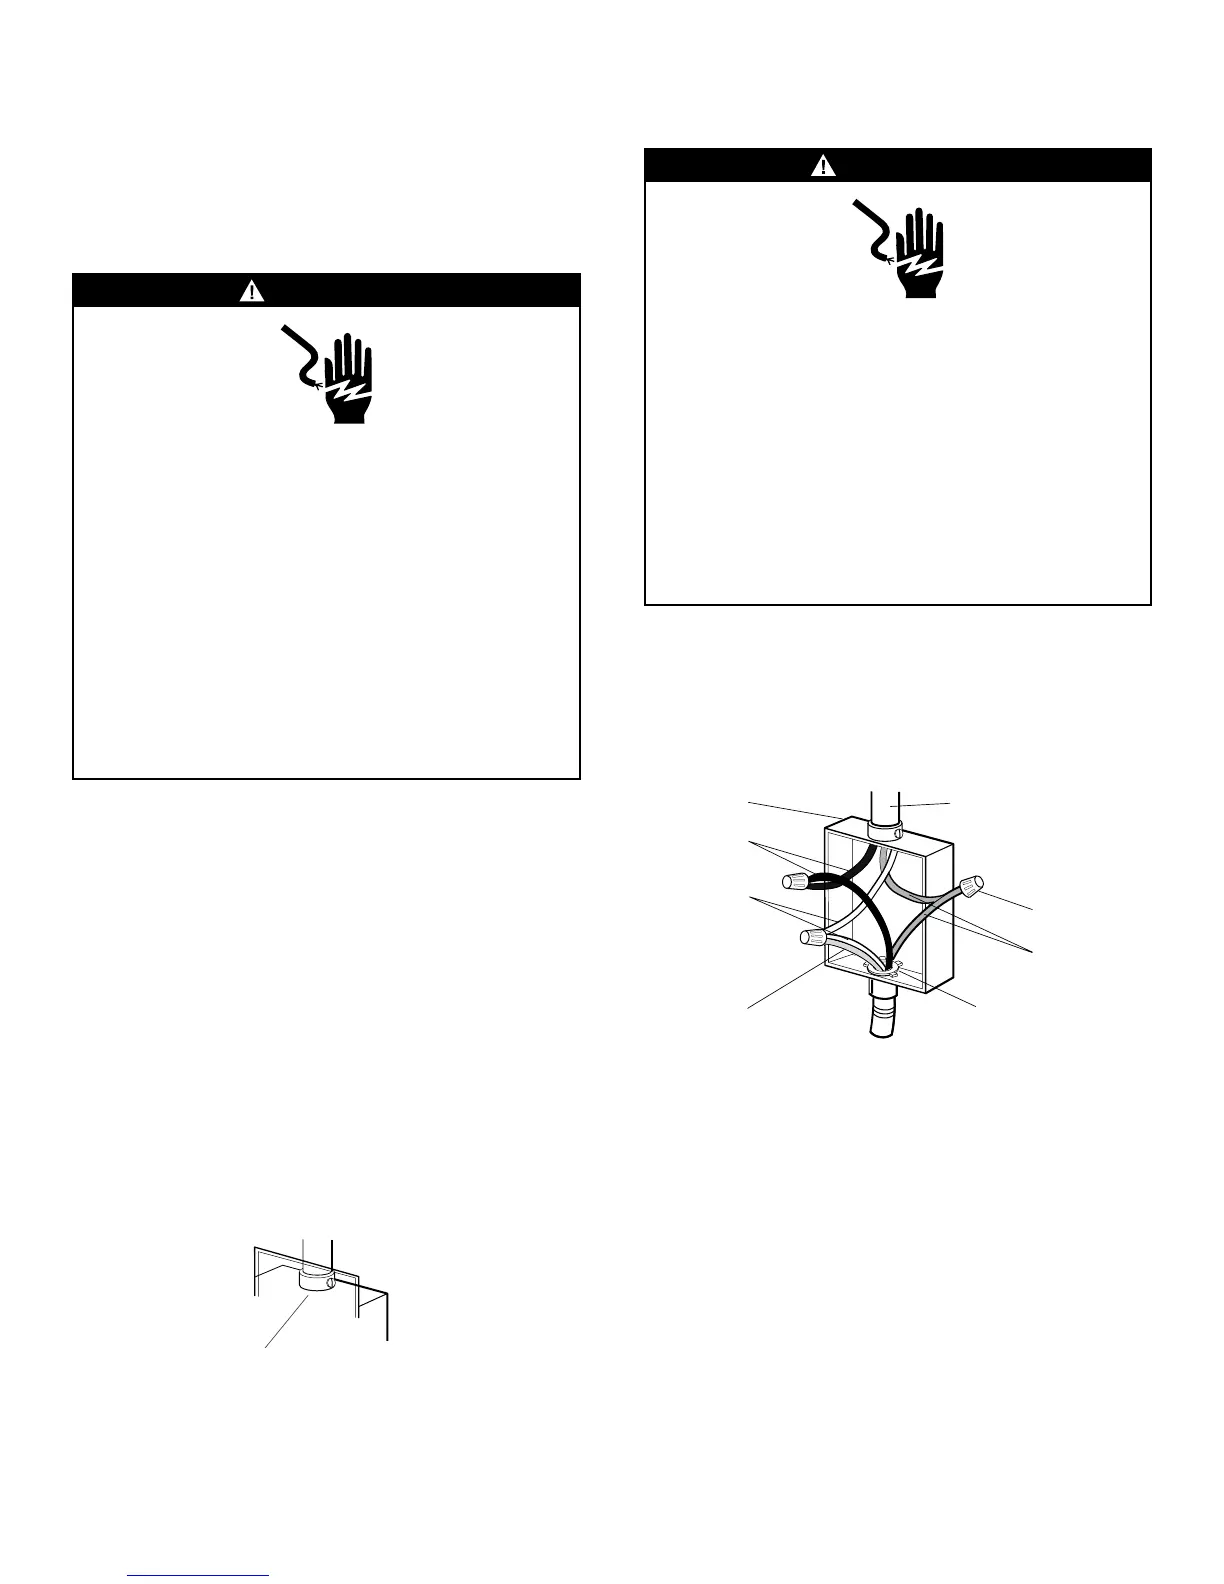
3-WIRE CABLE FROM HOME POWER SUPPLY
IMPORTANT: Use the 3-wire cable from home power supply where
local codes permit a 3-wire connection.
1 Disconnect power.
Grounded Neutral
E
I
G
H
F
A
B
C
D
A. Junction Box
B. Black Wires
C. Neutral (White) Wires
D. Ground (Green or
Bare) Wire
E. Cable from Oven
F. UL Listed Conduit
Connector
G. Red Wires
H. UL Listed Wire
Connectors
I. House Electrical
Supply
2 Connect the two black wires B together using a UL listed wire
connector.
3 Connect the two neutral (white) wires C and the ground (green or
bare) wire d (of the oven cable) using a UL listed wire connector.
4 Connect the two red wires G together using a UL listed wire
connector.
5 Install junction box cover.