Calibrated geomagnetism
First use
Calibration of compass and head-free flight direction
If this product is used for the first time, you should conduct a compass calibration
after the frequency match step is completed.
Calibrated geomagnetism
Press the No.13 key on remote control unit for 2 seconds, when the four indicator lights on the drone are flashing quickly, the drone
is in the calibration state.
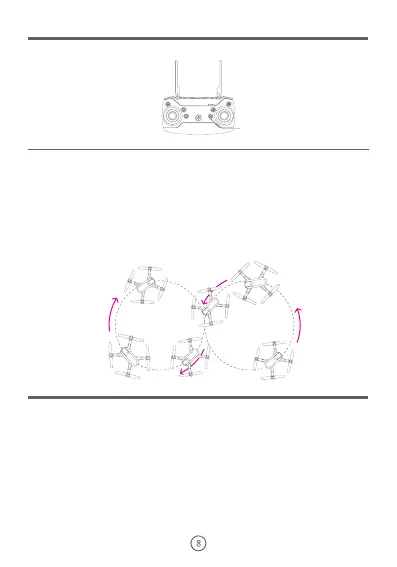
Steps
① firstly, perform a horizontal direction calibration: take the middle part of the drone, try to keep it parallel with the ground, and
slowly rotate the drone 4 times clockwise with the main body as the center;
② secondly, perform a vertical direction calibration: lift upwards the head of the drone vertically, keep it perpendicular to the ground,
and slowly rotate the drone clockwise with the main body as the center until the four indicator lights begin to flash slowly or keep
on, which represents the completion of the operation.
Note:
① when you use this product for the first time, please be sure to complete the steps carefully. If this product is only used in one
area, you do not need to repeat this operation in the future, if this product is taken 400 km away from the area where you calibrate
the compass last time, you will need to repeat this operation.
② please complete this operation carefully, this operation is related to whether the drone can fly in the correct direction following
the indication of remote control.
③ If the four indicator lights on the drone are in the cycle state of“slow flash once and quick flash twice”, it means the compass is
not successfully calibrated, you need to place the drone on a horizontal plane and repeat the above operation.
④ until this operation is to be done, the drone can begin to search satellites.
Please complete “calibration of compass and head-free flight direction” each time.
Press the No.12 key on remote control unit for 2 seconds, when the four indicator lights on the drone flash quickly on the same time
and then return to flash slowly or light on state, it means that the operation is completed.
Note:
① Please put the drone on the level ground or flat surface to operate, this step will be a key to the normal flight of drone, if the
calibration of gyroscope is not on level ground or flat surface, the drone may deviate toward a certain direction after took off,
sometimes, and it may damage the drone motor.
② It is recommended to repeat this step before starting the flight.
③ It may cause gyroscope fail if the drone is collided or dropped seriously, which will affect the flight; please calibrate the
gyroscope again in that case.
④ Refer to “headless flight mode” on page 10 of this manual for the meaning of calibrating the headless flight direction.
Search satellites and position
After completing the above steps, you still have to wait for the drone to complete the satellite positioning. When the four indicator
lights on the drone have changed from slow flashing to continuous light, it indicates that the drone has completed satellite
positioning and reached the take-off condition. Now you can conduct the next step to start up the motor and fly.
Note:
① The speed of searching satellites and positioning depends on environmental disturbances and weather conditions.
② In the case of cold start (more than 1 hour from the last flight), the time for searching satellites and positioning is from 40 to 90
seconds, usually it is within 60 seconds after the drone is started.
③ In the case of warm start (within 1 hour from the last flight), the time for searching satellites and positioning is from 10 to 40
seconds, usually it is within 20 seconds after the drone is started.