Charging station
Description Operating indicator Audible signal
Voltage supply on Permanently blue Off
3 Preparation
3.1 Inserting / removing the rechargeable battery
WARNING
Explosion risk!
Risk of explosion if using a wrong battery type.
•
Use only the battery types approved by the manufacturer.
Approved battery types: part number 6041193 (BT2100, 3.7V, 2600mAh)
1. With the charging contacts facing forward, slide the rechargeable battery
into the battery compartment until it engages.
2. Lock the compartment with the end cap.
✓ When the battery has been inserted correctly and charged sufficiently, the
scanner will emit four audible signals.
3. Secure the end cap using the screw provided (IDMx4x) or by turning the
integrated knurl wheel (IDMx6x).
b
To remove the rechargeable battery, perform these steps in reverse order.
NOTE
The overhang of the battery sticker can be used if necessary to pull out the
battery.
3.1.1 Disposal of used batteries
Batteries must not be disposed of with household waste!
Batteries must be disposed of in accordance with statutory requirements and can
be taken to local collection points or anywhere that sells batteries, for example.
The following symbol on batteries and rechargeable batteries, on the device or in
this document indicate this obligation:
3.2 Charging the rechargeable battery via the power supply unit
1. Select a suitable adapter and slide onto the power supply unit until it
engages.
2. Plug the power supply unit into a suitable wall socket.
3. Connect the power supply cable to the DC female connector on the base
station.
✓ The smart base station emits audible signals to confirm that it is connected
to the power supply and the operating indicator lights up blue once.
✓ When the charging station is in use, the operating indicator lights up perma‐
nently in blue.
4. Place the hand-held scanner on the charging station.
✓ While charging is in progress, the status indicator on the scanner lights up
permanently in red. Once the battery is fully charged, the status indicator on
the scanner lights up permanently in green.
NOTE
Charge the rechargeable battery for 8 hours prior to use.
3.3 Charging the rechargeable battery via the USB 3.0 port
By charging the rechargeable battery and operating the mobile handheld scanner
via a USB 3.0 port, it will not be necessary to use an external power supply unit.
For USB 2.0, the external power supply unit is required.
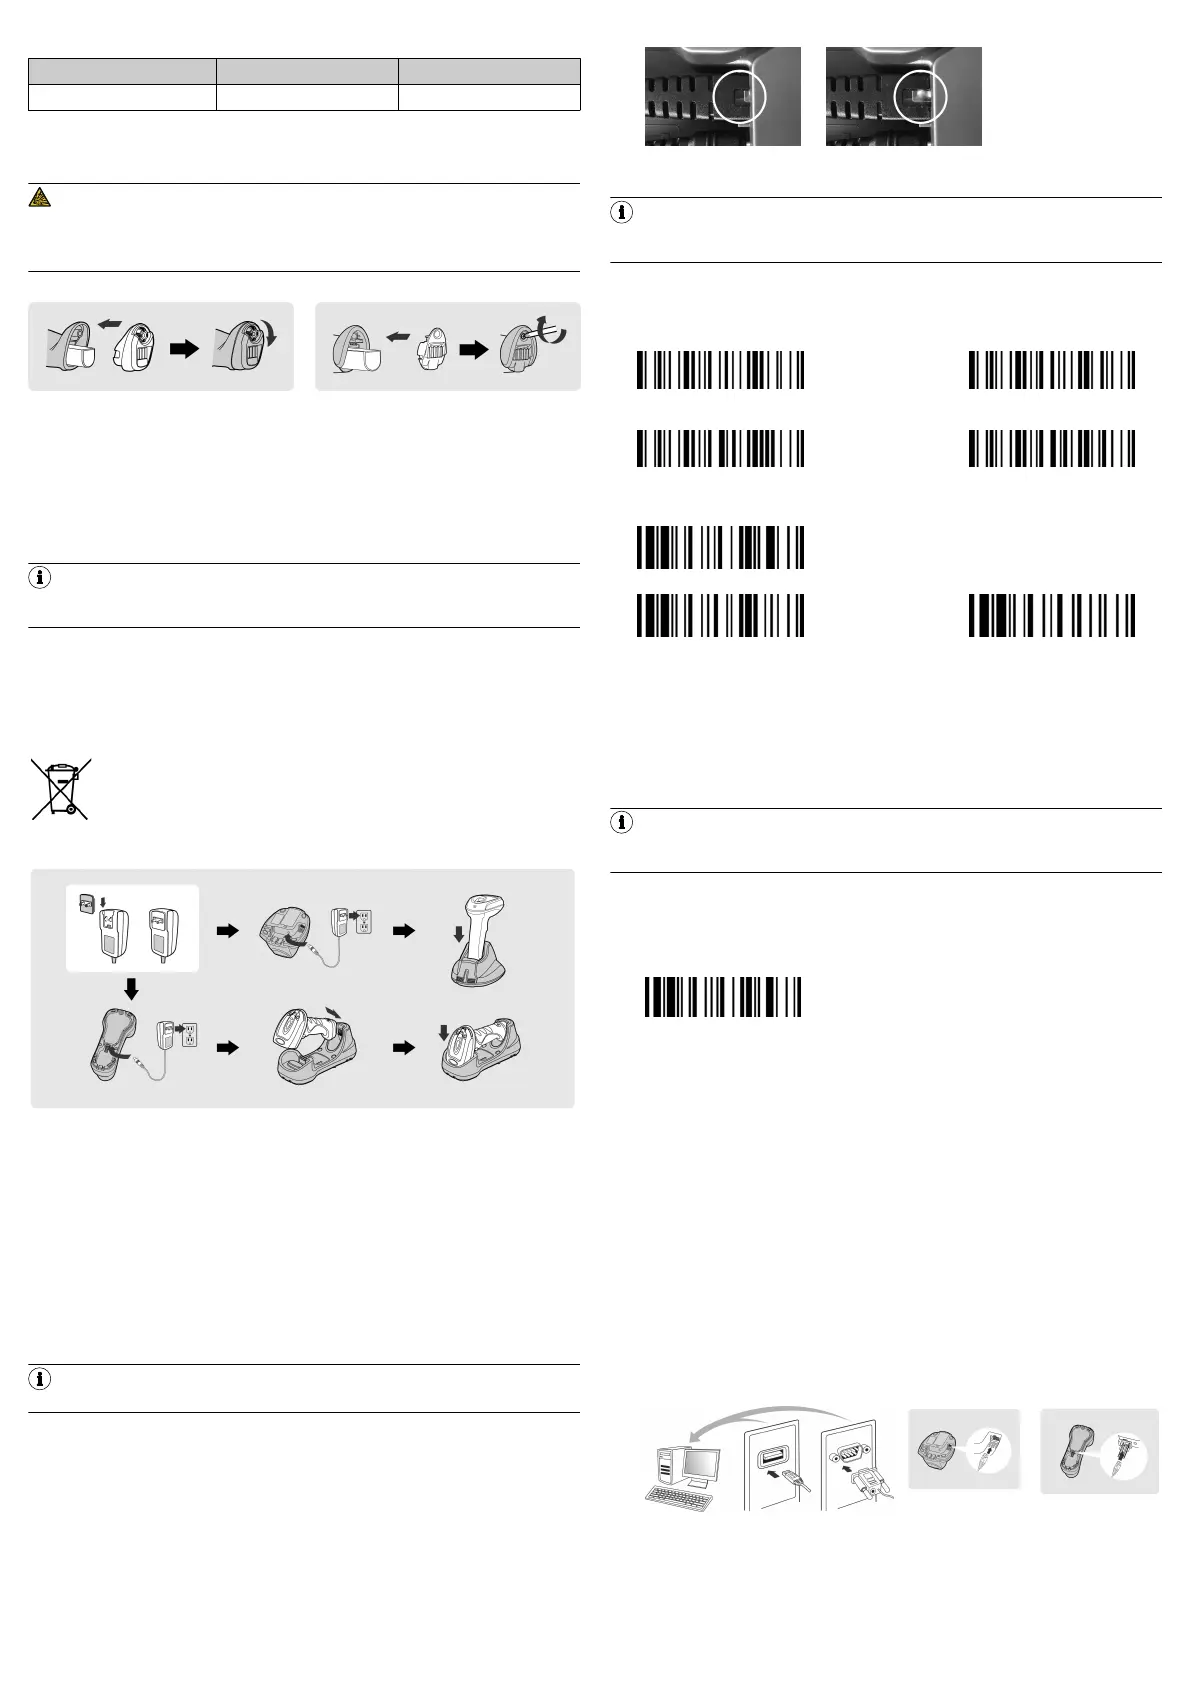
b
Connect the base station and host device using a USB cable. Make sure that
the connecting cable is fully inserted into the RJ female connector:
Correct Incorrect
4 Setup
NOTE
Products delivered as a set (hand-held scanner with smart base station) are
already linked together in PAIR mode.
4.1 Quick setup of host interface
Quick setup is only available in conjunction with a smart base station.
RS-232 serial
USB COM port
emulation
USB HID standard mode
◆ USB HID turbo mode
4.2 Quick setup of connection mode
Uninstall
HID mode HID legacy mode
4.3 Wireless connection modes
The hand-held scanners with Bluetooth interface offer various wireless connec‐
tion modes for communication with the host device.
If no Bluetooth-enabled host device is available, the mobile handheld scanner can
communicate with the smart base station in PAIR mode (peer-to-peer connection)
or in PICO mode (multi-user connection, for more information see the operating
instructions). This enables the wireless plug-and-play migration of existing devices
that are not Bluetooth enabled.
NOTE
Products delivered as a set (hand-held scanner with smart base station) are
already linked together in PAIR mode.
Connection to Bluetooth-enabled host devices is possible via SPP mode or HID
mode (see operating instructions for more information).
If the wireless connection is interrupted, the hand-held scanner re-establishes the
connection automatically as soon as the host device can be reached.
b
To change the wireless connection mode, scan the Uninstall command:
PAIR mode
For connecting one hand-held scanner to a base station.
If the Bluetooth device is not available in the existing system, PAIR mode is the
simplest plug-and-play solution. In this mode, only one hand-held scanner can be
used with a smart base station.
The smart base station provides the Bluetooth wireless connection for the hand-
held scanner and also offers conventional cable interfaces such as USB HID, USB
COM, and RS-232 serial.
HID mode
For direct HID communication with Bluetooth host without base station.
In HID mode, the hand-held scanner can be operated as a Bluetooth keyboard.
In this mode, the hand-held scanner can be detected via the wireless connection
request of the remote host device. In some cases, the authorization key (PIN)
may have to be entered for security reasons in order to establish the Bluetooth
connection.
4.4 Using PAIR mode
✓ The rechargeable battery is fully charged.
1. Connect the connecting cable (USB or RS-232) to the host device and the
smart base station:
2. Switch on the host device.
✓ The connection indicator on the hand-held scanner flashes blue once every
2.5seconds and the operating indicator on the smart base station lights up
permanently in blue: The devices are linked together.
✓ The connection indicators on the hand-held scanner and the smart base
station each flash red and green alternately: The devices still need to be
8028120//2022-10-28/en IDM Bluetooth (IDMxx1-4xx) | SICK 2
 Loading...