SWITCHPLATE
5-INCHES SQUARE
(SUPPLIED)
SWITCHPLATE
5-INCHES SQUARE
(SUPPLIED)
4-INCH SQUARE BOX
2 1/8-INCHES DEEP
DOUBLE GANG BOX
3 1/2-INCHES DEEP
Siemens Building Technologies, Inc.
8 Fernwood Road
Florham Park, New Jersey 07932
Siemens Building Technologies
Fire Safety
Siemens Building Technologies, Ltd.
2 Kenview Boulevard
Brampton, Ontario L6T 5E4 Canada
P/N 315-033300-2
(Contd From Previous Page):
7. Terminal 5 must be
connected to earth ground.
a. Use wire nuts to pass the
shield wire through the
electrical box with NO
connection to the device
terminal block or to local
ground.
b. Use shielded wire to
connect the switch wiring.
c. Tie the switch wiring shield
to terminal 5 or the local
earth ground.
8. For proprietary burglary
application (Refer to Figure 9):
a. Use an HTSW-1 tamper
switch to monitor the main
enclosure.
b. Monitor each HTRI-S/-R/-D
related to this application
continuously by using a
listed motion detector (to
prevent tampering).
9. In supervisory:
HTRI-S/-R draws 1mA
HTRI-D draws 1mA
Figure 9
Security Point (1076) Wiring Connections
Terminal 5 of the HTRI-S/-D/-R must be connected to a known good earth ground for
proper operation.
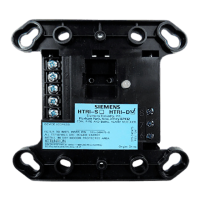
MOUNTING Addressable Interface SIEMENS Models HTRI-S, HTRI-D, and HTRI-R mount directly
into a (user supplied) double gang or 4 inch switchbox. Fasten the module to the
switchbox with the switchplate using the 2 screws provided.
A red LED will blink to indicate an off-normal input switch position and/or an internal
relay transfer.
Be sure to program the HTRI before fastening the switchplate to the unit.
Figure 10
Mounting the HTRI-S/-R/-D
TO NEXT
ADDRESSABLE DEVICE
END OF LINE DEVICE
SEE NOTES 2 AND 8
RELAY CONTACTS
SEE NOTE 6
NOTE:
WITH HTRI-S, TERMINALS
5 AND 6 ARE NOT USED.
SUPERVISED SWITCH
SEE NOTES 1, 5, 8 AND 9
FROM CONTROL PANEL
OR FROM PREVIOUS
ADDRESSABLE DEVICE
1
HTRI-S/-R
2
3
4
5
8
7
6
LINE 1
LINE 1
LINE 2
LINE 2
SEE NOTE 7
HTRI-D
NOT USED
TO NEXT
ADDRESSABLE DEVICE
END OF LINE DEVICE
SEE NOTES 2 AND 8
END OF LINE DEVICE
SEE NOTES 2 AND 8
SUPERVISED SWITCH
SEE NOTES 1, 5, 8 AND 9
SUPERVISED SWITCH
SEE NOTES 1, 5, 8 AND 9
FROM CONTROL PANEL
OR FROM PREVIOUS
ADDRESSABLE DEVICE
1
2
3
4
5
8
7
6
LINE 1
LINE 1
LINE 2
LINE 2
SEE NOTE 7
 Loading...