Chapter 2
Installing Device
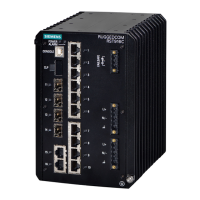
RUGGEDCOM RSG2100
Installation Guide
6 General Procedure
• Section2.2, “Required Tools and Materials”
• Section2.3, “Cabling Recommendations”
• Section2.4, “Installing the Device in Hazardous Locations”
• Section2.5, “Mounting the Device”
• Section2.6, “Connecting the Failsafe Alarm Relay”
• Section2.7, “Connecting Power”
• Section2.8, “Connecting to the Device”
• Section2.9, “Configuring the Device”
Section2.1
General Procedure
The general procedure for installing the device is as follows:
1. Review the relevant certification information for any regulatory requirements. For more information, refer to
Section6.1, “Approvals”.
2. Mount the device.
3. Connect the failsafe alarm relay.
4. Connect power to the device and ground the device to safety Earth.
5. Connect the device to the network.
6. Configure the device.
Section2.2
Required Tools and Materials
The following tools and materials are required to install the RUGGEDCOM RSG2100:
Tools/Materials Purpose
AC power cord (16 AWG) For connecting power to the device.
CAT-5 Ethernet cables For connecting the device to the network.
Flathead screwdriver For mounting the device to a DIN rail.
Phillips screwdriver For mounting the device to a panel.
4 x #8-32 screws For mounting the device to a panel.
 Loading...