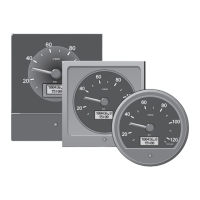
MPH
km/h
75,3 ',67$1&( IXQFWLRQ
LV VHOHFWHG 0D[LPXP
PLOHDJH GLVSOD\HG LV
¬ LV GLVSOD\HG ZKHQ
MPH
km/h
0D[LPXP PLOHDJH
GLVSOD\HG LV
Siemens VDO North America
.
http://sso-usa.siemensvdo.com
.
Phone: 1-800-265-1818
VDO North America warrants all merchandise against defects in factory workman-
ship and materials for a period of 24 months after purchase. This warranty applies
to the first retail purchaser and covers only those products exposed to normal use
or service. Provisions of this warranty shall not apply to a VDO product used for a
purpose for which it is not designed, or which has been altered in any way that
would be detrimental to the performance or life of the product, or misapplication,
misuse, negligence or accident. On any part or product found to be defective after
examination by VDO North America, VDO North America will only repair or replace
the merchandise through the original selling dealer or on a direct basis. VDO North
America assumes no responsibility for diagnosis, removal and/or installation labor,
loss of vehicle use, loss of time, inconvenience or any other consequential ex-
penses. The warranties herin are in lieu of any other expressed or implied warran-
ties, including any implied warranty of merchantability or fitness, and any other
obligation on the part of VDO North America, or selling dealer.
(NOTE: This is a Limited Warranty as defined by the Magnuson-
Moss Warranty Act of 1975.)
Siemens VDO Limited Warranty
turn on the ignition and start the engine. Hold in the but-
ton until the word shows up. When it does,
release the button.
2. Press the button once, and the word will be
displayed on the LCD readout. Press it twice, in rapid
succession, and
[for down]will be displayed.
3. When either or is showing, press the button
again, and hold it in. If you hold the button in for just a
short time, the pointer will move slowly either upwards or
downwards, depending on which mode you selected. This
allows for a very accurate adjustment of the pointer. Hold-
ing the button in for a longer period of time makes the pointer
move faster.
4. When you have repositioned the pointer where you want
it, release the button and wait. If no further adjustments
are made within one minute, the speedometer will revert
back to the normal operating mode.
NOTE: If you move the pointer past the upper limit of the
calibration range, the LCD display will flash and you will
only be able to adjust the pointer downward. If you move
the pointer past the lower limit of the calibration range, the
LCD display will also flash, and you will only be able to ad-
just the pointer upward.
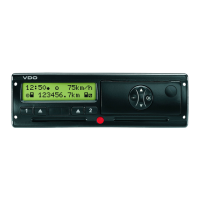
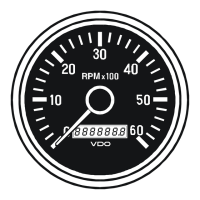
IV. Operating the Speedometer
When the speedometer is in the normal operating mode,
the LCD readout acts as an odometer, allowing you to dis-
play either total miles driven, or trip distance. Total mile-
age is counted up to 999,999.9 miles. Trip distance is counted
up to 99,999.9 miles.
To display either Total Mileage or Trip Distance:
Press the button. If the Total Mileage had been showing on
the LCD readout, it will change to Trip Distance when you
push the button. If the Trip Distance had been showing, the
display will change to reveal Total Mileage.
Diagram J
The LCD display showing Total Mileage
To reset the odometer Trip Distance display to zero:
Push and hold in the button for about two seconds. The
odometer will reset to 0.0 miles. Be aware that pushing
and holding in the button will reset Trip Distance to zero
regardless of which display is currently showing on the
LCD readout Trip Distance or Total Mileage.
Diagram K
The LCD display showing Trip Distance
Operating voltage: 10.8 – 32 Volts
Operating current: <100 mA
(<600 mA with light)
Operating temperature: –4° F to 158° F
(-20° C to 70° C)
Protection: IP65 (Front)
Ozone and UV
resistant housing
Dimensions—
Depth: 3.6" (91 mm)
Diameter: 3c " (80 mm)
3d" (85 mm)
4" (100 mm)
Illumination: Backlit/Frontlit
dial and display
Calibration range: 500 to 399,999
pulses per mile or
kilometer
TECHNICAL DATA
At this point, the number 5 is set, and the digit to its im-
mediate left begins to flash the middle digit. Press the
button again, and hold it until the number 8 appears. Re-
lease the button. Now, the second digit from the left begins
to flash. Again, hold in the button until the number 3
appears. When it does, all but the left-lmost digit are set.
Repeat the process to set the 4 and the value in our ex-
ample is set. The value 43850 should be displayed on the
LCD readout.
4. When you are satisfied you have properly entered the
correct calibration value when that value is displayed on
the LCD readout take your finger off the button and wait.
After a few seconds, the value you have entered will be down-
loaded into the speedometers microprocessor, and the speed-
ometer will revert back to normal operating mode. At this
point, the manual calibration process is complete.
In the future, you can use this method to update the calibra-
tion value stored in the computer should it ever become
necessary. This function also allows you to manually adjust
the calibration value after you perform the automatic cali-
bration process.
3. Manual Calibration (Fine Tuning)
( )
To manually calibrate the pointer on the analog display (with the
car on a dyno at the specified speed):
1. Press and hold in the button on the speedometer as you
Diagram I
Calibration of the analog (pointer) display on the
speedometer
You can fine-tune the calibration of the speedometers ana-
log display (the pointer showing miles-per-hour or kilome-
ters-per-hour)by using speed test equipment and the
function on the LCD readout. The pointer can
be repositioned anywhere within the calibration range of
the speedometer.
MPH
km/h
_b
dXU^
 Loading...