EasyManua.ls Logo

Signature Hardware GREYFIELD 948556 - User Manual

Signature Hardware GREYFIELD 948556
10 pages
Print Icon
To Next Page IconTo Next Page
Loading...
1
1.800.221.3379
GREYFIELD
THERMOSTATIC SHOWER VALVE
VÁLVULA DE DUCHA TERMOSTÁTICA GREYFIELD
SKU: 948556
REVISED 02/01/2021
CODES: SHGF9009, SH6004, SH6006
GETTING STARTED
BEFORE YOU BEGIN
We recommend consulting a professional if you are

Hardware accepts no liability for any damage to the
plumbing, wall, or for personal injury during
installation.
Observe all local plumbing and building codes.
Unpack and inspect the product for shipping
damage. If any damage is found, contact our
Customer Relations team at 1-800-221-3379.
Ensure that you have gathered all the required
materials that are needed for the installation.
TOOLS AND MATERIALS:
HERRAMIENTAS Y MATERIALES:
ANTES DE COMENZAR
Le recomendamos que consulte a un profesional si no
sabe cómo instalar accesorios de plomería. Signature
Hardware no asume ninguna responsabilidad con
respecto a los daños causados a la plomería, la pared, ni
por daños personales que ocurran durante la
instalación.
Cumpla con todas las normas locales de plomería y
construcción.
Retire el producto del empaque y verifique si no sufrió
daños durante el envío. Si encuentra algún daño,
comuníquese con nuestro equipo de Servicio al cliente
al 1-800-221-3379.
CÓMO COMENZAR
Asegúrese de haber reunido todos los materiales
necesarios para la instalación.
Long-nose Pliers
Pinzas de punta
Pliers
Pinzas
de punta

Llave hexagonal
Safety Glasses
Gafas de seguridad
Adjustable Wrench
Llave Ajustable
Phillips
Screwdriver
Destornillador
Phillips
Plumbers Tape
Cinta Selladora
Para Rosca
Question and Answer IconNeed help?

Do you have a question about the Signature Hardware GREYFIELD 948556 and is the answer not in the manual?

Summary

Before You Begin

Professional Consultation and Code Compliance

Consult a professional plumber and adhere to local plumbing and building codes.

Product Inspection and Damage Reporting

Inspect the product for shipping damage and contact customer relations if issues are found.

Before Installation

Installer Qualifications and Experience

The installer must be a professional plumber experienced with custom shower products.

Factory Calibration Settings

Valve calibrated to 104°F (40°C) first stop, max temp 120°F (49°C).

Factory Calibrated Inlet Conditions

Details factory settings for water pressure and temperature.

Recalibration for Different Inlet Conditions

Re-calibrate valve if inlet conditions differ from factory calibration.

Valve Installation

Prepare Water Supply and Pipes

Shut off water supply and flush all pipes thoroughly before installation.

Connect Hot and Cold Water Supply

Connect hot water to left inlet (H) and cold water to right inlet (C).

Use Plaster Guard as Installation Guide

The plaster guard serves as a guide; ensure it's flush with the finished wall.

Recommended Valve Depth and Spacing

Ensure valve depth is 1-3/4" to 2-1/4" from wall; tub spout spacing 8"-18".

Check Temperature Setting

Factory Temperature Range

Valve delivers water between 65°F and 145°F.

Factory Inlet Conditions for Calibration

Details pressure and temperature for factory calibration.

Align Cartridge Stem and Body Marks

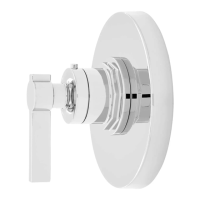
Ensure the black line on the cartridge stem aligns with the black mark on the body.

Trim Installation

Align Stem Extension and Tighten Screw

Align black marks, position stem extension with large groove upright, tighten screw.

Install Trim Plate and Secure Valve

Fit joint through plate, secure with o-ring, and tighten long screws.

Position Escutcheon and Install Handle Seat

Place escutcheon, align groove, install handle seat with 'UP' marking at 12 o'clock.

Install Handle Assembly and Adjust Temp

Attach handle assembly, tighten screw, press button to adjust hot water.

Removal of Cartridge for Maintenance

Understand Cartridge Screens

Screens prevent dirt damage; clogs reduce flow and mix efficiency.

Shut Off Water Inlet

Tighten the two screws at the check stop valves to shut off water.

Remove Handle and Unscrew Cartridge

Remove the handle, then unscrew the cartridge counterclockwise.

Clean or Replace Cartridge

Clean screens with water or replace with a new cartridge.

Care Instructions

Preserve Finish with Non-Abrasive Wax

Apply non-abrasive wax to preserve the product finish.

Rinse Cleaners Immediately

Rinse off any cleaners immediately after use; avoid abrasive cleaners.

Signature Hardware GREYFIELD 948556 Specifications

General IconGeneral
BrandSignature Hardware
ModelGreyfield
CategoryBathroom Fixtures
Faucet Holes3
MaterialBrass
Product Number948556
Faucet Centers8 inches

Related product manuals