AFTER SALES SUPPORT
1300 7 77 137
service@unclebills.com.au
MODEL: EA2258 PRODUCT CODE: 709435 07/2022
21
INSTRUCTIONS (CONT.)
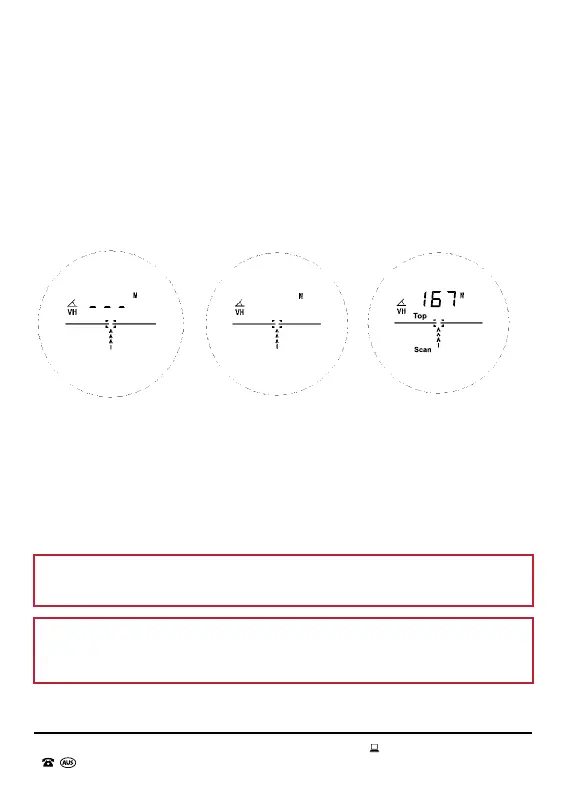
2. Press down the OPEN button. The lens will display the last mode selected
when the Laser Range Finder shutdown. Keep pressing the MODE button
till you reach the Altitude Difference Measurement Mode (see Fig. 8.2). Hold
down the OPEN button until Bottom and Scan appears on the display (see
Fig. 8.3). Aim the Laser Range Finder at the bottom (base) of your desired
object. On identifying the bottom, 0 will appear on the display. Bottom will
then disappear from the display and then Top will appear. With the OPEN
button still held down, gradually move the Laser Range Finder to the top
point of the object (see Fig. 8.4). At this point the Laser Range Finder will
display the altitude difference/vertical height of the object and you can now
release the OPEN button.
Fig. 8.4
Bottom
Scan
0
Fig. 8.3Fig. 8.2
3. To ensure accuracy, hold the Laser Range Finder with a rm grip and keep it
steady till the measurement is displayed.
4. The default unit of measurement is M (Metres). To change the unit of
measurement to Y (Yards), hold down the MODE button. To switch between
the two units keep holding down the MODE button. Once the unit of
measurement desired is selected, release the MODE button.
WARNING: Please always pass your hand through the wrist strap prior to
gripping the Laser Range Finder to avoid it from dropping and getting damaged.
NOTE: If no distance is displayed on the lens display, there is a possibility that
the object is not in the measuring range of 5 to 1000m. In this case, you will
need to retarget and measure.