ANCHOR SYSTEM INSTALLATION INSTRUCTIONS (Day 1)
Figure 1
Note: It is recommended that you use some sort of
concrete form for the top 4" of the concrete. Cardboard
forms can be purchased at some hardware and home
stores or a wooden form can be constructed out of 2 x
4's.
3. Mix and pour concrete into hole. Follow instructions on
concrete bag. Stop about 18" below court level.
4. Insert four reinforcement bars (#40) into concrete 8" apart
creating a square in center on hole.
5. Finish pouring concrete up to court level.
6. Push anchor system into concrete and agitate to work out
voids in concrete. Immediately use a level to level and square
anchor plate to playing surface. Clean off any concrete that
may be on exposed threads.
Note: The bottom four nuts will be forever embedded
in concrete. The top four nuts remain on bolts and
Let concrete stand for a MINIMUM of 72 hours.
INSTALLATION TIMELINE
1. Prior to anchor system and goal assembly, call utility services for location of underground utility lines before you dig.
2. Vertical main post assembly is a two part process.
PART 1
Day 1. Complete Anchor System Installation Instructions.
(Below)
Day 2-4. Allow concrete to cure.
PART 2
Day 5. Complete Silverback
®
assembly instructions. (Requires
four adults)
Before digging hole for anchor system, check for
buried power, gas, water, and telecommunication
lines! Failure to do so could result in serious or fatal
injury! Contact your local utility company if unsure.
Note: For best results with less vibration, anchor system
should be independent of court. If pouring concrete for
both at same time, add an expansion joint in between.
Figure 2
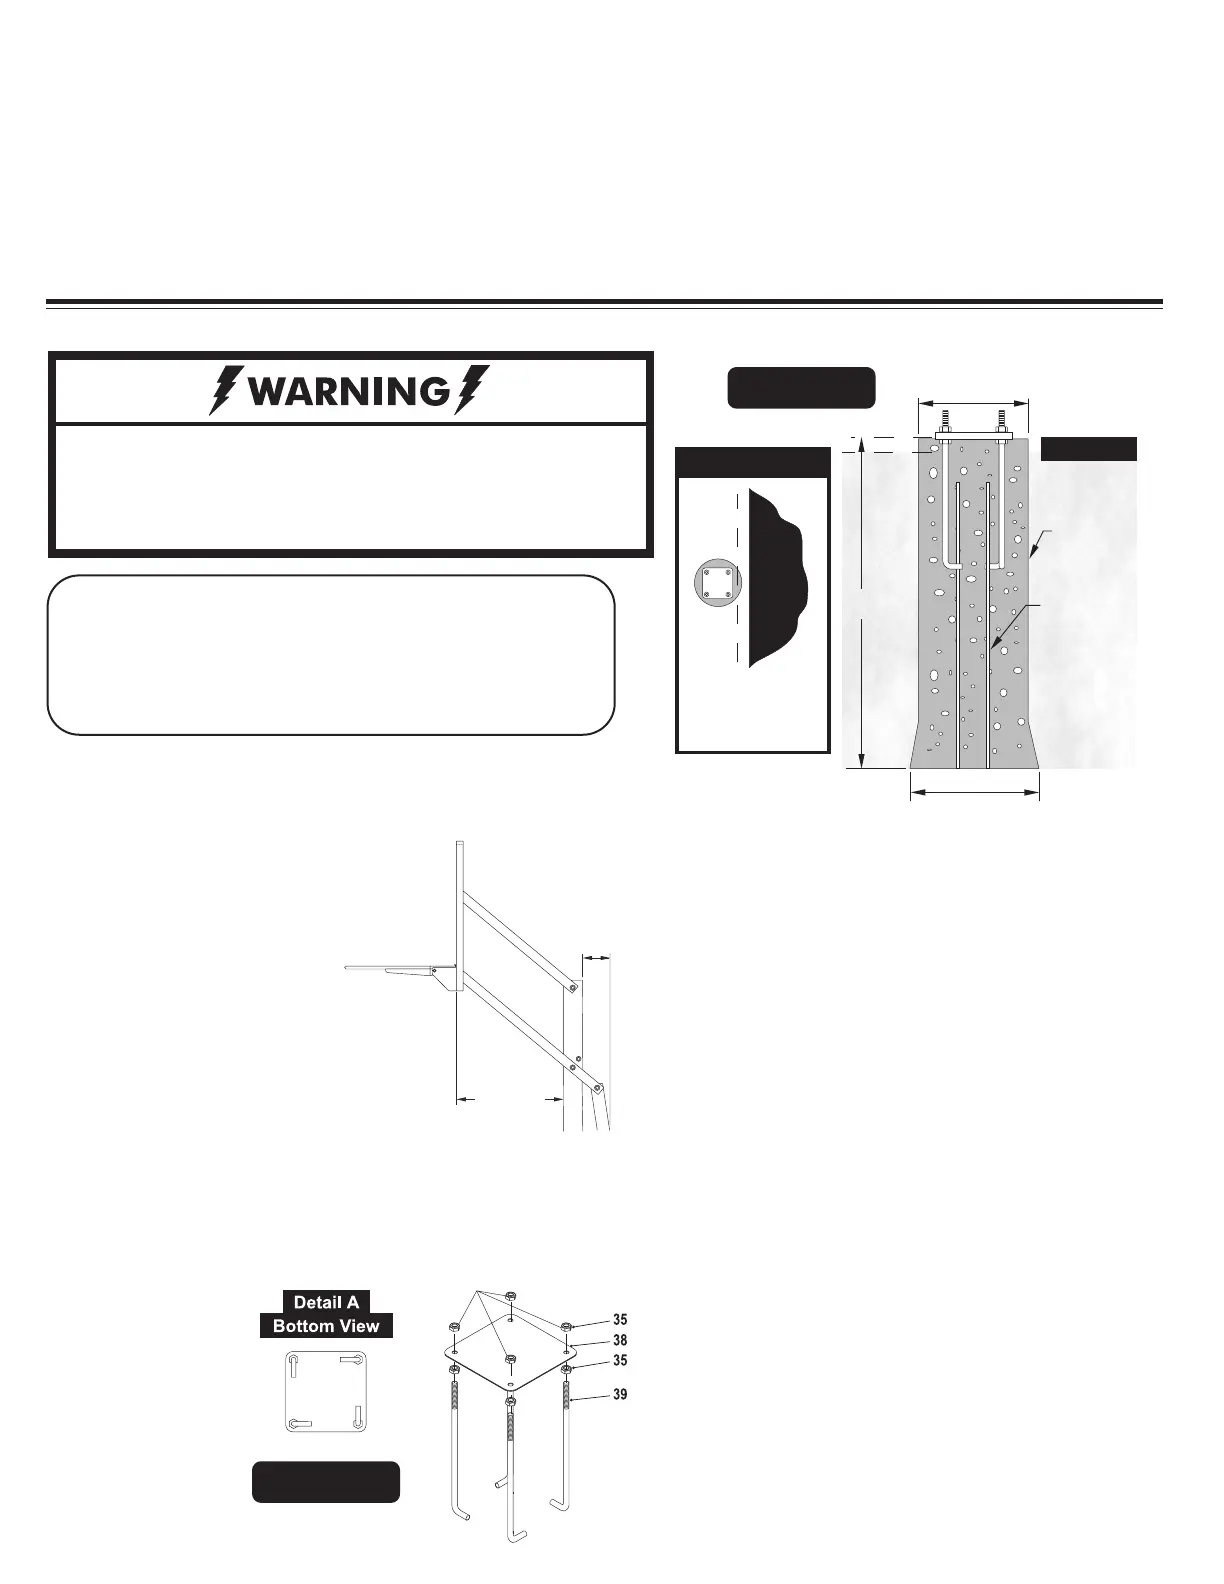
2. Assemble anchor system as follows: Thread nut (#35) to bottom
of threads on anchor bolt (#39) insert threads of anchor bolt
(#39) through hole on anchor plate (#38) and secure with
nut (#35). Repeat this step for the
remaining anchor
bolts. See Figure
2. Note: Each leg
of anchor bolts
should face the
anchor bolt to the
right. See Detail A.
1. Determine the location of the anchor
system. The proper location is as close to
the court without making contact, as
shown in Figure 1. This,
however, is a general rule.
If you need to locate the
anchor system in a location other than
this, use the following dimensions as a
guide.
Overhang when adjusted to 10 ft. = 27”
20” Diameter
16” Diameter
Concrete
Rebar #40
36”
Court
Court Level
Anchor Plate must be
square to your court so
the backboard will
line up with court.
Court
Top View
are used for leveling. (See Step 14 on page 7).
Items needed for Anchor Installation (not included)
9 - 80 lb. bags of concrete
1 - post hole digger (optional)
1 - 15/16” open end wrench
1 - 15/16” socket and ratchet (optional)
1 - wheel barrow
1 - garden hose
1 - level
1 - tape measure
1 - concrete form (see note after step 2)
OVERHANG
18 INCH
MINIMUM
REAR
CLEARANCE
REQUIRED
Note: When digging hole, if you hit rock
and cannot dig through contact a contractor.
Note: Minimum of 18” rear clearance is required behind pole.
THESE NUTS
USED FOR
LEVELING
 Loading...