8
GB
5. How to use
5.1 Setting up the device
NOTE: some parts of the device might be
slightly greased when delivered, which is
why slight smoke and odour formation
might develop. This is harmless and stops af-
ter a short amount of time. Ensure sufficient
ventilation in the meantime.
1. Remove the device from the packaging.
2. Remove any transport packaging and
any protective foil present.
NOTE: there is a piece of corrugated board
between the device and base3, which also
needs to be removed.
3. Check that the device shows no dam-
age.
FIRE HAZARD!
~ Ensure that there is sufficient distance to
the wall, furniture and fixtures or other
devices. The distance should be at least
0.5 m, in order to exclude the risk of a
fire hazard.
4. Select a location which complies with
the safety information.
5. Select a location where people, animals
or plants will not be suddenly hit by the
hot air flow.
6. Insert the mains plug into a wall socket
corresponding to the technical data.
NOTE: the device requires up to 10 amps
electricity (2,000 watt). If you have connect-
ed other consumers in the same electric cir-
cuit, ensure that the maximum capacity of
the fuse is not exceeded, as the fuse will oth-
erwise trigger.
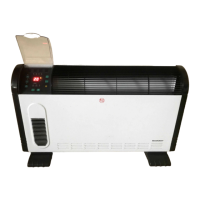
5.2 Inserting the battery
If the device is new or if the battery in the re-
mote control19 is empty, a new battery of
the type CR2032 must be inserted.
1. Figure A: press the closing flap to-
wards the centre and pull the battery
compartment out.
2. Remove the old battery, if applicable.
3. Insert a new battery.
NOTE: be sure to observe the correct polar-
ity when inserting the battery (+/–).
4. Slide the battery compartment back in.
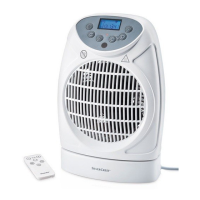
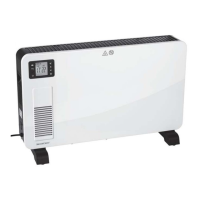
6. Operation
Identical symbols on the buttons mean iden-
tical functioning. These instructions describe
the operation via the remote control19.
The selected function is shown on the dis-
play10.
As soon as the device is in operation, the
control lamp18 lights up.
The device can be operated via the operating
panel1 or via the remote control19.
6.1 Switching the device on
and off
1. Insert the mains plug into a wall socket
corresponding to the technical data.
2. Switch the device on by setting the main
switch9 to I.
The main switch9 and the display10
are lit up. The device is in standby
mode.
3.
Put the device into operating
mode by
pressing the standby button 23. The
control lamp18 lights up.
BB&3(B%ERRN6HLWH'LHQVWDJ0DL