19
GB
WARNING! Risk of material damage!
~ In order to prevent damage to the de-
vice, interrupt the blending process im-
mediately if the blades of the blade
attachments|8/9 rotate with difficulty or
not at all. In this case, pull out the mains
plug|4
and check whether there is an ob-
struction in the blender jug|
5
-
7
.
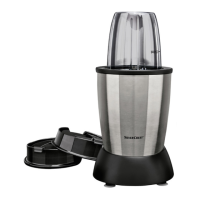
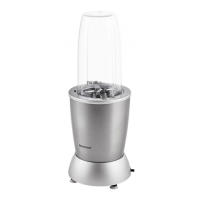
6.1 Uses
Blade attachment with a cross
blade
|8
Use the blade attachment with the cross
blade|8 for mixing whole-fruit beverages
(smoothies) and chopping ice cubes.
Blade attachment with a flat
blade|
9
WARNING! Risk of material damage!
~ Do not use the blade attachment with a
flat blade|9 for liquids!
Use the blade attachment with a flat blade|9
for chopping solid food (e. g. nuts).
NOTE:
with an operating time of approx.
10|seconds, use no more than 200 g when
chopping nuts.
6.2 Preparing food
WARNING! Risk of material damage!
~ Thick or firm peels, (e.g. of citrus fruits,
pineapple), stems and pips of stone
fruits (e.g. cherries, peaches, apricots)
must be removed before blending.
• Rinse or wash the fruits.
• Cut the fruit into rough pieces (approx.
3-4 cm edge length).
• For smoothies: use a sufficient amount
of liquid (mineral water, juice, milk, yo-
ghurt). We recommend a mixing ratio
of 1:1.
6.3 Mixing/Chopping
CAUTION:
~ Mind the marking MAX for the maxi-
mum filling quantity.
~ Depending on the hardness and consist-
ency of the ingredients in the blender
jug|5-7, do not fill it to the maximum;
otherwise the blade attachment|8/9
could become clogged.
~ Due to their exceptional hardness nut-
megs may not be chopped.
NOTE: if the smoothie is too thick, add a lit-
tle mineral water, fruit juice, milk or yoghurt
to suit your taste.
1. Place the fruit pieces and any other in-
gredients into the blender jug|5-7 as
desired. Mind the marking MAX for
the maximum filling quantity.
2.
Figure A:
screw the required blade at-
tachment|
8
/
9
onto the blender jug|
5
-
7
.
Ensure that the blade attachment is tightly
screwed to the blender jug.
3. Figure B: turn the blender jug|5-7
around and place it on the base unit|1.
The small noses|13 on the edge of the
blender jug fit into the recesses at the
head of the base unit|1.
4. Connect the mains plug|4 with the wall
socket.
5. A slight clockwise turn of the blender
jug|
5
-
7
switches the device on.
Let the device run for no more than
60|seconds.
6. A slight anticlockwise turn of the blend-
er jug|5-7 switches the device off.
Wait until the blade|8/9 has come to a
standstill.
 Loading...