10
CUTTERS FI LED AT
NON·MATCHING ANGLES
/ ' f
" I
/
'
/' I
/
,
,
'/ I "I
:_(:.:?"~~.);\;~~l-'__
r~
--r=
, I'
, I'
, I I
\ I
Caused by letting pressure and filing angle vary from tooth to
tooth or one side filed with different angle and lengths than
the other .
Chain will not cut at
its best. !Vial' cut off
line or "run" to one
side, dray may slow
down engine.
THIN FEATHERED EDGES
When they aImost immediately break off,
you have a dull chain. Usually found on
chain filed with a hook (see "forward
hook").
Causedby holdinq file with handle too low,
or pressing back down too hard on file.
BLUNT CUTTING EDGES
JOINTING
(DEPTH
Although edge is durable, it won't cut
properly; scrapes wood, robs power and
produces sawdust instead of chips.
Caused by holding file too high on face of
tooth, or keeping file handle too high.
.-
CHAIN
CLEARANCE)
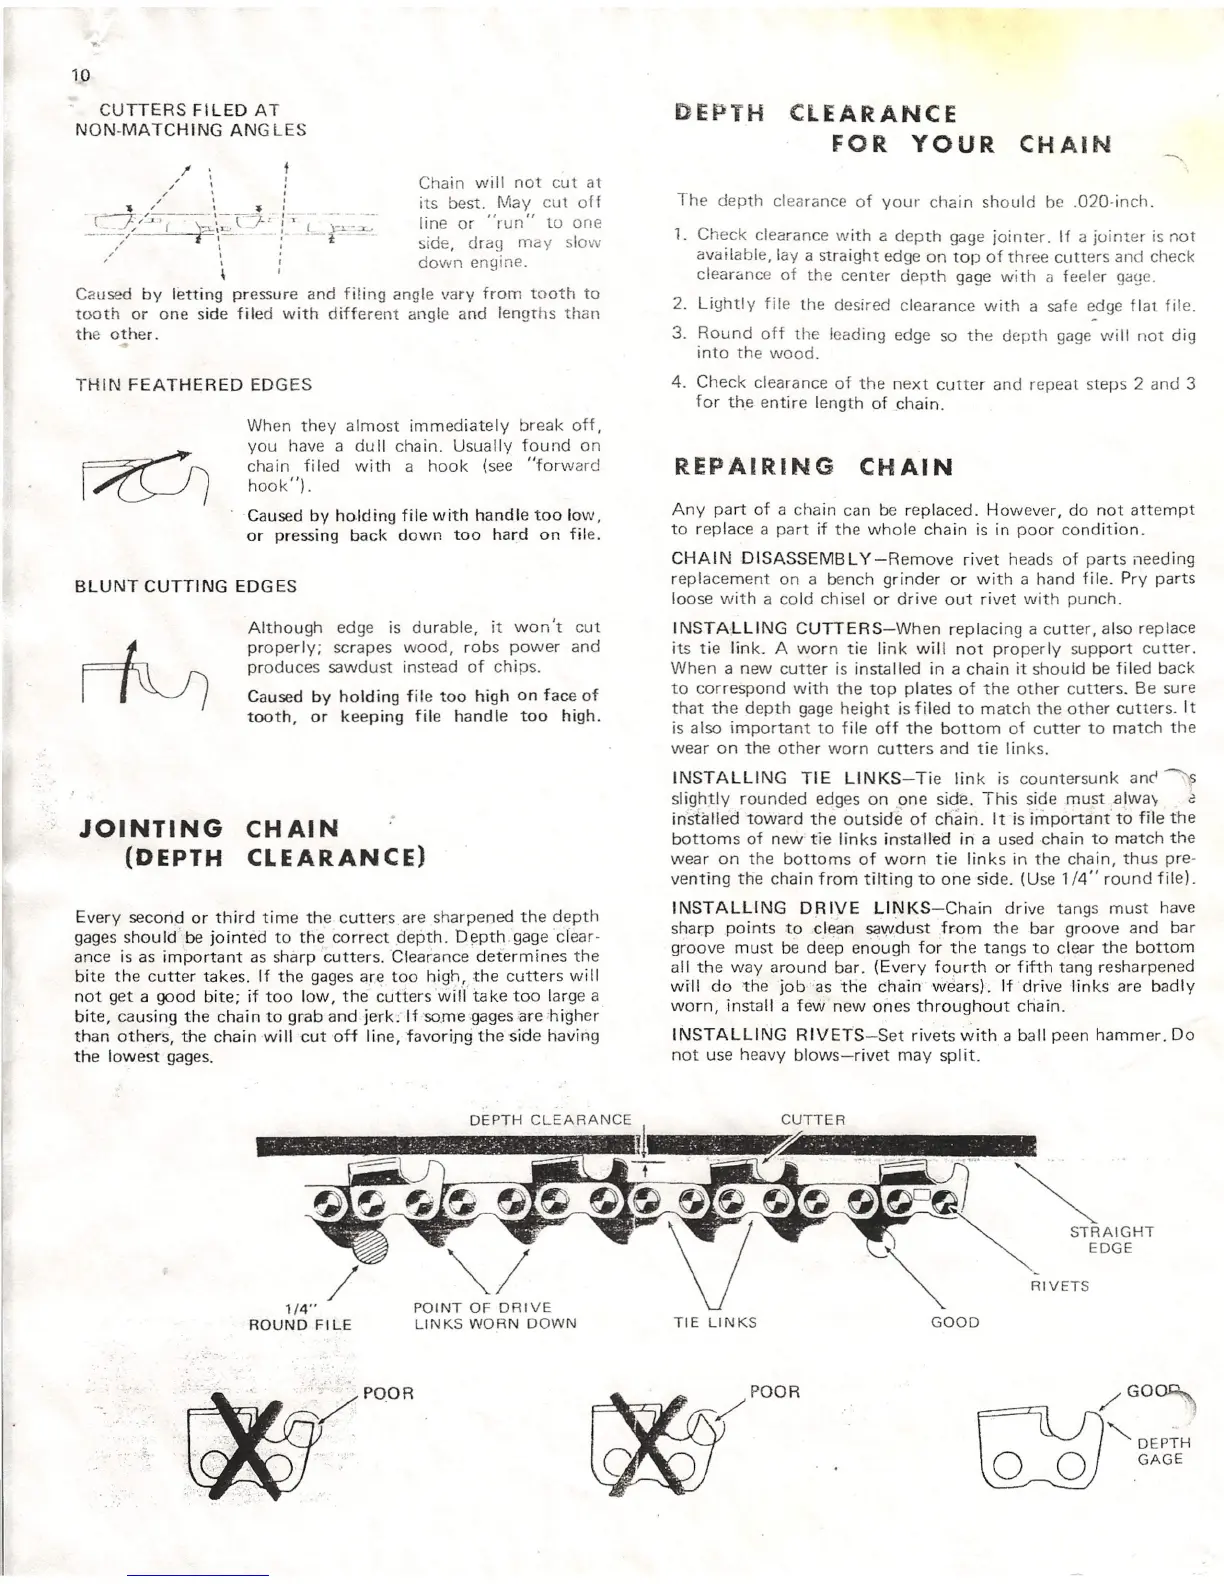
Every second or third time the cuttersare sharpened the depth
gagesshould' be jointed to the correct depth. Depth.gageclear-
ance is as important as sharp 'cutters. 'Clearance determines the
bite the cutter takes. If the gagesare too high, the cutters will
not get a good bite; if too low, the' cutters 'wit'I'take too large a
bite, causing the chain to grab and jerk;' If 'sorneqaqesare'higher
than others, the chain will cut off line, favoring the side having
the lowest gages,
/
1/4"
ROUND FILE
POINT OF DRIVE
LINKS WORN DOwN
DEPTH CLEARANCE
FOR YOUR CHAIN
The depth clearance of your chain should be .020·inch.
1.
Check clearance with a depth gage jointer. If a jointer is not
available, lay a straight edgeon top of three cutters and check
clearance of the center depth gage with a feeler gage.
2. Lightly file the desired clearance with a safe edge tlat file.
3. Round off the leading edge so the depth gage will not dig
into the wood.
4. Check clearance of the next cutter and repeat steps 2 and 3
for the entire length of chain.
REPAIRING CHAIN
Any part of a chain can be replaced. However, do not attempt
to replace a part if the whole chain is in poor condition.
CHAIN DISASSEMBLY -Remove rivet heads of parts needing
replacement on a bench grinder or with a hand file. Pry parts
loose with a cold chisel or drive out rivet with punch.
INSTA!.L1NG CUTTERS-When replacing a cutter, also replace
its tie link. A worn tie link will not properly support cutter.
When a new cutter is installed in a chain it should be filed back
to correspond with the top plates of the other cutters. Be sure
that the depth gageheight is filed to match the other cutters. It
is also important to file off the bottom of cutter to match the
wear on the other worn cutters and tie links.
INSTALLING TIE LINKS-Tie link is countersunk anr' ~
slightly rounded edges on .one side. This side must alway
c
installed toward the outside of chain. It is important' to file the
bottoms of new tie links installed in a used chain to match the
wear on the bottoms of worn tie links in the chain, thus pre-
venting the chain from tilting to one side. (Use
1/4"
round file).
INSTALLING DRIVE LINKS-Chain drive tangs must have
sharp points to clean sawdust from the bar groove and bar
groove must be deep enough for the tangs to clear the bottom
all the way around bar. (Every fourth or fifth tang resharpened
will do the job 'as the chain wears). If drive links are badly
worn, install a few new ones throughout chain.
INSTALLING RIVETS-Set rivets ~ith a ball peen hammer. Do
not use heavy blows-rivet may split.
RIVETS
TIE LINKS
GOOD
00
POOR
./
G
 Loading...