Do you have a question about the SKY-WATCHER VIRTUOSO GTi and is the answer not in the manual?
Steps for attaching a telescope to the mount securely.
Overview of the mount's control panel layout and indicators.
Detailed explanation of each interface port and switch on the mount.
Technical details of the electrical connections for control ports.
Guide to selecting appropriate cables for camera control.
Specifications and recommendations for powering the mount externally.
Instructions for manual movement and clutch operation.
Guidance on using the optional SynScan hand controller.
How to control the mount using a smartphone or tablet app.
Steps and details for connecting to the mount's Wi-Fi network.
Explanation of the mount's encoder system for tracking manual movements.
Procedures for updating the mount's internal software.
Instructions for attaching the finderscope or red dot finder.
Steps for installing eyepieces for different telescope types.
Guide to using and aligning the red dot finder.
Instructions for achieving a sharp image with the telescope.
Advice on selecting eyepieces for optimal viewing.
Factors affecting astronomical observation quality like seeing and transparency.
Tips for choosing a good location for stargazing.
Guidance on optimal times for astronomical observation.
Importance of allowing the telescope to reach ambient temperature.
How to prepare your eyes for optimal night vision.
Links to download the mobile applications for mount control.
Link to download the user manual for the SynScan app.
Detailed steps for controlling the mount wirelessly via Wi-Fi.
Information on using the mount for wireless photography control.
Process of aligning telescope mirrors for optimal image quality.
Guidelines for safely cleaning telescope optics and components.
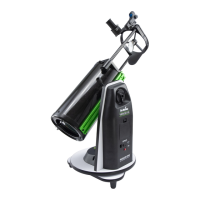
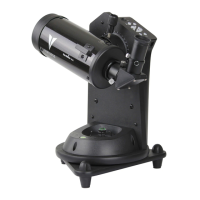
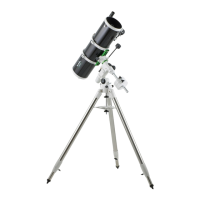
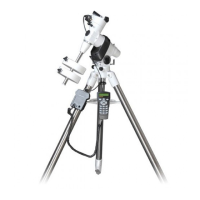
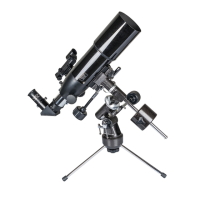
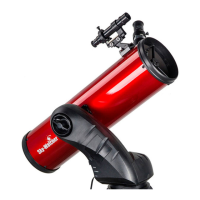
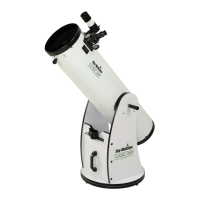
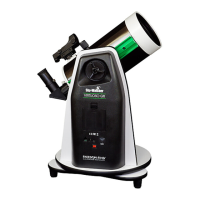
The VIRTUOSO GTi Mount is a sophisticated astronomical and terrestrial photography device designed for both novice and experienced users. It serves as a motorized alt-azimuth mount for telescopes, enabling precise tracking and automated pointing to celestial objects, as well as offering features for terrestrial panorama and timelapse photography.
At its core, the VIRTUOSO GTi Mount functions as a stable and motorized platform for various telescope optical tubes. It is equipped with auxiliary encoders on both the azimuth and altitude axes, allowing it to maintain an accurate record of its current position even when the clutches are unlocked and the mount is manually rotated. This "Freedom Find"™ function is a key feature, ensuring that users can manually adjust the telescope's position without losing its alignment status. When the user wishes to resume motorized operation with the SynScan hand control or App, no re-alignment is necessary, only re-locking the clutches. This feature can be enabled or disabled via the SynScan hand controller or App; disabling it is recommended for optimal pointing accuracy if manual rotation after alignment is not required.
The mount supports astronomical observation through integration with a SynScan hand control or a mobile device running the free "SynScan" App (available on App Store for iOS and Google Play for Android). This allows for automated slewing to celestial targets and tracking their movement across the sky. For terrestrial photography, the mount can be paired with a camera to facilitate panorama and timelapse photography, utilizing a dedicated "SynScan Photo" app.
Powering the VIRTUOSO GTi Mount can be achieved either through an external power source (DC 7.5V to 14V, barrel type, central positive, at least 750mA) or via an internal battery compartment designed for 8x AA batteries. An ON/OFF switch controls the power to both the mount and any connected hand controller. A Power LED indicates the mount's operational status, including internal Wi-Fi activity and firmware update mode.
The mount features a SNAP port, a stereo jack outlet, which connects to a camera's shutter control port. This allows the SynScan hand control or App to automatically trigger the camera for taking pictures. The SNAP port provides two trigger signals, accommodating cameras that require both a shutter-release and a "Focus" signal.
Setting up the VIRTUOSO GTi Mount involves installing the telescope optical tube onto the saddle. This process requires loosening the altitude clutch wheel to orient the dovetail groove horizontally, then loosening the dovetail locking knob. The telescope's dovetail bar is then slid into the saddle's groove and secured by tightening the locking knob. Proper balance in the altitude axis is achieved by adjusting the dovetail bar's position while the altitude clutch is fully loosened.
Manual rotation of the mount is facilitated by loosening the Alt clutch wheel for vertical movement and the Azimuth adjustment knob for horizontal movement. For motor-driven applications, clutches should be fully tightened for best pointing accuracy. For manual pointing while preventing free movement, clutches can be half-engaged. Fully loosening the clutches allows for quick manual repositioning.
Control of the mount can be established in several ways:
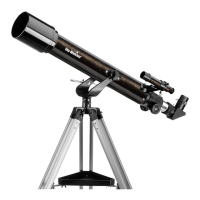
The manual also details the assembly of different telescope types (Reflector and Maksutov) with their respective finderscopes/red dot finders and eyepieces. For reflectors, the red dot finder bracket slides into a rectangular slot and is secured with a screw. Eyepiece insertion for Maksutov telescopes involves loosening a thumbscrew, inserting a diagonal, loosening its thumbscrews, and then inserting the eyepiece. For reflectors, thumbscrews are unscrewed to remove a plastic end-cap, then the eyepiece is inserted and secured.
Operating the telescope involves using the Red Dot Finder for aiming. This zero-magnification tool projects a red dot onto the night sky. It features variable brightness control, azimuth, and altitude adjustment controls. Before use, the Red Dot Finder must be aligned with the main telescope by positioning a bright object in the center of the eyepiece's field of view, then adjusting the finder's controls until the red dot overlaps the object. Focusing the telescope is achieved by slowly turning the focus knobs until the image in the eyepiece is sharp. Refocusing may be necessary over time due to temperature changes or when changing eyepieces. Choosing the appropriate eyepiece depends on the desired magnification, with lower magnifications recommended for initial object acquisition due to wider fields of view.
Proper care for the telescope includes collimation, the process of aligning the mirrors to ensure properly focused light reaches the eyepiece. This is checked by observing out-of-focus star images; symmetrical diffraction rings around the central Airy disc indicate correct alignment. If not, collimation is needed. A collimation cap, a plastic cap with a small hole, is used for this process.
Collimation involves two main steps:
Cleaning the telescope involves replacing the dust cap over the end of the telescope when not in use to prevent dust accumulation. Cleaning optical surfaces, especially mirrors or lenses, should only be done by those familiar with the process, using special lens paper for eyepieces. Optical surfaces should be handled with care and avoided from touching.
The manual also provides guidance on observing conditions, such as selecting an observing site away from city lights and pollution, choosing the best time to observe (e.g., when objects cross the meridian), cooling the telescope to ambient air temperature to minimize heatwave distortion, and adapting eyes to darkness by avoiding bright light exposure for 30 minutes prior to observing.
| Type | Reflector |
|---|---|
| Focal Ratio | f/5 |
| Mount Type | Alt-Azimuth |
| GoTo System | Yes |
| App Control | Yes |
| Wireless Connectivity | Wi-Fi |
| Motor Drive | Yes |
| Tracking Rates | Sidereal, Lunar, Solar |
| GPS | No |
| App Control Software | SynScan App |
| Payload Capacity | 5 kg |
| Power Supply | 12V DC |
| Tripod | Aluminum |