EasyManua.ls Logo

Skytech 1001 T/LCD-A User Manual

Skytech 1001 T/LCD-A
5 pages
To Next Page IconTo Next Page
Page #1 background imageLoading...
Page #1 background image
INSTALLATION AND OPERATING INSTRUCTIONS
IF YOU CANNOT READ OR UNDERSTAND THESE INSTALLATION
INSTRUCTIONS DO NOT ATTEMPT TO INSTALL OR OPERATE
INTRODUCTION
This remote control system was developed to provide a safe, reliable and user-friendly remote control system for gas heating appli-
ances.
TRANSMITTER
ON
TIMER
OFF
BUTTON
WALL CLIP
SLOT
FRONT BACK
OFF
SET
ON
BUTTON
TIMER
BUTTON
SET
BUTTON
ROOM
TEMP
BATTERY
COMPARTMENT
KEY SETTINGS
1. ON - - -
2. OFF - -
3. TIMER
4. SET - -
Turns appliance on.
Turns appliance off.
Changes unit from manual mode to timer mode.
Adjusts timer setting.
ON
TIMER
OFF
SET
1
2
3
4
LCD - LIQUID CRYSTAL DISPLAY
1. Display - - - - - - - - - -
2. Fahrenheit or Celsius
3. Flame - - - - - - - - - - -
4. Room - - - - - - - - - - -
5. Temperature - - - - - -
6. Set - - - - - - - - - - - - -
Indicates current room temperature.
Indicates degrees Fahrenheit or Celsius.
Indicates appliance is on.
Indicates remote is in thermo mode.
Appears during manual operation.
Appears when adjusting the desired timer setting.
TEMP
ROOM
SETTING ºFAHRENHEIT / ºCELSIUS SCALE
The factory setting for temperature is ºF. To change the displayed
temperature scale, press the ON and OFF keys at the same time.
Follow this same procedure to return to ºF.
TEMP
ROOM
TEMP
ROOM
MANUAL FUNCTION
ON OPERATION:
Press the ON key to turn the
appliance on. (The ame icon will
appear on the LCD screen).
OFF OPERATION
:
Press the OFF key to turn the
appliance off. (The ame icon will
disappear from the LCD screen).
Press the ON button to start the
appliance.
Press the TIMER button. The
LCD screen will show the word
set.
Press the SET button until the
desired time is reached (15min
- 180min in 15 minute incre-
ments). The max setting time is
3 hours.
NOTE: The LCD display will
ash the set time for 6 sec-
onds, then start the countdown.
Press the OFF button to turn off
the timer, and the appliance.
TIMER FUNCTION
SET
ON MODE
OFF MODE
SET MODE
COUNT DOWN MODE
REV 4/15/11 Page 1
The transmitter operates on (2) 1.5V AAA batteries. It is recommended that ALKALINE
batteries always be used for this product. Be sure the batteries are installed with the (+)
and (-) ends facing the correct direction, and are fully charged.
Skytech 1001T/LCD-A
Model: 1001 T/LCD-A
Toll-Free 1-866-667-8454
NorthlineExpress.com
www.NorthlineExpress.com
Toll-Free 1-866-667-8454
NorthlineExpress.com
www.NorthlineExpress.com
Question and Answer IconNeed help?

Do you have a question about the Skytech 1001 T/LCD-A and is the answer not in the manual?

Skytech 1001 T/LCD-A Specifications

General IconGeneral
BrandSkytech
Model1001 T/LCD-A
CategoryRemote Control
Battery TypeAAA
Number of Batteries2
TypeHandheld remote

Summary

Transmitter Operation and Display

Key Settings Explained

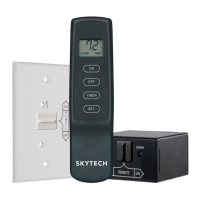
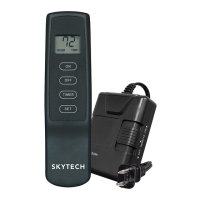
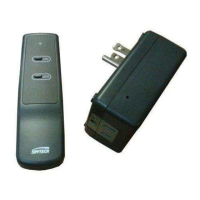
Explains the functions of the ON, OFF, TIMER, and SET buttons on the transmitter.

LCD Display Overview

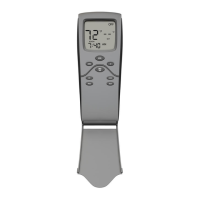
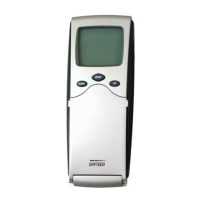
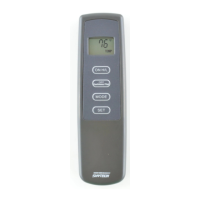
Details the various indicators and symbols shown on the Liquid Crystal Display screen.

Temperature Scale Setting

Instructions on how to change the displayed temperature unit from Fahrenheit to Celsius and vice versa.

Manual Operation Modes

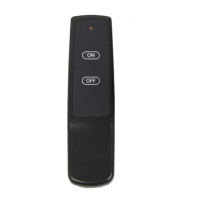
How to operate the appliance manually using the ON and OFF buttons.

Timer Operation Modes

How to set and use the timer function for appliance operation.

Receiver Functionality and Installation

Temperature Updating Feature

Explains how the transmitter updates room temperature readings to the LCD screen every 2 minutes.

Receiver Mode Selection

Describes the function of the 3-position slide switch on the receiver for ON, REMOTE, and OFF modes.

Installation Warnings

General warnings regarding installation, modifications, and potential hazards of the remote control system.

Remote Receiver Wall Mounting

Instructions for mounting the receiver in a wall switch box using the provided cover plate.

Wiring and System Checks

Hearth Mount Installation

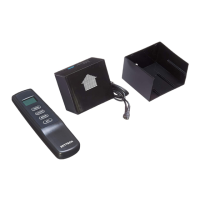
Instructions for placing the receiver on or under the fireplace hearth.

Wiring Millivolt Systems

Wiring diagram and instructions for connecting the remote receiver to millivolt gas valves.

Millivolt System Verification

Steps to verify the millivolt system operation after wiring, checking pilot and main flame.

Wiring Electronic Ignition Systems

Wiring diagram and instructions for connecting the remote receiver to electronic spark ignition systems.

Electronic System Verification

Steps to verify the electronic spark system operation, checking spark and flame ignition.

Childproof (CP) Feature

How to activate and deactivate the childproof feature that locks transmitter operations.

Transmitter Pairing, Maintenance, and Troubleshooting

Learning Transmitter to Receiver

How to pair a transmitter with the receiver using the LEARN button and security codes.

Communication Safety Feature

Explains the safety feature monitoring transmitter-receiver communication range and signals.

Transmitter Wall Clip Mounting

Instructions for mounting the transmitter on a wall using the provided clip.

Battery Life and Replacement

Information on battery life expectancy and when to replace batteries in the transmitter and receiver.

Troubleshooting Guide

Common issues and steps to resolve them for the remote control system.

FCC Requirements

Standard FCC compliance notice regarding interference and unauthorized modifications.

Warranty and Service Information

Obtaining Warranty Service

Steps to follow for warranty claims, including required information and contact details for Skytech II.

Related product manuals