Do you have a question about the Skytech 5301P and is the answer not in the manual?
Detailed instructions for mounting the remote receiver in a standard plastic switch box.
Guidance on placing the remote receiver on or near the fireplace hearth.
Covers wiring for millivolt and electronic ignition systems, including setup checks.
Procedure to pair the transmitter's security code with the receiver.
How to use the thermostat mode to control room temperature automatically.
Step-by-step instructions for customizing weekday and weekend program schedules.
The Skytech 5301P is a remote control system designed for gas heating appliances, offering a blend of safety, reliability, and user-friendly operation. This system allows users to control their fireplace or other gas heating appliance either thermostatically, manually, or through a built-in factory program. The factory program is a key feature, offering two distinct segments: one for weekdays and another for weekends, each with preset time periods for operation. For those who prefer a personalized schedule, the system also supports custom programming after an initial setup.
Operating on radio frequencies (RF), the 5301P communicates within a 20-foot range using non-directional signals. Each system is equipped with one of 1,048,576 security codes, pre-programmed into the transmitter at the factory. For initial use, the remote receiver's code must be matched to that of the transmitter to ensure secure and proper operation.
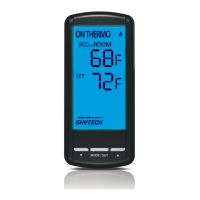
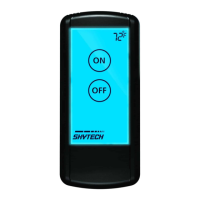
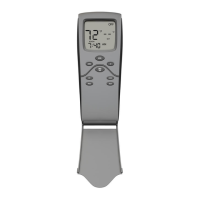
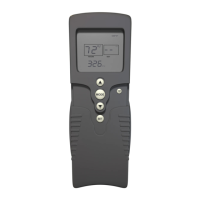
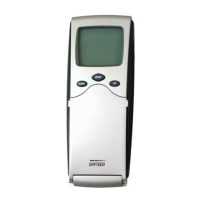
The transmitter, the handheld component of the system, is powered by four AAA 1.5V alkaline batteries. It's crucial to install these batteries with the correct polarity to ensure proper function. If the LCD screen doesn't illuminate or a low battery signal appears upon startup, users should check the battery position and charge. The transmitter features a touchscreen interface with several key settings: "MODE" to switch between On, Thermo, and Off; "PROGRAM" to activate or deactivate the program function; "SET" to confirm settings; and "UP" and "DOWN" buttons for adjusting time, set temperature, and programming functions. The LCD display provides comprehensive information, including a battery icon for low power indication, current room temperature ("ROOM"), desired set temperature ("SET"), Fahrenheit/Celsius indicator, a flame icon to show burner/valve operation, the current mode, time and program time settings, a lock icon for childproof lockout, program on/off indicators, and the day of the week.
The basic transmitter functions include a backlight that illuminates for 5 seconds when any part of the screen is touched. The "MODE" function allows users to select between manual ON (where the flame icon appears), Thermostatic mode (THERMO), or OFF (where the flame icon disappears). The temperature scale can be toggled between Fahrenheit and Celsius by simultaneously pressing and holding the "UP" and "DOWN" touch buttons. When changing scales, the set temperature defaults to the lowest setting (45°F or 6°C).
Setting the clock is straightforward: press and hold the "SET" button for 5 seconds until the hour section flashes. Use the "UP" and "DOWN" buttons to select the hour, then press "SET." Repeat this process for minutes, AM/PM, and the day of the week. Once all are set, pressing "SET" again accepts the time.
Installation of the remote receiver is flexible. It can be wall-mounted in a standard plastic switch box (not metal) or placed on or near the fireplace hearth. Wall mounting is recommended to protect the electronic components from heat. The receiver should be kept away from temperatures exceeding 130°F, as high temperatures can significantly shorten battery life. Before installation, the receiver's slide switch must be in the "OFF" position, and moved to "REMOTE" after installation. For wall mounting, longer 18-gauge (AWG) wires, no longer than 20 feet and without splices, are required to connect to the gas valve or electronic module. The cover plate attaches by aligning the lower tab with the receiver's groove, snapping it into place, and then installing the receiver into the switch box with the provided screws.
Wiring instructions vary based on the type of gas valve. For millivolt valves, one wire from the remote receiver connects to the TH terminal on the gas valve, and the other to the TH/TP terminal. For electronic spark ignitions, the remote control receiver connects in series to a 24VAC transformer to the TR terminal on the electronic module. The hot wire from the 24VAC transformer goes to one receiver terminal, and another wire connects the other receiver terminal to the TH (thermostat) terminal on the electronic module.
System checks are essential after wiring. For millivolt systems, ensure the pilot flame is lit. Sliding the receiver's 3-position button to "ON" should ignite the main flame. Moving it to "OFF" should extinguish the main flame (pilot remains ON). Sliding to "REMOTE" and pressing "ON" on the transmitter should ignite the main flame. For electronic spark systems, sliding the receiver's button to "ON" should initiate sparking to ignite the pilot, followed by the main flame. Moving to "OFF" should extinguish both pilot and main flames. In "REMOTE" mode, pressing "ON" on the transmitter should again initiate sparking and ignition.
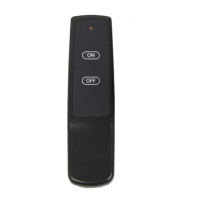
The receiver itself is powered by four AA-size alkaline batteries, installed with correct polarity. It features a 3-position slide switch for "ON," "REMOTE," and "OFF" modes. "ON" manually activates the appliance, "REMOTE" allows control via the handheld transmitter, and "OFF" disables the receiver. It's recommended to set the switch to "OFF" when away from home for extended periods.
Learning the transmitter to the receiver is a crucial step. Each transmitter has a unique security code. To accept this code, the receiver's slide switch must be in the "REMOTE" position. The "LEARN" button, located inside a small hole on the receiver's front face, is pressed gently with a small screwdriver or paperclip. After a "beep" from the receiver, pressing and releasing the transmitter's "MODE" button will cause the receiver to emit several beeps, confirming the code has been accepted.
The thermostat function allows the system to be thermostatically controlled when the transmitter is in "THERMO" mode. The desired room temperature is set using the "UP" or "DOWN" touch buttons, with a maximum setting of 99°F (32°C). The system operates with a "swing" or temperature differential feature, turning the appliance on or off when the room temperature varies by 2°F (1°C) from the set temperature, which helps cushion the frequency of on/off cycles. In "THERMO" mode, the transmitter reads the room temperature every 2 minutes and sends a signal to the receiver if it differs from the set temperature.
The program function includes two default segments: P1 and P2, for weekdays and weekends respectively. To enter program mode, press the "PROG" button or touch the "PROGRAM" portion of the touchscreen; "PROGRAM" will appear on the display. The factory presets for weekdays are P1 ON at 5:00 AM (72°F), P1 OFF at 9:00 AM, P2 ON at 4:00 PM (72°F), and P2 OFF at 10:00 PM. For weekends, P1 ON is 6:00 AM (72°F), P1 OFF is 10:00 AM, P2 ON is 5:00 PM (72°F), and P2 OFF is 10:00 PM. Users can override the program function by switching to manual ON mode. To turn the program function OFF, press the "PROG" button or touch the "PROGRAM" portion of the touchscreen, which will make "PROGRAM" disappear from the LCD.
Editing program settings involves pressing and holding the "PROG" button or touching the "Program" section of the touchscreen for 5 seconds until the program section flashes. Users can then select the desired ON/OFF times and set temperatures for P1 and P2 for both weekend and weekday segments using the "UP," "DOWN," and "SET" buttons. P1 can only be set from 12:00 AM to 12:00 PM, and P2 from 12:00 PM to 12:00 AM.
The temperature swing (differential) can also be adjusted. The factory preset is 2°F (1°C). To change it, press "SET" and "DOWN" simultaneously to display the current swing setting, indicated by an "S" in the room temp frame. Use "UP" or "DOWN" to adjust the swing (1°-3°F or 1°-2°C), then press "SET" to store the new setting.
A communication safety (C/S - TX) function is built into the software. The transmitter sends an RF signal every 15 minutes to the receiver, confirming it's within the normal 20-foot operating range. If the receiver doesn't receive a signal for 15 minutes, it initiates a 2-hour countdown. If no signal is received within this period, the receiver shuts down the appliance, emits rapid "beeps" for 10 seconds, then a single "beep" every 4 seconds until a transmitter "MODE" button is pressed to reset it.
A childproof "LOCK-OUT" (CP) feature is also included. To activate it, press and hold the "UP" touch button and "SET" button together for 5 seconds; a lock icon will appear on the LCD. To disengage, repeat the process. When in "LOCK-OUT" mode, programmed functions continue uninterrupted, but manual functions are prevented.
A thermo safety feature protects against overheating. If the receiver reaches 130°F, it automatically shuts down and beeps 4 times every 2 seconds. Once the temperature drops between 120°F and 130°F, the appliance can be reactivated by pressing the "MODE" key, but the beeping continues until temperatures fall below 120°F, indicating the receiver needs to be relocated.
For maintenance, battery life is approximately 12 months for alkaline batteries in both the transmitter and receiver. Batteries should be checked and replaced annually, or if the operating range is reduced, transmissions are not received, or if the receiver or transmitter batteries measure less than 5.3 volts. Troubleshooting involves ensuring correct battery installation and charge, checking metal contacts for tightness, maintaining the 20-25 foot operating range, keeping the receiver away from high temperatures, and confirming proper communication between the transmitter and receiver.
| Brand | Skytech |
|---|---|
| Model | 5301P |
| Category | Remote Control |
| Power Source | Battery |
| Color | Black |
| Compatible Devices | Fireplaces |
| Control Method | Remote |
| Battery | 2 x AAA batteries |