EasyManua.ls Logo

SkyZone SKY04O - User Manual

Default Icon
8 pages
Print Icon
To Next Page IconTo Next Page
Loading...
SKY04O PRO/04X PRO
FPV Goggle USER MANUAL
2024.01
V1.5
Question and Answer IconNeed help?

Do you have a question about the SkyZone SKY04O and is the answer not in the manual?

Summary

Introduction to SKY04 Series

Quick Start Guide and Basic Settings

Band;Channel;Receiver Mode Setting

Configure receiver band, channel, and operating mode for optimal signal reception.

Volume Setting

Adjust audio volume levels for earbuds, independent of AV OUT.

Drone Finder Mode

Activate a buzzer that signals proximity based on RSSI strength.

Advanced Modes and Features

Mode Menu Options

Explore RF modes, AVIN, HDMI IN, and Playback options.

Head Tracking Setup

Configure and initialize the head tracking gyro for immersive control.

Image and DVR Settings

Adjust image parameters and configure DVR recording functions.

Display and System Configuration

Display Settings

Customize OSD, RSSI display, luminance, and sleep mode.

System Menu Functions

Configure power, voltage, language, fan, factory reset, and firmware.

Firmware Update Procedures

Goggles Firmware Update

Update goggle firmware via USB connection to a computer.

DVR and Receiver Firmware Update

Update DVR and receiver modules using an SD card or USB.

Overview

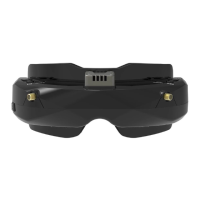
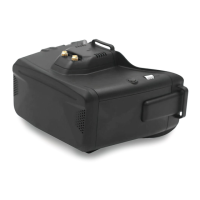
The SKY04O PRO/04X PRO FPV Goggle is a sophisticated and feature-rich device designed to provide an immersive and high-quality first-person view experience for drone pilots. As the first Skyzone goggle with focus adjustment, it aims to deliver vivid colors, high contrast ratios, and exceptional detail, enhancing the racing experience for users. The device incorporates a Steadyview receiver, which merges two signals into one, effectively eliminating image tearing and rolling, thereby ensuring a more stable and clearer image even in challenging flight conditions. This advanced optical design, coupled with a wide field of view, contributes to a more immersive FPV experience.

The goggle features a new operating system that supports 10 languages, making it accessible to a broader user base. The intuitive menu system, combined with a shuttle wheel and a new user interface, allows pilots to adjust all settings without needing to remove the goggle, streamlining the in-flight experience.

Usage Features:

Quick Start Guide:

To begin, users need to install the antenna and faceplate. Power is supplied by connecting a 2-6 cell LiPo battery using the provided power cables, and the device is turned on by holding the power button. Focus adjustment is achieved by moving the focus adjustment wheel; users should close one eye to adjust the focus, using the OSD menu as a template for clarity, then repeat the process for the other eye. IPD (Interpupillary Distance) adjustment involves moving the IPD slider until a single, clear image is achieved without double vision.

Band/Channel/Receiver Mode Setting:

The right wheel is central to RF settings. A short press allows users to change channels by rolling the wheel. Pressing the wheel again switches to Band setting mode, where rolling the wheel changes the band. Another press allows selection between Diversity or Mix mode. If there's no wheel operation for 3 seconds, the RF setting mode automatically exits. To initiate an auto-search, users can hold the right wheel. Once the search is complete, the receiver will lock onto the strongest signal. The right wheel can then be rolled to manually select channels, and holding it again exits the search function. It's important to note that auto-search may not always be perfectly accurate, and manual channel selection might be necessary.

Receiver Modes:

The goggle offers several receiver modes to optimize video quality:

  • MIX1: This mode provides basic signal fusion processing to minimize circuit interference on the picture.
  • MIX2: Designed to improve synchronization stability, especially under weak signal conditions, maximizing synchronization and video lock.
  • MIX3: Builds upon MIX2 by enhancing the synchronization signal, further maximizing video image stability and compatibility with other display devices. However, this mode may reduce the brightness of the video signal.
  • DIV (Diversity): In this mode, fusion processing is turned off, and the receiver operates in a traditional diversity receiving mode. It selects the audio and video signal output corresponding to the channel with the highest RSSI intensity.

Volume Setting:

In all preview modes, the left wheel can be rolled to adjust the volume. This setting is only effective for earbuds and does not affect AV OUT volume. The system does not save volume settings, to prevent excessively high volume in AVIN or RF modes upon startup.

Drone Finder Mode:

To use the drone finder function, a patch antenna should be installed on the RX. Long-pressing the left wheel enables this feature (long-pressing again disables it). The buzzer frequency will synchronize with the RSSI, meaning a stronger RSSI will result in a more rapid buzzer sound, helping to locate a lost drone.

MODE MENU:

A short press of the left wheel brings up the mode menu.

  • RF Normal: Standard 48-channel receive mode.
  • RF Racing: Restricts the receiver to RaceBand channels.
  • RF Third-Party: In this mode, the goggle buttons cannot control external receivers, and the goggle's OSD cannot read the receiver's band/channel.
  • AVIN (Audio/Video In): When enabled, the NTSC and PAL system formats are automatically switched. The receiver module is automatically turned off to save power.
  • HDMI IN: The receiver module and video recording module are automatically turned off to save power.
  • Playback: Allows users to review DVR files.

PLAYBACK:

In playback mode, rolling the right wheel selects DVR files. A short press plays or pauses the selected file. The left wheel adjusts volume. While playing, rolling the right wheel allows for fast-forwarding or fast-backwarding. Pressing the right button exits DVR playback, and pressing the left button deletes the current DVR file.

Head Tracking:

The head tracking button is located on the right side of the goggles. The gyro requires an initialization period; upon power-on, the goggles must be kept horizontal and stable until a "beep" sound indicates initialization is complete. Holding the HT button resets the PPM signal to the center, accompanied by a beep. Disabling the Headtracker can reduce goggle boot time by saving gyro initialization time.

Image Settings:

The image setting menu offers "standard," "bright," "vivid," "soft," and three customizable profiles. Users can adjust brightness, contrast, saturation, hue, and sharpness to suit different environments. The four pre-set files do not allow image setting changes.

DVR (Digital Video Recorder):

The left button serves as both the record and stop button. The built-in DVR uses H264 encoding and supports SD cards up to 128GB (Class10 recommended). SD cards must be formatted to FAT32, which can be done via the system menu. Video recording works in both RF Mode and AV IN Mode. By default, sound recording is enabled, but it can be turned off in the system menu to record only video signals.

  • Automatic Recording: When enabled, recording automatically activates upon detection of a video signal and stops 30 seconds after the signal is lost. If the signal returns, recording resumes.
  • Follow Recording: Pressing the REC button manually starts recording. It stops 30 seconds after signal loss but resumes if the signal returns. Pressing REC again manually stops recording to save SD card space.
  • Cyclic Recording: Overwrites older recordings to manage storage space.
  • Video File Length: Video files are automatically divided into multiple files. The length can be set in the menu to 5, 10, 20, or 30 minutes (default is 30 minutes per file).
  • Repair Function: If power is suddenly disconnected during recording, the DVR file may be damaged. The goggles have a repair function that automatically checks and repairs the last DVR file upon entering Playback mode.

Display Settings:

The display setting menu allows customization of the top bar OSD (On-Screen Display) time, with options to disable OSD timeout or keep it always on. Users can configure the RSSI icon (Icon + percentage, Icon only, Percentage only, or Disable) and adjust its vertical position. The luminance of the LCOS screen can be adjusted in 8 stages (default is 5), though it's generally not recommended to set brightness too high unless the image is dim.

  • Sleep Mode: To prevent screen burn-in, the goggles feature a sleep mode, configurable to 1, 3, or 5 minutes (default is 3 minutes). When enabled, the goggles detect movement via the headtracker gyro. If the goggles remain still for the preset time, a buzzer will sound, and after 10 seconds, the goggles will enter sleep mode, turning off the screen. Moving the goggles will exit sleep mode.
  • Aspect Ratio: Users can change the aspect ratio (4:3 or 16:9), with 4:3 as the default. A small FOV mode is also available, which cuts the image at the screen edges.
  • When sleep mode is triggered, other goggle functions (receiver, DVR, etc.) continue to operate. To exit sleep mode, simply move the goggles when the beep is heard.

SYSTEM MENU:

  • Power Supply: Users select the battery type (2S-6S) to ensure accurate battery capacity display.
  • Voltage Calibration: Provides a ±0.9V range for voltage adjustment. Users should use a multimeter to measure the loaded battery voltage and then use the shuttle wheel to calibrate the goggle's voltage reading.
  • RSSI Calibration: To calibrate RSSI, users must remove the antenna, turn off the VTX, and then select "yes." The goggle will beep when calibration is complete.
  • System Language: Options include English, French, German, Russian, Italian, Portuguese, Spanish, Chinese, Japanese, and Korean.
  • Fan Control: The built-in fan serves both for defogging and heat dissipation. Its speed can be set in the system menu. Pressing the POWER button starts or stops the fan.
  • Factory Reset: Resets all functions and settings to their default values.
  • DVR FW Upgrade: Allows upgrading DVR firmware from an SD card.
  • Firmware Version: Displays the Goggles Firmware, DVR Firmware version, and Serial Number.
  • Rotary Switch: The function of the wheels and buttons can be swapped from left to right, adapting the device for left-handed users. When enabled, all manual instructions regarding left/right controls are reversed.

Maintenance Features:

Firmware Update:

The goggles have different hardware versions due to global chip shortages. Before flashing firmware, users must check their hardware version in the system menu.

  • V1 (Original): Firmware starts with V1.3.9.
  • V2 (60FPS DVR): If a user purchased the 60FPS DVR kit, V1 goggles will be upgraded to V2, requiring V2 firmware (starts with V2.3.9).
  • V3 (New MCU): Due to a new MCU from chip shortage, performance is the same as V2, but requires V3 firmware (starts with V3.3.9).

Goggles Firmware Update:

  1. Connect the goggles to a computer.
  2. Hold the left wheel while turning on the goggles. The USB cable will power the goggles. Release the left wheel. The computer will automatically install the driver and show a new removable storage device.
  3. Copy the Firmware (A/B) File to the storage. The goggles will install the update simultaneously.

DVR Firmware Update:

  1. Take an SD card and format it to FAT32.
  2. Copy the DVR Firmware to the SD card, then insert it into the goggles and turn them on.
  3. Go to the system menu and select "DVR FM upgrade."

Receiver Firmware Update:

  1. Remove the receiver module.
  2. Hold the boot button on the receiver while connecting it to the computer.
  3. The computer will automatically install the driver and show a new removable storage device.
  4. Copy the Firmware File to the folder (not the SD card). The goggles will install the update simultaneously. Once copying is complete, the firmware upgrade is done.

Important Note:

Users are explicitly warned not to expose the goggle lenses directly to sunlight, as this will cause the screen to burn in.

The content of this manual is subject to change, and users are advised to download the latest version from www.skyzonefpv.com for the most up-to-date information.

SkyZone SKY04O Specifications

General IconGeneral
Display TypeOLED
Field of View42 degrees
Aspect Ratio16:9
DVRYes
Head TrackerYes
Refresh Rate60Hz
Lens TypeAspherical
Battery Life2 hours
ReceiverBuilt-in 5.8G receiver
ConnectivityHDMI, AV

Related product manuals