9
ZCT9080CE Rev. A (04/21)
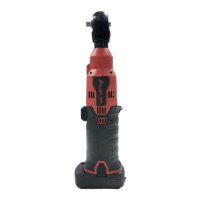
Using the Speed Selector
The speed selector button is used to control the anvil
speed, impact speed, and torque output.
Figure 2: Speed Selector
The speed settings can be set independently for CCW
(reverse) and CW (forward). This feature can be used to
remove fasteners with full speed and reinstall them with
improved control at a lower speed.
1. Pull and release trigger to activate tool. The current
speed selection will be shown according to the speed
selector chart shown below.
2. Push the speed selector to cycle through the three (3)
speed modes. When the desired speed setting is lit,
begin work.
SPEED
SETTING
SPEED
SELECTION
DISPLAY
SPEED IPM
TORQUE
% *
1
0-395 0-560 0-25%
2
0-780 0-1150 0-50%
3
0-1570 0-2300 0-100%
* Effect on torque % obtained using a 1-1/4” hex bolt.
Always use a torque wrench to verify torque.
LIGHT COLOR DIRECTION
Green CCW (reverse)
Red CW (forward)
Forward/Reverse Switch
The forward/reverse switch determines the rotating
direction of the anvil, either clockwise or
counterclockwise.
A
Figure 3: Forward/Reverse Switch
A – Depress switch for reverse or
counterclockwise rotation.
B – Release switch for forward or clockwise
rotation.
To change the direction of anvil rotation:
1. Be sure the impact wrench is stopped and not
operating.
2. The position of the forward/reverse switch
determines the direction of the anvil rotation. Switch
positions, when tool is positioned as above, are:
— Forward (B), the anvil rotates clockwise,
— Reverse (A), the anvil rotates counterclockwise.
3. The switch must be in either the forward or the
reverse position to operate. Center position locks the
switch off.
Trigger
Depress the trigger to rotate the anvil. The lever must be
in a forward or reverse position to operate. The trigger
can be locked in the OFF position. Locking the trigger in
the OFF position helps to reduce the possibility of
accidental starting the impact wrench when not in use.
Place the lever in the center position to lock the trigger.
Lock the trigger when not in use.
Overloading
If the tool is overloaded for any reason that causes
excessive heating of switch or battery, the internal
electronics will cause the tool to stop working. This is a
safety feature that will help to prevent overheating of the
tool. Release the trigger to resume operation.
— Battery over temperature – indicated by all four
LED lights flashing on the battery. This means
the internal temperature of the battery is too
high, and it will stop operation to prolong battery