13
ADVANCED SETTING cont'd
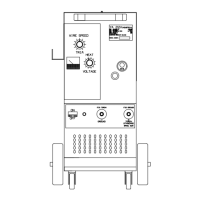
knob
B
and press it for less than 2 seconds. The
display screen
A
shows the adjustment bar. The
gure can be changed and conrmed by pressing the
knob
B
for less than 2 seconds.
• AUTO burnback
The adjustment can vary from -9.9 to +9.9. Its purpose
is to adjust the length of the wire coming out of the gas
nozzle after welding. A positive gure corresponds to
greater wire burning.
Default is Auto (preset function). To access this
function, simply highlight it using the knob
B
and
press it for less than 2 seconds. The display screen
A
shows the adjustment bar. The gure can be changed
and conrmed by pressing the knob
B
for less than
2 seconds.
• Soft Start AUTO
Adjustment can vary from 0 to 100%. This is the wire
speed expressed in percentage of the speed set
for welding, before the wire touches the piece to be
welded.
This adjustment is important to always obtain good
starts.
Default is Auto (preset function).
To access this function, simply highlight it using the
knob
B
and press it for less than 2 seconds. The
display screen
A
shows the adjustment bar. The
gure can be changed and conrmed by pressing the
knob
B
for less than 2 seconds.
• Pre Gas
The adjustment can vary from 0 to 10 seconds.
To access this function, simply highlight it using the
knob
B
and press it for less than 2 seconds. The
display screen
A
shows the adjustment bar. The
gure can be changed and conrmed by pressing the
knob
B
for less than 2 seconds.
• Post Gas
The adjustment can vary from 0 to 25 seconds.
To access this function, simply highlight it using the
knob
B
and press it for less than 2 seconds. The
display screen
A
shows the adjustment bar. The
gure can be changed and conrmed by pressing the
knob
B
for less than 2 seconds.
• LCD Contrast
The adjustment may range from 0 to 100%
This function can be used to increase or decrease the
brightness of display screen
A
.
To access this function, simply highlight it using the knob
B
and press it for less than 2 seconds. The display
screen
A
shows the adjustment bar. The gure can be
changed and conrmed by pressing the knob
B
for less
than 2 seconds.
• Factory OFF
The purpose is to return the welding machine to the
original default settings.
To a cces s the f unct io n, sim pl y h ig hl ight i t u si ng the k nob
B
. By pressing this for less than 2 seconds, the display
screen
A
shows the words OFF and ALL. By highlighting
the word ALL and briey pressing the knob
B
reset is
made and the display screen
A shows Factory Done!!
This indicates the reset has been successful. To return to
the previous display page, simply press the knob
B
for
more than 2 seconds.
 Loading...