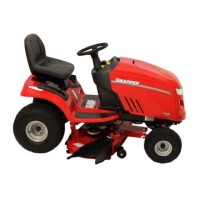
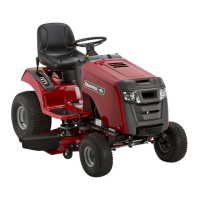
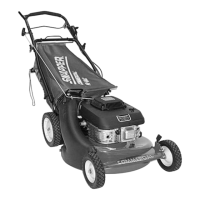
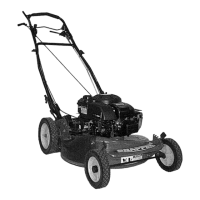
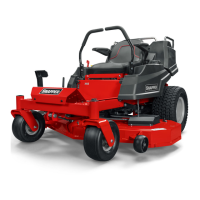
This document is an operator's manual for Snapper Series 11 Rear Engine Riding Mowers, equipped with an automatic blade stop and smooth start clutch. The manual covers various models, including 250811BE, 281011BE, 2811511BE, 301011BE, 3011511BE, 301411KVE, 3312511BE, 331411KVE, R250811BE, R281011BE, and R3312511BE. The model designation indicates the width of cut (first two digits), horsepower rating (next two or three digits), engine type (B for Briggs & Stratton, K for Kohler, V for overhead valves), and start type (E for Electric Start). Models with an "R" prefix are recycling mowers.
The primary function of these devices is to mow grass using a rotating blade. The automatic blade stop feature ensures the blade stops in less than 3 seconds after the blade pedals are released, enhancing safety. The smooth start clutch provides a gradual engagement of the blade, preventing abrupt movements and reducing wear on components.
Important Safety Instructions:
The manual emphasizes critical safety precautions, including:
- Children and Pets: Do not allow children or pets in the yard during operation, nor allow children to ride on the mower or attachments. Only responsible teenagers with mature judgment and under adult supervision should operate the mower.
- Slopes: Do not operate on slopes exceeding 15° (27% grade). Exercise extreme caution on slopes above 10° (18% grade), turning the blade OFF when traveling uphill, avoiding mowing across slopes, reducing speed, and avoiding sharp turns or uphill starting. If stopped uphill, turn the blade off and back down slowly. Test drive terrain with the blade OFF if traction or stability is doubtful.
- Hazards: Stay alert for holes, hidden hazards, ditches, washouts, culverts, fences, and protruding objects.
- Operation: Always begin forward motion in No. 1 speed position. Use a weighted load carrier on the front when using a grass catcher on slopes above 10°.
- Personal Safety: Read and follow all manuals. Only mature, responsible persons should operate. Mount and dismount from the left side. Wear appropriate protective clothing (substantial footwear, long pants). Practice operation with the blade OFF. Do not operate under the influence of alcohol or drugs. Know how to stop the blade and engine quickly. Keep people and pets a safe distance. Ensure all shields, deflectors, switches, and safety devices are in proper position and functional.
- Area Preparation: Clear the mowing area of wire, rocks, and other objects.
- Leaving Mower: Stop the blade, shift to NEU (neutral), and set the parking brake when leaving the mower momentarily with the engine running. When leaving unattended, shut off the engine, shift to a forward speed, set the parking brake, and remove the key.
- Seating: Operate only when properly seated with feet on pads or pedals.
- Blade Safety: Keep hands and feet away from the rotating blade. Never place feet on the ground when the blade is ON or the mower is in motion. Turn the blade OFF, stop the engine, and wait for the blade to stop before attempting to unclog grass or leaves.
- Deck Position: The blade must be shifted OFF except when cutting grass. Set the deck in the highest position when mowing over rough ground.
- Discharge: The deflector or grass catcher must be in position. Never point discharge at people, passing cars, windows, or doors. Watch out for traffic.
- Reverse: Mow in reverse only after careful observation and only when absolutely necessary.
- Maintenance: Service and make adjustments only when the engine is stopped. Have the mower serviced by an authorized Snapper dealer at least once a year. Use only genuine Snapper replacement parts. Tighten all nuts, bolts, and screws frequently. Lubricate at specified intervals.
- Lighting: Mow only in daylight or good artificial light.
- Fuel Handling: Handle gasoline with care. Never remove the cap while the engine is running. Fill the tank outdoors only with the engine stopped and cool. Clean spilled gasoline. Store gasoline in an approved, well-ventilated, unoccupied building, out of reach of children.
- Ventilation: Do not run the engine indoors due to dangerous exhaust fumes (carbon monoxide).
- Engine Speed: Do not change engine governor speed settings or overspeed the engine.
- Grass Catcher: Check components frequently for wear and replace as needed.
- Pulling Loads: Exercise caution, limit loads to what can be safely controlled, and attach to the hitch plate as specified in attachment instructions.
Usage Features:
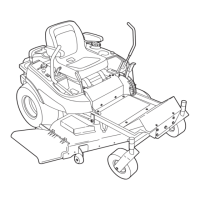
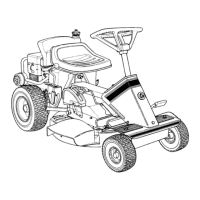
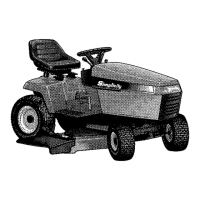
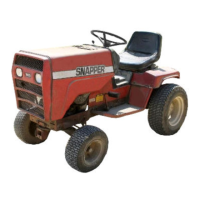
- Controls: The mower features a battery (1-C), belt cover (2-C), blade lever (3-C), blade pedals (4-C), clutch/brake pedal (5-C), cutting height lever (6-C), discharge deflector (7-C), engine control lever (8-C), front tire (9-C), fuel filler cap/valve (10-C), ignition key/switch (11-C), operator's seat (12-C), parking brake lever (13-C), rear bumper (14-C), rear tire (15-C), rope start handle (16-C), and transmission shift lever (17-C).
- Recycling Mowers: Factory-equipped with a recycling deck cover. The side discharge chute can be installed by removing the recycling deck cover, aligning the hinge halves, inserting the hinge pin, positioning the spring, and securing the pin. The chute restricts hinging action. The side discharge chute does not need to be removed when using the recycling cover or a grass catcher.
- Starting Engine:
- Shift the blade lever (3-C) to OFF and the transmission shift lever (17-C) to NEU (Neutral) to allow the engine to start.
- Open the CAP VENT/FUEL VALVE (10-C) by turning the fuel filler cap "valve" counter-clockwise. Open the shut-off valve if equipped.
- Choke: For a cold engine, move the Engine Control Lever (8-C) to CHOKE. For a warm engine, move to FAST.
- Manual Start: Turn the Ignition Key (11-C) to RUN and pull the rope Start Handle (16-C).
- Electric Start: Turn the Ignition Key (11-C) to START and hold until the engine starts.
- Engine Warm-up: After a brief period at CHOKE, move the Engine Control Lever (8-C) rearward until the engine runs smoothly. Set the lever at or near FAST for best cutting and bagging performance.
- Stopping Engine: Turn the Ignition Key (11-C) to OFF.
- Starting/Stopping Rider:
- Forward: Partially depress the CLUTCH/BRAKE pedal (5-C) for clutch action, allowing shifting. Further depression provides braking. After shifting the TRANSMISSION SHIFT lever (17-C) to #1 speed, release the pedal to move forward. Move the lever forward or rearward to shift speeds without depressing the pedal. Always depress the CLUTCH/BRAKE pedal before shifting into or out of NEUTRAL.
- Reverse: Fully depress the CLUTCH/BRAKE pedal (5-C) to stop. Move the TRANSMISSION SHIFT lever (17-C) rearward to REV, then completely release the pedal to move in reverse. Fully depress the pedal to stop in reverse.
- Smooth Start Clutch: Releasing foot pressure on the clutch pedal brings the rubber driven disc into contact with the metal drive disc. As more pressure is released, the brake lining inside the rubber disc exerts more friction against the driven disc hub, transferring rotational movement to the chain case and driving the transmission. More pressure equals better pulling power.
- Starting/Stopping Mower Blade:
- Shift the BLADE lever (3-C) forward and to the right to ON and hold. Depress the BLADE pedals (4-C) with your heel(s) to "lock" the blade into mowing. The blade will rotate whenever the engine is running.
- To stop, remove your heel(s) from the BLADE pedals. The spring-loaded BLADE lever will snap rearward to OFF. The BLADE lever can be forced OFF while pedals are depressed by pushing the lever inward and then pulling rearward.
- Mowing Hints:
- Move the ENGINE CONTROL lever to FAST. Set the TRANSMISSION SHIFT lever in a mid-range, and the CUTTING HEIGHT lever in a raised position. Experiment to adjust cutting height and forward speed.
- The engine is designed to run at "FULL THROTTLE" while cutting.
- If the ground is dry, dusty, or grass is sparse, the blade's vacuum action can create a dust storm. Do not use the mower after fertilizing with dry-type fertilizer until after a shower or sprinkling.
- Change mowing patterns to create a smoother cut lawn. Finely chopped clippings add nutrients. Avoid heavy accumulation, which can lead to matting and thatch. The Snapper Thatcherizer Kit #6-0948 can prevent thatch accumulation.
- Operator's Seat: The seat (12-C) can be moved forward or rearward by loosening two three-prong knobs (A) on the underside of the mounting bracket, moving the seat, and retightening. The offset steering wheel can be rotated 180 degrees for taller operators.
Maintenance Features:
- Pre-Start Checks:
- Blade Controls: Check that controls work freely and are adjusted properly. The BLADE lever (3-C) must "snap" from ON to OFF when BLADE pedals (4-C) are released.
- Guards, Deflectors & Covers: Ensure they are in place and securely fastened.
- Engine Oil: Check oil level at the "FULL" mark on the dipstick. Add oil if needed (refer to engine manual).
- Tires: Front tires (9-C) 20 p.s.i., rear tires (15-C) 12 p.s.i. Add air if needed.
- Exterior Surfaces: Remove dirt, grass, oil from the engine and mower deck. Keep engine air intake screens and cooling fins clean.
- Fuel: Add fuel outdoors. Tighten the FUEL FILLER CAP (10-C) after refueling.
- Service Assistance/Replacement Parts: Return the mower to an Authorized SNAPPER Dealer yearly for inspection and safety device upgrades. Mention the MODEL and SERIAL NUMBER when contacting the dealer. For engine parts/service, check the engine manufacturer's dealer.
- Standing Mower on Rear Bumper: Before standing the mower on its rear bumper (14-C):
- Tighten the FUEL FILLER CAP (10-C).
- Close (turn clockwise) the VENT VALVE on the FUEL FILLER CAP (10-C).
- Remove the BATTERY (1-C) if standing for longer than 2 hours.
- When preparing to raise the front, position both hands near the center of the front frame "lip" to prevent pinched fingers.
- Lubrication Schedule:
- Every 25 Operating Hours:
- Front Wheel Bearings: Lubricate through grease fittings (6-L) with bearing grease from a pressure gun.
- Rear Left Axle Bearing: Riders with 8 or 10 HP engines have a grease fitting (8-L). Lubricate with 2 shots of bearing grease. The rear right axle bearing is lubricated by the transmission.
- Every 6 Months:
- Cutting Height Lever (6-C): Remove the BELT COVER (2-C) from the deck and apply medium-grade cup grease to the top surface of adjusting cams and lubricate the idler arm.
- Blade Lever (3-C): Lubricate the idler arm and engagement lever at wear points with oil. Lube the arm at the pivot to the spindle housing.
- Blade Pedals (4-C): Lubricate all pivoting and sliding surfaces with oil. Reinstall the BELT COVER.
- Once a Year (Stand Mower on Rear Bumper):
- Blade Spindle: Two shots of grease through the grease fitting (2-L) between the deck and the blade.
- Differential: Remove the DIFFERENTIAL CHECK PLUG (5-L) at A. If the grease level is below the bottom edge of the hole, add SNAPPER 0 grease until it reaches the bottom edge by removing the plug at B and filling through that hole. Install new plugs. Total capacity must not exceed 2 ounces.
- Chain Case: Remove the CHAIN CASE CHECK PLUG (3-L) and add about 1 ounce of SNAPPER 0 grease if low. Avoid overfilling. Install a new plug.
- Engine Service: Change oil and clean/replace air cleaner element(s) per engine manual. Inspect the air cleaner periodically, especially in dry, dusty environments.
- Fuel Filter: The in-line filter (between the fuel tank and engine) protects against gasoline impurities. Check hose clamps for leaks. Replace the filter (SNAPPER#1-4359) before the screen clogs or if the engine is starved for fuel.
- Belt Tension Adjustment & Replacement:
- Shut off the engine, disconnect the spark plug wire, and remove the belt cover.
- With the deck in #5 height and blade ON, check the distance between the inside surfaces of the belt (1" to 1-1/2" clearance). Adjust tension by changing the "distance" between the front axle and the rear case. Remove the shoulder bolt (Y) and spacers from the main channel tab (X). Pull the front assembly FORWARD to increase tension. Remove spacers as needed and reinsert the shoulder bolt.
- To replace a frayed, cracked, or worn belt: Remove the BELT COVER, cut and remove the old belt. Close the fuel cap valve. Stand the mower on the REAR BUMPER (14-C), shift into NEUTRAL, and work the belt between discs. Shift into #5 speed and push the belt over the edge of the engine drive disc. Work the belt into the groove of the drive disc. Position the other end in pulleys on the mower deck. Loosen or remove the idler pulley, loop the belt around the spindle pulley, and work the belt between the restrictor and idler puller. Ensure the locking tab on the restrictor is engaged. Secure the idler arm nut and bolt. Ensure the belt is inside all belt guides. Check and adjust belt tension. Reinstall the BELT COVER.
- Blade Brake Adjustment:
- Adjustment is needed when the BLADE lever stops more than 1/4" behind the latch plate.
- Lower the cutting deck and remove the BELT COVER.
- Hold the BLADE lever firmly rearward, loosen the jam-nut on the eye bolt.
- Move the BLADE lever to ON, press the BLADE pedals down and hold, then turn the T-nut on the eye bolt clockwise several turns. Ensure the tab on the T-nut is positioned vertically.
- Release the BLADE pedals, allow the BLADE lever to move to OFF, then depress the pedals again. Check clearance between the forward edge of the BLADE lever and the rear edge of the latch plate (should be less than 1/4"). Repeat if needed. Hold the BLADE lever rearward and tighten the jam-nut. Reinstall the BELT COVER.
- Wheel Brake Test & Adjustment:
- Test braking action frequently. The rider should stop from FAST within approximately three feet after the CLUTCH/BRAKE pedal is fully depressed.
- Disconnect the spark plug wire before servicing.
- Stand the rider on its REAR BUMPER (14-C), engage the PARKING BRAKE (13-C), shift the TRANSMISSION SHIFT lever (17-C) to REVERSE. Check the distance between the driven disc's rubber drive ring and the surface of the drive disc (should be between 1/16" and 1/8" clearance).
- If the distance is incorrect, release the parking brake, rotate the clutch yoke to provide slack in the cable. Move one spacer (Y) through the "keyhole" slot in the top of the clutch arm (X) to the end of the cable. Re-engage the parking brake and recheck clearance.
- To adjust the brake (with parking brake ON), loosen both jam nuts (A) securing the clutch/brake cable threaded tube (B) to the chain case bracket. Screw the jam nuts up or down to change the distance the cable end is recessed inside the spring guide (tube) (between 3/16" to 7/16" from the cotter pin). Retighten both jam nuts (A).
- Clutch Adjustment:
- Adjust by repositioning the yoke lift spring. Initially, the spring is hooked through the #2 hole (second from end) in the clutch link for smooth action under normal loads. Hook the spring in #1 hole to pull heavier loads. Hook through hole #3 or #4 for smoother starts if the rider tends to "hop" or make jerky movements.
- Cutting Blade Service:
- Safety: Wear gloves.
- Inspection: Check the blade frequently for tightness and operating condition. Replace if chipped, bent, or notched. Sharpen if in good condition at a 22-28 degree angle inward about 2-1/2" from tips. Check for balance to prevent vibration. Install the blade with retaining hardware as shown in FIG. 14 and tighten to 70-80 FT. LBS. torque.
- Levelness: Check the levelness (straightness) of the blade "TIPS". Mark one (A) and the other (B). Scribe a mark on the deck at the lip. Rotate the blade and measure the distance from the tip to the marked lip. If there is a difference of more than 1/16", level the "TIPS" by loosening the two jam nuts and turning each of the two jackscrews until the "TIPS" are within 1/16" of each other. Retighten the jam nuts. If the blade tips rotate closer to one point on the deck lip, the lateral position of the spindle housing needs to be re-centered by an Authorized SNAPPER Dealer.
- Cutting Deck Service (Uneven Swath):
- Slow forward movement (lower range) and move the ENGINE CONTROL LEVER (8-C) toward FAST.
- Check belt tension.
- Check tire pressure (front 20 p.s.i., rear 12 p.s.i.).
- If uneven pattern persists, roll the rider onto a smooth, flat, level surface. Turn the ignition key (11-C) to OFF, and ensure the BLADE lever (3-C) is in OFF.
- Side to Side Level (30" & 33" decks): Raise the deck, place a triangular block under the rear (center), and lower the deck onto the block. On 33" mowers, measure the clearance between the lower outside edge of the deck and the floor (right and left sides). Difference should be 1/8" or less. To level, adjust the ECCENTRIC (on the front LEFT mower lift arm). Loosen the shoulder bolt, rotate the eccentric toward UP or DOWN, and hold in place while retightening. Remeasure.
- Rear Lift Bracket Adjustment: To reset deck height, adjust rear lift bracket at hanger cables. Raise the deck, place a block under the center rear of the deck. Lower the deck onto the block to permit slack in cables. Relocate the same number of spacers on each cable above the keyhole slot in each "arm" of the lift bracket to lower the rear of the deck. Placing an equal number of spacers below the slot raises the deck.
- HI-VAC Mowers: Measure the distance from the front and rear lower edges of the deck to the floor. The rear edge should be level with, or no more than, 3/8" lower than the front edge.
- 26" Deck Mowers: Align one blade tip to face the front of the rider and measure the distance from the tip to the floor. Rotate the blade and measure the distance (from the same tip) to the floor while the tip is facing the rear of the rider. The distance at the rear should be 1/8" to 5/8" more than the front.
- Front to Rear Adjustment: The deck pitch is pre-set. The adjusting nut "A" should be screwed in or out only by a technician. Timing rod "B" maintains levelness.
- Battery Service:
- Check fluid frequently; level should be above MIN. FILL line. Add distilled water to MAX. FILL line. Charge after adding water in freezing weather.
- The engine has a flywheel alternator for charging.
- Specific gravity should be above 1.250 (below 1.175, liquid may freeze).
- If charge is low, disconnect terminal wires and recharge with an automotive charger (slow charge 1 amp for 10 hours or fast charge 3 amp for 4 hours).
- Always disconnect the negative terminal first and reconnect it last. Keep the red boot over the positive terminal.
- Battery Storage: Recharge monthly during off-season. Remove wet cell type battery before standing the mower on end. Store in a vented area above 32 degrees Fahrenheit, but not too warm. Do not store on a concrete floor.
- Storage Procedure:
- Remove wet cell type battery.
- Clean surfaces and lubricate the machine.
- Drain fuel from the tank and close the vent on the fuel filler cap.
- Service the engine for storage per the engine owner's manual.
- After storage, turn the IGNITION SWITCH off and pull the ROPE START HANDLE slowly. If resistance is felt or the engine refuses to rotate, remove the spark plug and pull the handle to clear the cylinder of oil. Clean and reinstall the spark plug.
Technical Specifications (from model designations):
- Width of Cut: 25", 28", 30", 33" (e.g., 250811BE is a 25" cut mower).
- Horsepower Rating: 8 HP, 10 HP, 11.5 HP, 12 HP, 14 HP (e.g., 250811BE is an 8 HP mower).
- Engine Types: Briggs & Stratton (B suffix), Kohler (K suffix), Overhead Valves (V suffix).
- Start Type: Electric Start (E suffix).
- Mower Type: Recycling Mowers (R prefix).
- Tire Pressure: Front 20 p.s.i., Rear 12 p.s.i.
- Blade Stop Time: Less than 3 seconds.
- Blade Torque: 70-80 FT. LBS.
- Differential Grease Capacity: Not to exceed 2 ounces.
- Chain Case Grease Capacity: Not to exceed 2 ounces.