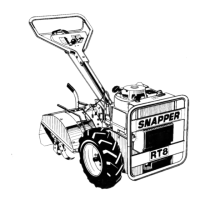
The document is an Operator's Manual & Safety Instruction for the Snapper Model R5000 Rear Tine Tillers.
Function Description:
The Snapper R5000 is a rear tine tiller designed for breaking sod or untilled ground, deep tilling, cultivating, and seed bed preparation. It operates in two primary modes: reverse tine rotation and forward tine rotation. In reverse rotation mode, the tines rotate in the opposite direction of the wheels, which is ideal for breaking sod or new ground and for deep tilling. Forward rotation mode is used for cultivating and seed bed preparation. The tiller can also be converted into a walk-behind garden tractor by detaching the tiller unit and installing a Snapper #6-0572 clevis pin hitch kit, allowing it to accept various garden tool accessories.
Important Technical Specifications:
- Model: R5000 Rear Tine Tiller
- Tine Rotation Modes: Reverse (tines rotate opposite to wheels) and Forward (tines rotate in the same direction as wheels).
- Chain Case Capacity: Approximately 1 U.S. standard quart of Snapper OO grease.
- Tine Bolts: Special hardened bolt (Snapper #9-0166) and locknut (9-0289).
- Conversion Kit: Snapper #6-0572 clevis pin hitch kit for garden tractor conversion.
- Accessories (when converted):
- Cultivator, 4-Spring Shank (KIT #6-0562)
- Cultivator, 5-Sweep (KIT #6-0561)
- Cultivator, 5-Shovel (KIT #6-0560)
- Middle Buster, 10" (KIT #6-0564)
- Disc Hiller (KIT #6-0563)
- Hauling Tray (KIT #6-0559)
Usage Features:
- Engine Stop-Start Control: Located on the front left side of the engine, with positions for CHOKE, RUN, and STOP.
- Traction & Tine Clutch Control: A lever that engages the driving wheels and tines when pulled up to the handle bar. Releasing it stops tine rotation and drive wheels.
- Skid Arm (Depth Lever): Used to adjust tilling depth. For deepest tilling, set the skid arm in the highest position; intermediate notches are for lesser depth. For transport, set the skid arm in the lowest position to raise tines clear of the surface.
- Transmission Lever: Allows shifting between different ground speeds (R, 1, 2, 3).
- Handle Bar Adjustment:
- Horizontal: Adjustable to two positions on either side of the center by raising a release lever, swinging the bar, aligning a notch, and releasing the lever.
- Vertical: Adjustable for comfort by loosening two lower bolts on the handle pivot bracket, repositioning, and tightening.
- Tine Rotation Selection: The direction of tine rotation can be changed by adjusting the belt arrangement as shown in Figure 8. This involves removing the wing-nut and washer from the belt cover, swinging the cover out of the way, and slipping the belt off the pulley to change its configuration.
- Tilling Procedure:
- Set skid arm for desired depth.
- Adjust handle bar horizontally for comfort.
- Set transmission to lower ground speed and engine control to fast.
- Begin tilling by pulling the clutch control back to the handle bar and holding firmly.
- Tilling hints: Allow the tiller to do the work; a slight down pressure on the handle bar helps keep tines firmly in the ground.
- Transporting: To transport, raise the tines by setting the skid arm in the lowest position, shift into higher forward speeds, and pull the clutch control back to the handle bar.
Maintenance Features:
- Pre-Start Check List:
- Check engine oil level.
- Check air cleaner.
- Check external surfaces for dirt/dust and clean tines.
- Check guards for proper position and tightness.
- Fill fuel tank in a well-ventilated area.
- Standing Tiller on End: Many services require standing the tiller on end for access to underside components. This is also a storage option. Before doing so, ensure the fuel tank is less than half full to prevent leakage, and stop the engine and disconnect the spark plug wire to prevent accidental starting.
- Chain Case Oil Check & Fill:
- Check oil level by removing the check plug and washer; level should be up to the edge of the opening.
- To add oil, remove the plastic plug on the upper side of the case and add Snapper OO grease until level with the bottom edge of the check plug opening.
- Reduction Gear Case: Pre-lubricated with Snapper OO grease; normally does not require additional lubrication.
- Moving Points Lubrication: Grease shift lever, roller, cam on traction clutch yoke, and other moving surfaces twice a year.
- Tiller Tines: Tines are sharpened on both front and rear edges for forward or reverse rotation. The point of the tines should be the leading edge, except when cultivating in forward mode.
- Belt Adjustment & Replacement:
- Tension Adjustment: Stand tiller on end, swing belt cover up, pull clutch control to handle bar, and observe idler arm position. Adjust idler at drive pulley to make the idler arm parallel to the cross member when the belt is tight.
- Replacement: Stand tiller on end, swing belt cover up, move shift lever between R and 1, remove V idler nut/lockwasher, slide idler down, slip belt off pulleys, and pull out. Install new belt by threading through opening, routing around pulleys/idlers, sliding V idler back, and securing. Readjust tension.
- Driven Disc Service:
- Check rubber driven disc for wear or improper positioning if wheels lose traction.
- Ensure the rubber disc is outside the indentation in the center of the metal drive disc in both reverse and #1 forward positions. Adjust shift detent if needed.
- Replace driven disc if worn unevenly or if it no longer makes firm contact with the drive disc by removing three flange nuts, slipping off the old disc, and installing the replacement.
- Off-Season Storage:
- Clean all external surfaces and tines.
- Drain gasoline from the fuel system and engine crankcase oil.
- If stored on end, check chain case plugs for leakage; some grease may seep through upper bearing races.
- Before starting after storage, replenish engine oil and gasoline. Move engine control to OFF, pull rope starter slowly several times. If excessive resistance is felt, remove the spark plug and pull rope rapidly to clear oil from the cylinder. Clean and reinstall the spark plug.
Safety Instructions:
- Familiarize yourself with all controls and quick stop procedures.
- Never allow children or inexperienced persons to operate the tiller.
- Keep everyone safely away from the tilling area, especially children and pets.
- Wear protective clothing and appropriate shoes.
- Do not operate under the influence of alcohol or drugs.
- Stay alert and focused.
- Fill fuel tank only when the engine is stopped, not hot, and outdoors.
- Ensure clutch is disengaged before starting.
- Keep feet, hands, and clothing away from tines.
- Disengage tines and stop the engine before making adjustments, cleaning tines, or leaving the operator's position.
- Avoid operating the engine in enclosed areas due to deadly exhaust fumes.