Preparing the equipment for use
ENGLISH 9
5. Preparing the equipment for use
For shipping purposes, the brushcutter is partly
disassembled and has to be reassembled prior to
use.
Only use the brushcutter after it has been fully
assembled.
Ensure that the tank is fully drained before any
assembly, disassembly or modification.
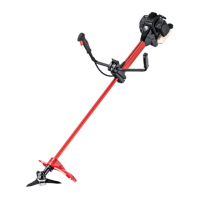
5.1 Assembly of the handle
A) "Loop" handle for models 109L and 111L
(letter "L" in the model name)
Attach the "loop" handle approximately 5 cm - 30
cm from the strap attachment according to your
preferred working position. The longer side of the
handle serves as a safety barrier and must
therefore always be on the side of the user:
• If you carry the brushcutter on the right hand
side of your body when working then the longer
side of the handle must face to the left.
• If, however, you prefer to carry the brushcutter
on the left hand side of your body when working
(i.e. if you are left-handed) then the longer side
of the handle must face to the right.
• Initially tighten the screws only lightly.
• Push the handle, in accordance with your body
size, into its optimum position.
• Then tighten the screws.
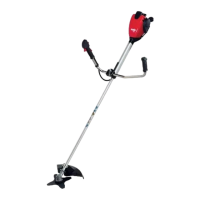
B) "Bike handle" for models 109B and 111B
(letter “B” in the model name)
• Remove quick release screw (20) with sleeve
(b) and wavy washer (c) from the handle
support (19)
• Take off the two half shells (a) from the handle
support.
• Position the two-handed "bike handle" (5) with
the two half shells (a) on the handle support
(19).
• Insert quick release screw (20) with sleeve (b)
and wavy washer (c) into the handle support,
but only so far that the quick release
mechanism can still flip over when the handle is
sitting tight. The quick release mechanism can
be flipped over to the front or rear. If the handle
is not quite tight yet, tighten the quick release
screw another half turn and flip the mechanism
to the opposite side.
• The r.h. side of handle should be fitted as near
as possible to the handle support.
• In order to adjust the handle to the perfect
position, flip up the quick release mechanism
and loosen the screw one turn if necessary.
• Adjust the handle and screw the quick release
screw (20) back in again, then flip the quick
release mechanism back over.
Note: You will have achieved an optimum
adjustment, if the centre of the power tool is at the
centre of your body. Your elbow should be slightly
angled in operating position.
Important: Always lead the brushcutter with the
bicycle handlebar on the r.h. side of the body!
Fig. 2b
Fig. 2a