masterpage:Left
filename[\\Nas-data-server\SONY Current jobs\SONY CMT-SE7\CMT-
SE7_GBCT\DTP\4248325112\424832511CMTSE7HK\GB09MDE-CEK.fm]
56
GB
model name [CMT-SE7]
[4-248-325-11(2)]
6 Press ENTER/YES if point A is correct.
“Point B set” appears and playback for
setting the ending point of the portion to be
erased (point B) starts.
If the point A is incorrect, press V or v
repeatedly to find the starting point of the
portion to be erased (point A) while
monitoring the sound, then press ENTER/
YES.
You can shift the point by 1/86 second
(1 frame) intervals.*
* You can shift the point by 2-frame intervals (in
Monaural mode and LP2 stereo mode) or by
4-frame intervals (in LP4 stereo mode).
7 Continue playback until the deck
reaches point B, then press ENTER/
YES.
“A-B Ers” and “Point B ok?” appear
alternately and the deck repeats a portion of
the few seconds before point A and after
point B successively.
8 Press ENTER/YES if point B is correct.
“Complete!” appears for a few seconds and
the portion between point A and B is erased.
Playback starts from the beginning of the
track.
If the point B is incorrect, press V or v
repeatedly to find the ending point of the
portion to be erased (point B) while
monitoring the sound, then press ENTER/
YES.
You can shift the point by 1/86 second
(1 frame) intervals.*
* You can shift the point by 2-frame intervals (in
Monaural mode and LP2 stereo mode) or by
4-frame intervals (in LP4 stereo mode).
Tip
To shift the point by minute or second intervals in steps
6 and 8, press m or M repeatedly to flash minute,
second, or frame indication, then press . or >.
You can use this function to change the order of
any track on the disc. When you move tracks,
the tracks are automatically renumbered.
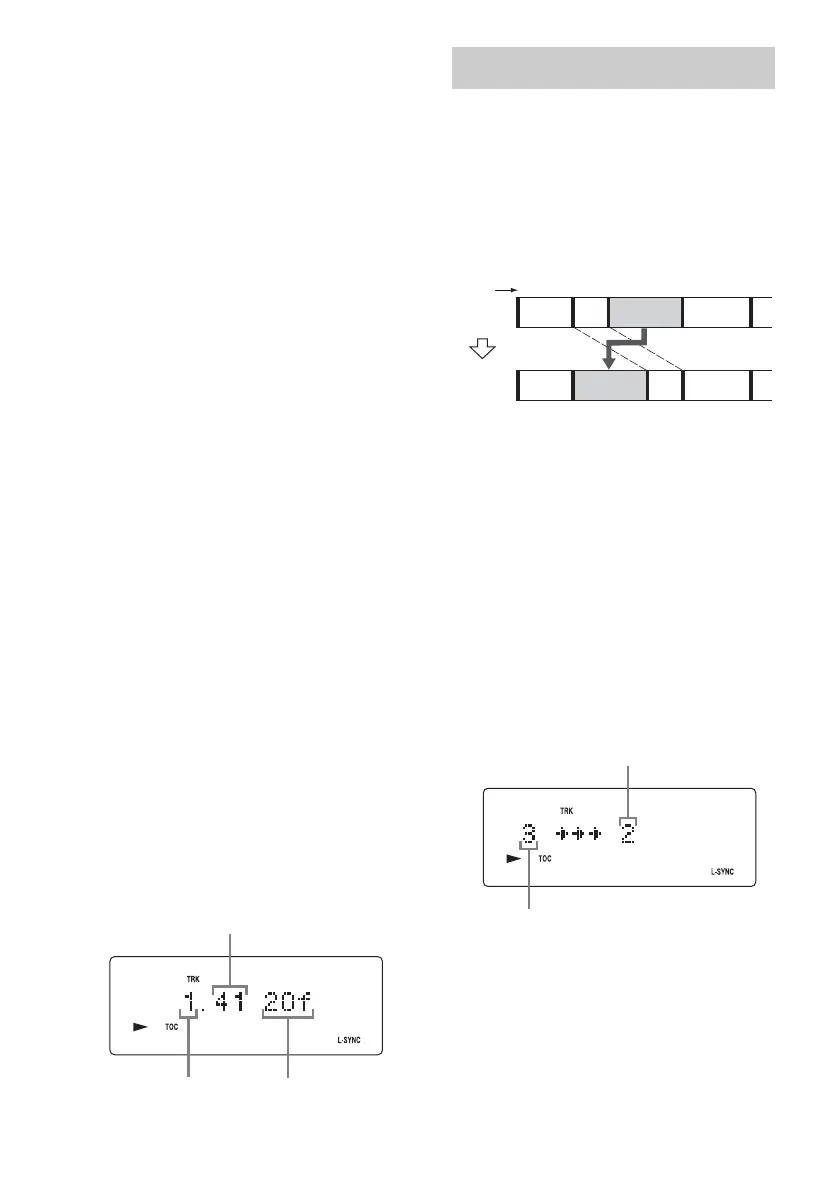
Example: Moving track 3 to position 2
Open the lid before performing the following
operations.
1 Press FUNCTION repeatedly to switch
the function to MD.
2 Press MENU/NO.
3 Press V or v repeatedly until “Move?”
appears, then press ENTER/YES.
Playback starts.
4 Press V or v repeatedly until the
desired track number to move appears,
then press ENTER/YES.
5 Press V or v repeatedly until the new
track position appears.
6 Press ENTER/YES.
“Complete!” appears for a few seconds and
the moved track starts playing.
Minute
Second
Frame
Moving recorded tracks
— Move Function
123
1
23
4
4
AB C D
CBDA
Track number
Original
tracks
After
MOVE
Original track number
New track position