This document describes the Sony ECM-B10 Shotgun Microphone, a device designed to enhance audio recording with compatible cameras.
Function Description
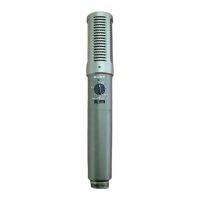
The Sony ECM-B10 is a shotgun microphone that connects to a camera's Multi Interface Shoe to provide external audio input. It offers selectable pickup patterns (super-directional, unidirectional, and omnidirectional) and various audio processing features to optimize sound recording in different environments. The microphone is designed to minimize unwanted noise and provide clear, high-quality audio for video content.
Usage Features
Compatibility:
The ECM-B10 is compatible with camera models equipped with a Multi Interface Shoe. Users should verify their camera's compatibility on the Sony website, as the unit will not function with unlisted camera models.
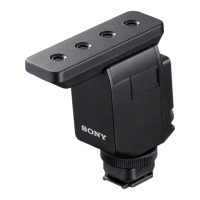
Identifying Parts:
The microphone features several key components:
- Microphone: The primary sound capture component.
- Micro USB port: Used for maintenance and service purposes.
- Lock dial: Secures the microphone to the camera's Multi Interface Shoe.
- Multi Interface foot: The connector that slides into the camera's shoe.
- Connector protect cap: Covers the Multi Interface foot when not in use to prevent damage.
Controls on the Back of the Unit:
The back of the microphone houses several switches and a dial for adjusting audio settings:
- Directivity selection switch: Allows users to choose the pickup pattern:
- Super-directional: Provides sharp directivity, picking up sounds primarily from the front while minimizing surrounding noise. Ideal for focusing on a specific subject in front of the camera.
- Unidirectional: Records sounds coming from the front while minimizing those from the back. Suitable for general recording where sounds from the sides are less critical.
- Omnidirectional: Captures sounds from all directions. Best for recording environmental sounds or including the voice of the photographer.
- ATT (Attenuator) switch: Adjusts the audio recording volume to prevent distortion or amplify quiet sounds:
- 20dB: Recommended for recording loud sounds to minimize distortion.
- 0dB: Recommended for recording quiet sounds to amplify them. Users should monitor the volume level meter on the camera or use headphones for optimal adjustment.
- AUTO/MAN (Automatic/Manual) switch: Controls how the recording volume level is set:
- AUTO: The recording volume level is automatically adjusted by the microphone.
- MAN: Allows manual adjustment of the recording volume using the AUDIO LEVEL dial.
- AUDIO LEVEL dial: Used for fine-tuning the recording volume level when the AUTO/MAN switch is set to "MAN." Monitoring the volume level meter on the camera or using headphones is recommended for precise adjustment.
- FILTER switch: Activates noise reduction functions:
- NC (Noise Cut): Uses digital signal processing to effectively eliminate unpleasant noises. If sound quality seems inappropriate, users can switch to "OFF."
- LC (Low Cut): Minimizes unwanted low-frequency noises such as wind noise, air-conditioning noise, and vibration noise.
- OFF: Disables both noise cut and low cut filter functions.
- DIGITAL/ANALOG switch: Selects the audio input type based on camera compatibility:
- DIGITAL: For cameras compatible with the digital audio interface of the Multi Interface Shoe. This allows digital signal communication between the microphone and camera, providing audio recording with minimum noise insertion.
- ANALOG: For cameras not compatible with the digital audio interface. If the camera displays a "This accessory is not supported by the device and cannot be used" message, setting this switch to "ANALOG" may resolve the issue.
Attaching/Removing the Microphone:
- Preparation: Before attaching or removing the unit, ensure the camera's power is turned off.
- Attachment:
- Remove the connector protect cap from the microphone.
- Slide the Multi Interface foot into the camera's shoe.
- Rotate the lock dial in the "LOCK" direction to firmly secure the unit.
- Attaching the microphone automatically switches the audio input from the camera's built-in microphone to the ECM-B10. If insertion is difficult, rotate the lock dial counterclockwise until it stops, then try again.
- Recording: Operate the camera to begin recording. Refer to the camera's Help Guide for specific recording instructions.
- Removal:
- Turn off the camera's power.
- Rotate the lock dial counterclockwise until it stops.
- Slide the Multi Interface foot out of the shoe.
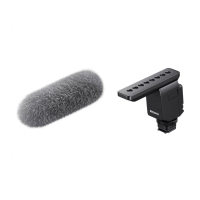
Wind Screen:
The included wind screen can be fitted over the microphone to minimize noise caused by wind or breath hitting the microphone during recording.
Troubleshooting "This accessory is not supported by the device and cannot be used." message:
- Check camera compatibility: Verify that your camera model is listed as compatible on the Sony website. The unit will not work with unlisted models.
- Set DIGITAL/ANALOG switch: If your camera is not compatible with the digital audio interface, set the DIGITAL/ANALOG switch on the microphone to "ANALOG."
- Clean contacts: Clean the contacts on both the microphone and the camera using a cotton swab or a dry, soft cloth. Dust or debris on the contacts can prevent the camera from detecting the unit. Do not use water or chemicals for cleaning.
Maintenance Features
Protection during Transport:
To protect the Multi Interface foot connector from damage when carrying the unit, remove the microphone from the camera, attach the connector protect cap to the foot, and store the unit in the supplied pouch.
Handling Noise:
- During recording, operation and handling noises from the camera or lens may be picked up.
- Touching the microphone unit while recording can also introduce noise into the recording.
- Monitoring or recording voice with the camera's microphone may cause a slight delay in the voice.
Lens Changes:
Before changing lenses, ensure that no wind screen fibers are present on the surface of the lens or camera body. If fibers are present, clean them off with a blower or similar tool before changing the lens.
Microphone Surface Cleanliness:
Dust or water droplets on the microphone surface can impair recording quality. Always ensure the microphone surface is clean before use.
Wind Screen Care:
If the wind screen becomes wet from rain or other sources, remove it from the unit and allow it to dry in the shade.