HBD-E190/E290/E490/E690
24
6. Diag (Audio Input Test)
This screen performs audio input test.
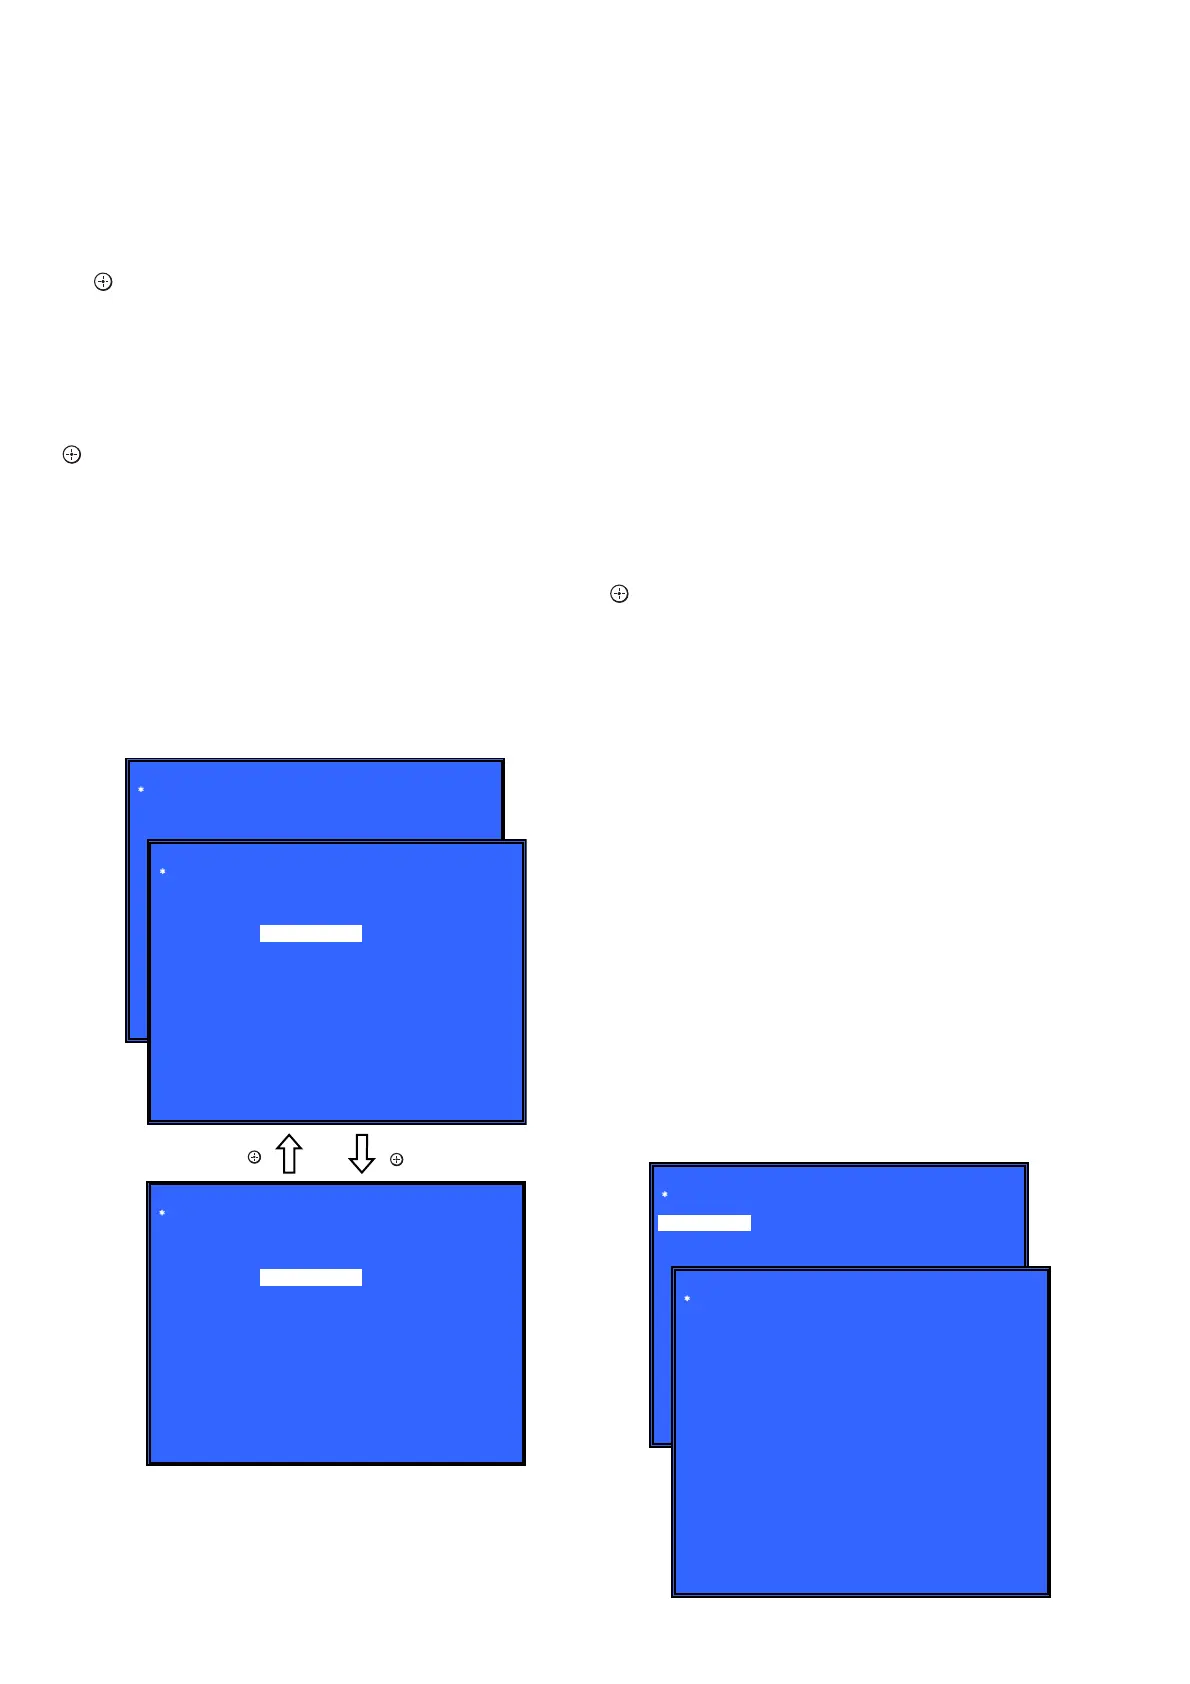
Screen 1: Select Audio Input Test Category
Operation:
[<]/[,] Selects the category
[m]/[ ] Activate the selected category
[RETURN] Returns to the service top menu
Screen 2: Select Input Device
After “Audio Input Test” selects in Screen 1, the device to test is
chosen.
Operation:
[M]/[m] Selects Device
[ ] Activate and Start Test/Stop
[RETURN] Returns to the selection of test category
• Device Test : Device List
Digital Input1 : CXD90008 is inputted from ARC
Digital Input2 : CXD90008 is inputted from Optical
Analog Input : CXD90008 is inputted from AUDIO
• Audio Input Test
CXD90008 is inputted from DIR/analog and outputs LineOut
(8ch) L and R.
Check tone sound by speaker connected with LineOut (8ch) L and
R.
(Input; LPCM 48kHz 2ch)
7. Diag (Wireless LAN Test)
This screen performs wireless LAN test.
Note: Not used for the servicing.
8. Diag (MIC Input Test)
This screen performs MIC input test.
Note: Not used for the servicing.
9. Diag (HDMI Input Test)
This screen performs HDMI input test.
Note: Not used for the servicing.
10. Diag (Transcoder Test)
Note: Not used for the servicing.
11. Log: Error Log (Output of each Log)
This screen displays the contents of each log.
Note: Do not refer to the displayed date.
Screen 1: Selects log
Operation:
[1]/[ ] Moves to the Error Log output screen
[RETURN] Returns to the top menu of the service mode
Screen 2: Displays the Error Log
Operation:
[
<
] Returns to the previous page
[
,
] Moves to the next page
[RETURN] Returns to the screen (Screen 1) that selects the log
type
[RED] Writes the log contents to an USB memory device
• Viewing the log display
Error Log:
[174] 2010/01/01 00:00:08 [ErrCode:0902A4053002]
[Index number] [Date] [Time] [Error code]
About copying log to USB memory device:
Press the [RED] button in each log display screen with the USB
memory device inserted into the unit.
Note: Please do not press the [RED] button immediately after USB mem-
ory is inserted.
Please do not pull out USB memory immediately after the [RED]
button was pressed.
Error Log:
When “getErrLogFile.trm fi le” exists in the USB memory de-
vice, errlog.log fi le is output.
Diag
Category:
Diag
Category: Audio Input Test
Device:
[ENT] Start Input Sound
HELP: [LEFT] [RIGHT] [UP] [DOWN] [ENT] [RET]
Audio Input Test
Digital Input 1
Digital Input 2
Analog Input
(Screen 1)
(Screen 2)
[ ]
Diag
Category: Audio Input Test
Device:
[ENT] Stop Input Sound
HELP: [LEFT] [RIGHT] [UP] [DOWN] [ENT] [RET]
[ ]
Digital Input 1
Digital Input 2
Analog Input
Select Log
HELP : [DOWN][ENT][(NUM)]
Error Log
02]
[174] 2010/01/01 00:00:08 [ErrCode:0902A4053002]
[175] 2010/01/01 00:00:08 [ErrCode:0902A4053002]
[176] 2010/01/01 00:00:08 [ErrCode:0902A4053002]
[177] 2010/01/01 00:00:08 [ErrCode:0902A4053002]
[178] 2010/01/01 00:00:08 [ErrCode:0902A4053002]
[179] 2010/01/01 00:00:08 [ErrCode:0902A4053002]
[180] 2010/01/01 00:00:08 [ErrCode:0902A4053002]
[181] 2010/01/01 00:00:08 [ErrCode:0902A4053002]
[182] 2010/01/01 00:00:08 [ErrCode:0902A4053002]
[183] 2010/01/01 00:00:08 [ErrCode:0902A4053002]
[184] 2010/01/01 00:00:07 [ErrCode:0902A4053002]
[185] 2010/01/01 00:00:08 [ErrCode:0902A4053002]
[186] 2010/01/01 00:00:08 [ErrCode:0902A4053002]
<Page 1/20>
HELP : Press [RED] key to store log to Udisc.
[1] Error Log
(Screen 1)
(Screen 2)