5-GB
GB
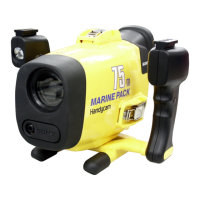
Preparations
Preparing your camcorder
Before installing your camcorder in the marine pack, prepare the camcorder according to this
chapter.
The procedure may be different depending on your camcorder type.
Refer also to the operating instructions supplied with your camcorder.
You can also install camcorder models different to the one shown in the illustration.
1 Remove the lens cap, shoulder strap, conversion lens, filter or lenshood from the
camcorder.
2 Attach a fully charged battery pack.
If you are using the camcorder DCR-PC109/PC109E/PC108/PC108E/PC107/PC107E/PC106E,
remove the battery pack from the camcorder.
3 Insert a cassette tape, “Memory Stick” or disc.
4 Attach the reflex prevention ring to the lens.
for DCR-HC90/HC90E/DVD803/DVD803E/DVD703/DVD703E/DVD653/DVD653E/
DVD602/DVD602E/DVD403/DVD403E/DVD203/DVD203E/DVD202E/DVD103/DVD103E/
DVD92/DVD92E : ø 30 mm
for DCR-HC43/HC43E/HC42/HC42E/HC40/HC40E/HC39E/HC33/HC33E/HC32/HC32E/
HC30/HC30E/HC22E/HC21/HC21E/HC20/HC20E/HC19E/HC18E/HC17E/HC16E/
PC109/PC109E/PC108/PC108E/PC107/PC107E/PC106E : ø 25 mm
Be sure not to tighten the prevention ring too tightly.
Note
If you select WIDE (16:9) on a camcorder with a selectable recorded picture aspect ratio, the
picture will appear elongated on the LCD monitor of the marine pack, although the picture is
actually recorded in 16:9 aspect ratio.
continued