5: Calibrating the speaker
settings
automaticallyl
5: Calibrage automatique des reglages
des
enceintesl
5: Calibraci6n automatica de los ajustes del
altavoz
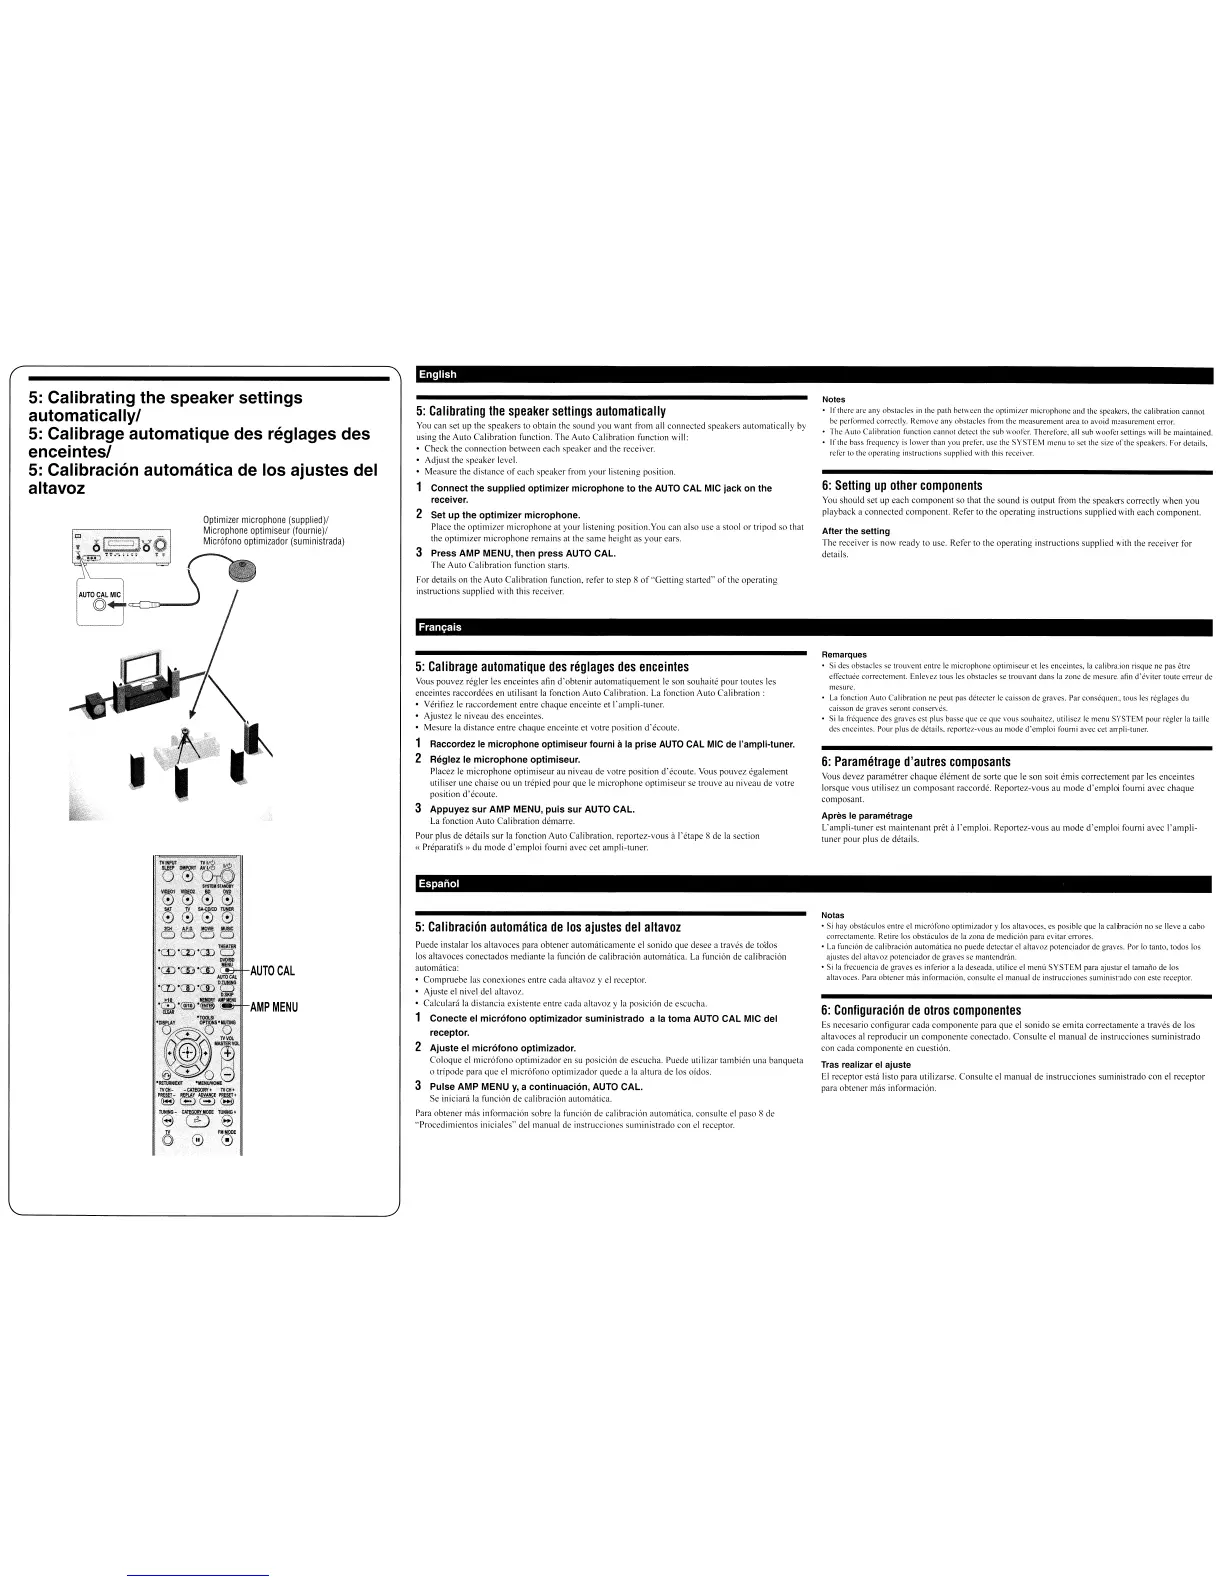
Optimizer
microphone
(supplied)!
Microphone
optimiseur
(fournie)!
Microfono
optimizador
(suministrada)
English
5:
Calibrating
the
speaker
settings
automatically
You
can set up the speakers to obtain the sound you want from all connected speakers automatically
by
using the Auto Calibration function. The Auto Calibration function will:
• Check the connection between each speaker and the receiver.
• Adjust the speaker level.
• Measure the distance
of
each speaker from your listening position.
Connect the supplied optimizer microphone
to
the
AUTO
CAL
MIC
jack on the
receiver.
2 Set up the
optimizer
microphone.
Place the optimizer microphone at your listening position.Yoli can also use a stool
or
tripod
so
that
the
optimizer
microphone remains
at
the
same
height
as
your
ears.
3 Press AMP MENU, then press AUTO CAL.
The
AUlD
Calibration function stans.
For details on the Auto Calibration function, refer to step 8
of
"Getting
started'
of
the operating
instructions supplied with this receiver.
Fran~ais
5:
Calibrage
automatique
des
rllglages
des
enceinles
VOllS pouvez regler les enceintes afin
d'obtenir
automatiquement
Ie
son souhaite pour loutes les
enceintes raccordees en utilisant la fonction Auto Calibration,
La
foncliol1 Auto
Calibration:
Veritiez
Ie
raccordemenl entre chaque enceinte el l'ampli-tuner,
• Ajustez
Ie
niveau des enceintes.
• Mesure
la
distance entre
<.:haque
enceinte el votre position
d'ccoule.
1 Raccordez
Ie
microphone optimiseur lourni
ilia
prise
AUTO
CAL
MIC
de
I'ampli-tuner.
2 Reglez Ie
microphone
optimiseur.
Placez
Ie
microphone optimiseur au niveau
de
vOlre position d'ecoute.
VOLIS
pouvez cgalcment
utiliser line chaise ou un Ircpied pour que
Ie
microphone optimiseur sc lrouve
all
niveau
de
votre
position d'eCOUle,
3 Appuyez
sur
AMP MENU,
puis
sur
AUTO CAL.
la
foneticn Auto Calibration demarre,
Pour plus
de
delails
sur
la fanetion Auto Calibration.
reponcz-vous
it l'etape 8
de
la
section
(
Preparalifs~)
du mode
d'emploi
foumi avec eet ampli-Iuner.
Notes
•
lfther,'
arc
any
obstacles
in
the path bet\\ ceo the optimiLcr microphone
and
the speakers. the calibration cannot
tx'
~rforTlled
correctly, RemO\'e
any
obstacles from the measurement area to avoid measurement error.
• The
AUlO
Calibration function cannot detcct the sub wooll-r. Therefori.', all
sub
woofer settings will
be
maintained.
•
Irlhe
bass lrequency is lower than you prell-r, usc thl'
SYSTEM
nll'nuto
set the size
of
the speakers. For details,
rdcr
to the operating instructions supplied with this recci\ cr.
6:
Setting
up
other
components
YOLI
should set up each
component
so that the sound
is
output from the speakers correctly when you
playback a connected component. Refer to thc operating instructions supplied with each component.
After the setting
The receiver
is
now ready to use, Refer to the operating instructions supplied with the receiver for
delails.
Remarques
• 5i des obstacles sc trouvcnt entre
Ie
microphone optimiscur ct
Ics
enceintcs. la calibration risque ne pas etn:
cllcctuel' corrcctclllcnl. Enlcvcz tous lcs ohstaclcs
sc
IrOlivant dans
la
zone de mesure, afill
d'eviter
IOllte
erreur
de
mcsurc.
•
La
lonctiol1 Alilo C;llibration ne peut pas detecter
Ie
C<.lisson
de graves. Par consequent, tous
1cs
reglagcs du
cilisson
de
graws scronl conserves.
• 5i
la
fr~411cncc
des gravcs est plus bassc que ce que VOllS souhaitcz.utiliscz
Ie
menu SYSTEM pour reglcr la tail
Ie
des cnccintes. Pour plus de details. rcportcz-VOllS au mode d'cmploi tourni avcc cet ampli-tuner.
6:
Parametrage
d'autres
composants
Vous devez paramctrer
chaque
element de sorte
que
Ie
son soit emis correctement par les ellceinles
lorsque vous utilisez un composant raccorde. Reportez·vous
au
mode
d'emploi
foumi avec
chaque
composant.
Apres
Ie
parametrage
L'ampli-tuner est maintenant pret it I'emploi. Reportez-vous
au
mode
d'emploi
foum!
avec
I'ampli-
tuner pour plus
de
details.
AUTO
CAL
AMP
MENU
Espanal
5:
Calibracion
automatica
de
los
ajustes
del
aitavol
ruede
instalar los altavoces para obtener automillicamenle el sonido que desee a traves
de
toaos
los ahavoces conectados mediante la funcion de calibracion automatica.
La
funcion
de
calibracion
automatica:
• Comprucbe las <.:onexiones enlre cada ahavoz y el receptor.
• Ajuste el nivel del ahavoz.
•
Ca1culad
1<\
dislancia exislentc entre cada altavoz y
1'1
posicion de escucha.
Conecte el micr610no
optimizador
suministrado
a la toma AUTO
CAL
MIC del
receptor.
2
Ajuste
el micr610no optimizador.
Coloque elmicrofol1o optimizador en su posicion
de
escLlcha. Ilucdc utilizar tam bien una banqueta
o tripode para
que
elmicrotono
optimizador quede a
la
altura de los Didos.
3 Pulse AMP MENU
y,
a
continuaci6n,
AUTO
CAL.
Se iniciara
la
funcion de calibracion <lutomatica.
Para obtencr mas informacion sobre
la
fllncion de calibracion alllOrnatica, eonsulte
el
paso 8
de
"Procedirniemos iniciales" dellllanual
de
instruceiones sUlllinistrado con
el
receptor.
Notas
• Si hay obstaculos entre el microfono optimizador y los altavoces.
es
posiblc
que
la calibracion no se lIeve a
cabo
corrcctaml'nle. Retire los obstaculos de la zona de medician para c\'ilar crrorcs.
•
La
funcian de calibracion aUlOmatica no puede dClcctar
cI
altavoL potenciador de graves. Por
10
lanlo,
IOOos
los
ajustcs del
alta\oz
potcnciador de gra\'es
se
mantendnin.
• Si
13
fn:euencia de
gra\es
es
inferior
ala
deseada. uliliee d menu
SYSTEM
para ajustar el tamano
de
los
alta\ oces. Para obll,.'ncr mas informacion. eonsulte d manual de instrucciones surninistrado con este receptor.
6:
Configuracion
de
otros
componentes
Es
necesario configurar cada
componente
para que el sonido
se
emita correctalllente a traves de los
a!tavoces al rcproducir un componente coneclado. COl1sulte el1ll3nual
de
instrucciones suministrado
con cada componente
en
cuestion.
Tras realizar el
ajuste
EI
receplor est{llisto para utilizarse. Consulte
el
manual
de
instrllcciones suministrado con
el
receptor
para obtencr mas informacion.