they are used to their full output capability. Determine the alternator rating of your car to
make sure your charging system is capable of delivering the necessary current to operate
these products. If either one of these amplifiers is being used without any additional
amplifiers, odds are you have more than enough current. If these amplifiers are part of a
multi-amplifier system, investigate your potential current consumption. It may be necessary
for you to add a second battery or upgrade the existing alternator.
For Power, Ground and Remote connections, we recommend Soundstream premium cable
(such as Power 80 or
loo),
or an equivalent. A minimum of 10 gauge power and ground
cable should be used on both of these amplifiers in order to realize maximum performance.
An in-line fuse should also be installed under the hood approximately 12
inches from the
battery. For the
MC140X
a 20 amp fuse should be installed, and for the MC245 a 30 amp
should be installed
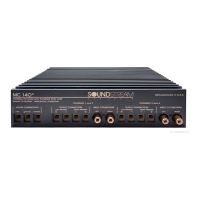
Remote Power-on Connection
If
your head
unit has a remote
power-on control wire, connect it to the remote terminal on
your amplifier. This is a control line, not a power line, so a small gauge wire, such as
_
Soundstream Remote 200 Sensing cable is ideal for this connection.
If your head unit has no remote power-on control labeled as
such,
look for a power antenna
control, this may be used instead. If your head unit has
neither
a remote power-on control
wire or a usable power antenna control, it will be necessary either to connect the remote
terminal to a
12
volt source which is switched by the ignition key, or to connect a 12 volt source
through an on/off switch you install in series with the ignition switch in a location accessible
to the driver.
NOTE:
If an
o&oar-d
switch is used, make sure it is in the
OFF position
whenever
you leave
the vehicle. this will prevent extended drain on the
battev.
Before Powering Up he System
To prevent unnecessary labor and damage to your components, be sure to proof your
system and all of its connections prior to attempted operation.
Also
double-check to see that
you have selected all of the correct amplifier settings.
Powering Up he System
Once all connections have been checked, turn on the system. Be sure to keep the volume
low. You should be hearing music at this point. If not, turn off the system immediately and
again check for shorts and poor connections. If all wiring is in order, check the fuse installed
at the battery and then the speaker output fuses located on the bottom of the amplifier. If any
of these are blown, replace them with the same value only.
Input
Level
Adjustments
Input levels are
adiusted
by means of independent controls located directly above the inputs,
b
tw
e een e ea
sin
s ins. 0 se yth h
t
’
k
f’
T
t
our amplifier levels, begin by turning all level controls to
minimum
(full counter-clockwise). Turn the
system on, and set the volume on your head unit
at its mid-point. Advance the amplifier input level controls until you have reached a
comfortable listening level and all channels are balanced.
NOTE:
W;th many head units, the radio output
/eve/
is
significant/y
difkent
than that of the
other source. Check both sources and set levels using the lesser of the outputs.