EasyManua.ls Logo

South-Tek Systems N2Blast FPS-650 - User Manual

Default Icon
29 pages
Print Icon
To Next Page IconTo Next Page
Loading...
FPS-650
FPS-1250
Fire Protection Systems
O&M Manual
Version 7; 09/06/2019
© 2020
The Leader in Nitrogen Generation Technology
Question and Answer IconNeed help?

Do you have a question about the South-Tek Systems N2Blast FPS-650 and is the answer not in the manual?

Summary

1 INTRODUCTION

1.1 PURPOSE

Explains the function of N2-BLAST® FPS-650 and FPS-1250 systems.

1.2 AUDIENCE

Specifies the intended readers for this manual.

1.3 IMPORTANT INFORMATION

Provides crucial safety and operational guidelines for users.

2 SAFETY GUIDELINES

2.1 GENERAL

Outlines general safety precautions and responsibilities for operating the system.

3 SYSTEM DESCRIPTION

3.1 KEY FEATURES

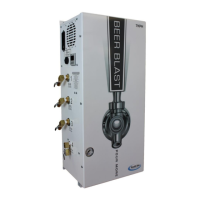
Lists the main components and functionalities of the N2-BLAST® system.

3.2 SPECIFICATIONS

Details technical specifications for FPS-650 and FPS-1250 models.

3.3 SYSTEM OPERATIONS

Explains the two standard operating modes: Run and Standby, and controller display.

4 PRODUCT INSTALLATION

4.1 UNPACKING AND PREPARATION

Provides instructions for safely unpacking and preparing the system for installation.

Lock and Unlock Controller

How to unlock the controller to access specific functions like alarm simulation.

4.2 ELECTRICAL REQUIREMENTS

Specifies the necessary electrical connections and power requirements for the system.

4.3 INSTALLATION (FOR FPS-650)

Details how to mount and install the FPS-650 model on a wall or floor.

Optional Mounting Bracket Kit Procedures

Step-by-step guide for using the optional mounting bracket for the FPS-650.

4.4 INSTALLATION (FOR FPS-1250)

Explains how to install the FPS-1250 model on a flat level hard surface.

4.5 PANEL LAYOUT AND GAS CONNECTIONS

Illustrates the panel layout and guides gas connections for the system.

4.6 AIR BYPASS SETUP (OPTIONAL)

4.7 START-UP PROCEDURES

Guides the user through the initial start-up steps, including leak checking.

4.8 CHECKING FOR LEAKS

Provides methods to detect and troubleshoot gas leaks in the system using various techniques.

4.9 ACCESS CONTROLS

4.10 STARTING THE SYSTEM

Instructions on how to initiate system operation by turning on the power switch.

4.11 STOPPING THE SYSTEM

Procedures for safely shutting down the system, including emergency shutdown.

5 SYSTEM USAGE

5.1 INSTRUCTIONS

General guidance on using the Nitrogen Generator for fire protection piping systems.

5.2 ALARM NOTIFICATION

Explains the Filter Alarm and optional BlastOff™ Leak Detection System alarms.

6 SYSTEM MAINTENANCE

Air Pre-Filter

Details the air pre-filter's function and replacement procedure for the compressor.

Particulate and Coalescing Filter

Instructions for replacing the particulate and coalescing filters after the air compressor.

7 KEY CONTACTS

8 FAQS

Frequently Asked Questions section covering common system issues.

8.1 POWER ISSUES

Troubleshooting steps for power-related problems encountered with the system.

8.2 PRESSURE ISSUES

Addresses common issues related to system pressure and operation modes.

8.3 GAS LEAKS

Methods for detecting and fixing gas leaks using non-electrical sprays.

8.4 BLASTOFF - LEAK DETECTION SYSTEM

Explains the BlastOff™ leak detection feature, its alarms, and reset procedures.

APPENDIX A: WARRANTY

APPENDIX B: Internal Quick Fill Compressor Option for FPS-1250

Electrical Connection

Electrical hookup requirements for the optional internal quick fill compressor.

Over-Current Protection Device (OCPD)

Information on the compressor's OCPD and the requirement for a disconnect.

Compressor Disconnect

Recommendation for a disconnect switch for easy operation and safety of the compressor.

Compressor Motor Nameplate

Technical specifications of the internal quick fill compressor motor.

Operation Instructions

Steps for operating the internal quick fill compressor in conjunction with the generator.

Overview

The N2-BLAST® FPS-650 and FPS-1250 are Nitrogen Generators designed for Fire Protection Systems, providing an economical and precise means of generating high-purity nitrogen. These units separate nitrogen from the air using an air compressor that pushes air into filtering vessels, which mechanically separate N2 molecules from other air molecules. Nitrogen is an inert, non-combustible gas widely used in various industries, including fire protection.

Important Safety Guidelines:

  • The installer and user must read the entire manual before installation and operation.
  • N2 gas is not poisonous but should not be directly inhaled in high concentrations as it can cause asphyxiation. The unit must be installed in a well-ventilated room, not sealed off from normal living space air changes.
  • All personnel involved in installation, operation, and maintenance must follow safe working practices, OSHA, and local health/safety code regulations.
  • Only authorized, trained, and competent individuals should perform installation, operation, maintenance, and repair.
  • Always use approved parts for maintenance and repairs, ensuring they meet or exceed original specifications.
  • Completely isolate incoming and outgoing pressures and depressurize the service/repair section before any mechanical work, including filter changes. Exhaust gas must be vented outdoors or to a large, well-ventilated room to prevent suffocation.
  • Safety glasses and ear protection should be worn when the cabinet door is open or the equipment is operating.
  • Pressurized gases are dangerous; never allow them to exhaust from an unsecured hose, which can cause serious injury. Immediately close isolation valves and power down the unit if a hose bursts.
  • Never disable or bypass safety relief valves.
  • Always disconnect the nitrogen generator from the supply power before performing electrical work.
  • Do not tamper with or experiment with the equipment, or exceed technical specifications.

Key Features:

  • Air Compressor: An internal, oil-less compressor with an engineered dampening system to reduce vibration and noise. It includes a pre-filter with a recommended replacement schedule of 1000 run hours or 1 year, whichever comes first.
  • Air Filters: Two filters (particulate and coalescing) are located after the air compressor. The particulate filter is 5-micron, and the coalescing filter is 0.1-micron. Both have auto-drains plumbed to the outside of the cabinet for connection to a site drain.
  • Programmable Logic Controller (PLC): An integrated PLC with smart coding to maximize performance. It controls valve timing and sequencing, automatically adjusts "modes" based on run stages, and features a visual screen displaying run hours and alarms.
  • Pressure Swing Adsorption Beds: Essential for nitrogen generation.
  • Safety Relief Valves: Placed throughout the system for maximum safety, designed to minimize component failure, and come with an ASME stamp.
  • N2 Storage Tank: Housed inside the cabinet with manual ball valves and a gauge, plumbed to an external manual ball valve for easy user connection.
  • Automatic Cut-In/Cut-Out: A built-in pressure switch tied to the PLC sends a low voltage signal to put the system in "Standby Mode" when the tank is full of nitrogen.
  • STS Patented Blast-Off™ (optional): A leak detection system that triggers an audible alarm and displays it on the screen when a leak is detected. It can be tied into a dry contact for relaying the alarm to a Building Management System (BMS).

Technical Specifications (FPS-650 and FPS-1250):

  • Nitrogen Purity: 98.0+%
  • Installation: Wall Mount (FPS-650) / Floor standing (FPS-1250)
  • Display: Run Hours / Run Status / Alarm Status
  • N2 Storage Pressure: 55-75 PSIG
  • Cabinet Port Connections: 1/2" NPT Female
  • Electrical: 110-240V / 50-60Hz / 1Phase; 20 Amp Breaker
  • Compressor: Integral / Oil-Free
  • Ambient Temperature: 40° to 90°F
  • Noise Level (dbA): < 75 dBa (Nitrogen Generator)
  • Size:
    • FPS-650: 12.68" W x 10" D x 29.5" H (Cabinet Dimensions)
    • FPS-1250: 26" W x 18" D x 59" H (Cabinet Dimensions)
    • 100# Tank (for FPS-650 Only): 15.1" OD x 50" H
  • Weight:
    • FPS-650: Appx: 84 lbs
    • FPS-1250: Appx: 265 lbs
    • 100# Tank: Appx: 75 lbs

Usage Features:

  • Run Modes: The system operates in "Run" and "Standby" modes. "Run" mode indicates nitrogen production and feeding to the storage tank. "Standby" mode is automatically entered when the tank is fully pressurized (65-75 psig) and maintained until tank pressure drops by 7-10 psig.
  • Controller Lock/Unlock: The controller can be locked/unlocked by pressing and holding the Mode Select Button.
  • Alarm Simulation: Holding the Alarm Simulation Button (5) for 3 seconds activates a 2-second alarm condition and trips the alarm dry contact (if installed) for testing.
  • Starting the System: Turn on the power switch and ensure all gas line valves are open.
  • Stopping the System: Close all valves on the gas lines. Powering down the system is not necessary unless an emergency shut-off is required, in which case the power switch on the control panel side should be turned off.

Installation:

  • Unpacking: Carefully open the cardboard carton (FPS-650) or wooden crate (FPS-1250) and inspect all parts for damage. Report shipping damage immediately to the shipping company and then to STS.
  • Storage (Until Installation): Store in a dry, climate-controlled room (60-80°F), always in an upright position. Do not connect AC power until the manual is read and all connections are made. Keep gas lines dry. Do not place objects on top of the unit.
  • FPS-1250 Removal from Crate: Unbolt the cabinet from the crate, lift it, and use a floor jack to move it to the final location. Unbolt the 4 colored bolts at the bottom of the cabinet once in place.
  • Electrical Requirements: Requires 110-125VAC / 50-60hz / 1ph / 20A or 220-240VAC / 50-60hz / 1ph / 20A connection. A dedicated circuit is suggested. The system has a 20A circuit breaker built into the on/off rocker switch and is UL 508A ICP approved.
  • FPS-650 Installation: Can be wall-mounted (recommended on a weight-bearing wall) or floor-placed (still fastened). Install indoors between 40° and 90°F, in an upright position, away from water or moving equipment. Leave at least 6” (36” recommended) on the left side for ventilation and access. A ¼” OD tube drain port on the bottom right can be plumbed to a site drain. An optional mounting bracket kit (STS Part #: A05-TYP1-RD) is available for standard 16” wall stud width. Secure the N2-BLAST® to the wall at the top and bottom flanges to prevent damage or bodily injury.
  • FPS-1250 Installation: Must be installed on a flat, level hard surface. Anchoring is not required unless by local code. Ensure clearance room on top for N2 gas connection, on the left side for panel access, and on the front for maintenance.
  • Shipping Lock Bolts: Remove the 4 painted shipping lock bolts before starting the system (refer to Figure 2).

Maintenance Features:

  • General Maintenance: Power down the system and remove the front cover before performing any maintenance.
  • Annual Filter Replacement Kit: Part # FRP-007.
  • Air Pre-Filter: Located on the air compressor intake, prevents particles from damaging internal components. Replace annually or every 1000 hours. To replace, twist the cap clockwise, remove the old element, clean the filter bowl, and install the new element.
  • Particulate and Coalescing Filters: Located after the air compressor, capture particulate and moisture. Replace annually or every 1000 hours.
    1. Ensure no pressure on filter bowls (gauge reads 0 PSIG).
    2. Unscrew bowls counterclockwise.
    3. Rinse bowls with warm water.
    4. Dry bowls and replace old O-rings with new ones from the kit.
    5. Use a Philips-Head screwdriver to remove and replace the particulate element.
    6. Remove and replace the coalescing element by turning it counterclockwise.
    7. Screw bowls back into filter housings.
  • Filter Change Reset: After replacing all filters, press and hold the filter reset button on the electrical panel (or the Filter Change Reset Button (0) on the controller face for 7 seconds after unlocking the controller). An audible beep confirms the reset.
  • Checking for Leaks:
    • Listen for leaks or spray soapy water around connections. Isolate and relieve pressure before fixing.
    • If no leak is found, turn off the unit and isolate sections to check for pressure loss.
    • To check for leaks within the Generator to N2 Storage Tank:
      1. With the unit powered on, close both ball valves on the N2 storage tank. Note the storage tank pressure.
      2. Allow the system to run until "Standby" mode (within 10 minutes).
      3. Wait 5 minutes. If it remains in "Standby" mode, the leak is after the N2 Generator. If tank pressure changed, the leak is within the storage tank fittings. If not, check building pipelines.
    • To find a leak within the cabinet:
      1. Open the front cabinet door and locate the N2 storage tank.
      2. Close the output ball valve from the tank (upper ball valve on the red manifold).
      3. Watch the exterior gauge for 60 seconds. If pressure drops, the leak is between output ports, to the blender (if present), and back to the closed ball valve on the tank. Fix leaks. If pressure doesn't drop, proceed.
      4. With the unit running, close the input ball valve to the tank (lower ball valve on the red manifold).
      5. Within 5 minutes, the system should go into "Standby" Mode. If not, contact your provider.
      6. Wait 60 seconds in "Standby" mode. If it doesn't remain in "Standby," the leak is between the check valve and the output ball valve on the tank.
      7. If the system remains in "Standby," contact your provider.

Alarm Notifications:

  • Filter Alarm: The controller displays "FILtr" in red when filter change is overdue (recommended annually or every 1000 hours).
  • BlastOff™ - Leak Detection System Alarm (optional): If a leak is detected, the system initiates a buzzer, displays "b ōFF" in red on the controller screen, and shuts off the FPS-650/FPS-1250. To reset, turn the unit off and then back on. Repeated daily alarms indicate a potential issue, requiring consultation with the installer.

Internal Quick Fill Compressor Option for FPS-1250 (Appendix B):

  • Electrical Connection: Connect to the 1.9 HP Internal Quick Fill Compressor, ensuring site and local regulations are followed. The compressor requires 110-240VAC / 60hz / 1ph.
  • Over-Current Protection Device (OCPD): The compressor features an internal thermal overload that can be reset manually.
  • Compressor Disconnect: For easy operation, a disconnect rated for a 20A or more motor load is recommended.
  • Compressor Motor Nameplate:
    • HORSEPOWER: 1.9
    • RPM: 3450
    • PH: 1
    • HZ: 60
    • VOLTAGE: 120/240 VAC
    • AMB: 40°C
    • FR.: 56Y
    • ENCL.: DP
    • DUTY: CONT.
    • S.F.: 1.0
    • CODE: N
    • INS. CL.: F
    • F.L.A.: 15/7.5
    • BRG: BALL
    • DE: 6204DDU
    • ODE: 6203DDU
  • Operation Instructions:
    1. Switch the generator to bypass mode using the 3-way ball valve mounted atop the unit (handle in fully upright position).
    2. Turn on the compressor using the external disconnect.
    3. Once filling is complete, switch the generator back to Normal Operation Mode by turning the ball valve handle horizontal.
    4. Shut down the compressor with the external disconnect.

South-Tek Systems N2Blast FPS-650 Specifications

General IconGeneral
BrandSouth-Tek Systems
ModelN2Blast FPS-650
CategoryInverter
LanguageEnglish

Related product manuals