Do you have a question about the Sparkfun Electronics Inventor's Kit and is the answer not in the manual?
Overview of the SparkFun Inventor's Kit for micro:bit experiment guide and its purpose.
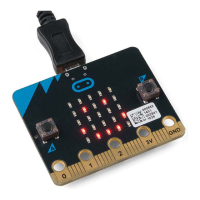
Introduction to the micro:bit, a pocket-sized computer for creative digital technology projects.
Instructions on how to connect the micro:bit to a computer via USB.
Overview of Microsoft MakeCode, the programming environment for the micro:bit.
Explains the choice between block-based and text-based programming in MakeCode.
Details how to use the MakeCode simulator for testing code without hardware.
Steps to build the 'Hello World' animation using MakeCode blocks.
Instructions on how to download and transfer your MakeCode program to the micro:bit.
Explains Light-Emitting Diodes (LEDs), their polarity, and current-limiting resistors.
Guide for connecting the LED and resistor to the breadboard and micro:bit.
Steps to run the code for blinking an LED.
Details the 'forever', 'digital write', and 'pause' blocks used for the LED blink.
Common issues and solutions for the LED not blinking.
Explains how a potentiometer works as a resistance-based analog sensor.
Guide for connecting the potentiometer to the breadboard and micro:bit.
Steps to run the code for controlling LED brightness with a potentiometer.
Explains 'set', 'analog read', and 'analog write' blocks for potentiometer control.
Solutions for sporadic operation or the potentiometer not working.
Explains how a photoresistor changes resistance based on ambient light.
Guide for building a voltage divider for the photoresistor.
Steps to run the code for the photoresistor-controlled night light.
Explains 'on start', 'forever', and 'if/else' blocks for the night light.
Solutions for the LED remaining dark or not working correctly.
Explains the RGB LED, its pins, and how to create custom colors.
Guide for connecting the RGB LED and resistors to the breadboard.
Steps to run the code for controlling the RGB LED with buttons.
Explains 'on button press', 'pick random', and 'analog write' for RGB LED.
Solutions for the RGB LED remaining dark or showing incorrect colors.
Explains the SPDT switch and how it makes connections based on position.
Guide for connecting the SPDT switch, LEDs, and resistors.
Steps to run the code for selecting LEDs with an SPDT switch.
Explains 'digital read' and 'digital write' blocks for switch-controlled LEDs.
Solutions for the switch not turning on LEDs or wiring problems.
Explains momentary push buttons and how they complete a circuit when pressed.
Guide for connecting the push button to the breadboard and micro:bit.
Steps to run the code for cycling RGB LED colors with buttons.
Explains 'on event', 'set pull pin', 'set pin to emit event' for button input.
Describes the RGB LED color changes based on button presses.
Solutions for the push button not triggering sounds or colors.
Details the TMP36 sensor, its output, and accuracy.
Guide for connecting the TMP36 sensor to the breadboard and micro:bit.
Steps to run the code for reading and displaying temperature.
Explains 'set degrees', 'show number', and 'get temperature' blocks.
How to add external code packages like the TMP36 sensor package.
Solutions for unchanging temperature readings or incorrect wiring.
Explains how servo motors rotate to specific angles using PWM signals.
Guide for connecting the servo motor to the breadboard and micro:bit.
Steps to run the code for controlling servo motor rotation.
Explains 'set direction', 'servo write', and 'change by' blocks for servo movement.
Solutions for the servo motor not twisting or not working.
Explains piezo buzzers and how they produce sound via PWM.
Guide for connecting the piezo buzzer and buttons to the breadboard.
Steps to run the code for playing melodies with the buzzer.
Explains 'start melody' and 'play tone' blocks for creating sounds.
Solutions for no sound or miswired push buttons.
Explains the accelerometer on the micro:bit and its function.
Guide for connecting the servo and micro:bit for accelerometer control.
Steps to run the code for controlling the servo with the accelerometer.
Explains 'acceleration', 'map', and 'servo write' blocks for orientation control.
Solutions for the servo moving backward or not working.
Explains how the magnetometer measures magnetic fields and Earth's magnetic field.
Guide for connecting LEDs and resistors for the compass experiment.
Steps to run the code for calibrating and using the compass.
Explains 'compass heading', 'and', and 'digital write' blocks for direction indication.
Solutions for backward LEDs or calibration problems.
Guide for a weather station kit using micro:bit and MakeCode.
Guide for controlling motors and building robots with the micro:bit.
Guide for writing and building games for the micro:arcade kit.
Guide to getting started with the micro:bit breakout board and basic electronic concepts.
| Brand | Sparkfun Electronics |
|---|---|
| Model | Inventor's Kit |
| Category | Toy |
| Language | English |