EasyManua.ls Logo

SpeedTech Lights FLARE 12 - User Manual

Default Icon
6 pages
Print Icon
To Next Page IconTo Next Page
Loading...
1 SpeedTech Lights, Inc © 2019
FLARE 12
HIDEAWAY
K-F12
INSTRUCTION MANUAL
Question and Answer IconNeed help?

Do you have a question about the SpeedTech Lights FLARE 12 and is the answer not in the manual?

Summary

Warnings and Notices for Users and Installers

Unpacking Your STL Product

Identify all included parts such as light bar, switch box, brackets, screws, and wiring harness.

Safety and Installation Guidance

Pre-Installation and Testing

Bench test all units prior to installation by connecting power to ensure features and parts are functional.

Maintenance

Clean light bars with water and a soft cloth; avoid car washes and pressure washers for longevity.

Wiring Diagram and Synchronization

Wiring Diagram

Details wire colors for functions like positive, negative, flash pattern, sync, and override.

Flash Pattern Synchronization

Guides on connecting white cables for sync and yellow for pattern cycle, then powering off/on.

Flash Pattern Alternating Synchronization

Instructions for dividing units into groups and connecting blue cables for alternating patterns.

Mounting Methods

Push Bulb Mounting

Insert flare bulb lens through the opening and use included hardware to mount the unit to the vehicle.

Surface Mounting w; Flare Flange

Push flange onto unit, run cable through pad, and use hardware to mount the unit to the vehicle.

Flash Pattern Information

Flash Pattern List

Comprehensive list of available flash patterns including steady burn, single flash, and quad flash.

Flash Pattern Shortcuts

Hold for 3 seconds to toggle Steady Burn mode.

About Flash Patterns

Products recall last pattern; cycle patterns via control box or wiring.

Overview

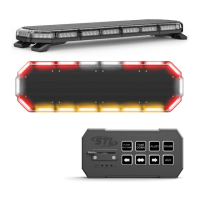
The SpeedTech Lights FLARE 12 HIDEAWAY is a professional-grade emergency warning device designed to alert pedestrians and other operators to the presence of personnel, emergency vehicles, or an emergency site. It is intended for strict use by authorized personnel only, who must be familiar with all applicable city, state, and federal laws and regulations regarding the use of emergency vehicle warning devices.

Function Description:

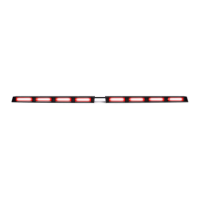
The FLARE 12 HIDEAWAY is a compact LED warning light with 12 LEDs and a dome lens optic. It operates on 12 VDC and has a current draw of less than 1.0 Amps. The device offers 34 different flash patterns, including steady burn, single flash at various speeds (120FPM, 150FPM, 75FPM, 180FPM, 210FPM), double flash, quad flash, quint flash, alternating patterns, and rotational patterns. It features non-volatile memory, which recalls the last flash pattern when the unit is powered on. Flash patterns can be cycled through using a dedicated Flash Pattern button on a Grand Control Box (if used) or by manually contacting the Flash Pattern wire to +12 VDC. A steady burn mode can be toggled by holding the Flash Pattern wire to +12 VDC for 3 seconds.

The device supports synchronization with other FLARE 12 units. For basic synchronization, all units must be powered on and flashing the same pattern. The White cables of all units are connected, and then the Yellow cables of all units are contacted to +12 VDC to cycle through patterns. Powering all units off and back on completes the sync process. For alternating synchronization, units are divided into two groups. The Blue cables of the first group are connected, and then contacted to +12 VDC for 3 seconds until the first group units are in steady burn (half of each unit will light up). The same process is repeated for the second group's Blue cables, but contacted to +12 VDC for 5 seconds until the second group units are in steady burn, with the opposite half of each unit lighting up. All programming for both groups must be completed before the steady burn portions cease.

Important Technical Specifications:

  • Voltage: 12 VDC
  • Amps: < 1.0
  • Optic: Dome Lens
  • LED Count: 12
  • Cable Length: 1'
  • Flash Patterns: 34
  • Mounting Options: Push Bulb Mounting (hideaway style) or Surface Mounting with Flare Flange (sold separately).
  • Wiring:
    • Red: Positive (main power cable)
    • Black: Negative (main power cable)
    • Yellow: Flash Pattern (contact to +12 VDC to cycle patterns)
    • Green: Steady Burn Override (contact to +12 VDC for steady burn)
    • White: Sync (connects units for synchronization)
    • Blue: Alternating Sync Programming (used for alternating flash patterns between groups)
    • Note: All cables except Negative and Sync contact +12 VDC.

Usage Features:

  • Non-volatile Memory: Retains the last selected flash pattern upon power cycling.
  • Flash Pattern Selection: Easily cycle through 34 patterns via a control box or dedicated wire.
  • Steady Burn Mode: Quick toggle to a constant on mode.
  • Synchronization: Ability to synchronize multiple FLARE 12 units for coordinated flashing.
  • Alternating Synchronization: Advanced synchronization feature to create alternating flash patterns between groups of units.
  • Hideaway Design: Allows for discreet installation within existing vehicle light housings.
  • Surface Mount Option: Can be surface mounted with an optional flange for external applications.

Maintenance Features:

  • Daily Testing: Users are advised to test the device daily to ensure proper operation.
  • Cleaning: Clean the outer body and lens with water and a soft cloth only. Do not use pressure washers, automatic car washes, or harsh chemicals, as these can scratch or damage the equipment.
  • Lens Replacement: Yellowing of clear lenses may occur over time; replacement lenses can be purchased from SpeedTech Lights Customer Service.
  • Wiring Inspection: Regularly inspect wiring for damage, ensure proper anchoring, and verify fuse integrity. Fuses should be properly sized and located as close to the power take-off points as possible.
  • Troubleshooting: Contact SpeedTech Lights Customer Service for troubleshooting or warranty claims if malfunctions occur.
  • Instruction Manual: Keep the instruction manual in a safe place for future reference; it is also available on the SpeedTech Lights website.

Important Warnings and Notices:

  • Read Manual Thoroughly: The end user and installer must read the entire manual before operating any STL product.
  • Eye Safety: Never stare directly into the LEDs to prevent momentary blindness or eye damage.
  • Airbag Safety: Never install the product or route wires through or in the deployment area of airbags. This can cause serious personal injury by damaging or reducing the effectiveness of the airbag, or by turning the unit into a projectile.
  • Drilling Precautions: If drilling is required, ensure no vehicle components are damaged, deburr all drilled holes, and remove metal remnants. Install grommets in all wire passage holes.
  • Electrical Safety: Protect and use caution around live electrical connections. Improper grounding or shorting can cause high current arcing, severe personal injury, vehicle damage, or fire. Do not use insulation displacement connectors.
  • Electromagnetic Interference (EMI): Mount light bars a minimum of 12" - 34" from radio antennas. Do not power equipment from the same circuit or share the same grounding circuit with radio communication equipment. Test all vehicle equipment together after installation to ensure no interference.
  • Secure Mounting: All equipment must be securely attached according to vehicle manufacturer instructions to withstand forces applied by the equipment. Permanent mounting is recommended; non-permanent mounting is discouraged due to risks during aggressive driving.
  • Authorized Use: This equipment is for authorized personnel only. Users must understand and obey all laws regarding emergency warning devices.
  • Operator Safety: Control boxes or remote devices must be installed within convenient reach of the operator to avoid losing eye contact with the roadway. Never activate or control equipment in hazardous driving conditions.
  • Wire Specifications: Use SXL type wire in the engine compartment where higher heat resistance is required (SAE J-1128). All wires should conform to minimum wire size and manufacturer recommendations and be protected from hot surfaces and moving parts.
  • Warranty Void: Failure to follow safety precautions, warnings, notices, and instructions will void the warranty and may cause serious injury.

Pre-Installation Testing:

Bench test all units prior to installation by connecting the Red (Positive) and Black (Negative) cables to a power source to ensure all features and parts are functional. Check LED diode and module functionality, flash patterns, non-volatile memory, and for any physical damage.

SpeedTech Lights FLARE 12 Specifications

General IconGeneral
BrandSpeedTech Lights
ModelFLARE 12
CategoryLighting Equipment
LanguageEnglish

Related product manuals