9
Troubleshooting Fejlfinding Depanare
Rozwiązywanie problemów Odstraňování potíží Αντιμετώπιση προβλημάτων
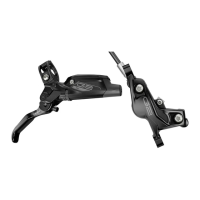
Disc Brake Pad Advancement Bremseklodserne stikker ud Poziționarea plăcuțelor de frână
Przesunięcie płytki ciernej hamulca
tarczowego
Zajištění volného pohybu destiček
kotoučových brzd
Προώθηση τακακιών
δισκόφρενων
NOTICE
Do not apply DOT brake fluid or grease to caliper pistons when performing troubleshooting procedures. Use of DOT brake fluid or
grease will reduce braking performance.
If your levers have excessive brake lever throw, it may be the result of one or more pistons sticking in the caliper. You can try to loosen the
sticky pistons by performing the following steps:
1. Clamp the bicycle into a bicycle work stand.
2. Remove the wheel from the affected caliper.
3. Remove the brake pads and pad h-spring from the caliper.
4. Insert two brake rotors into the caliper rotor slot.
5. Squeeze the brake lever to advance the pistons until they contact the rotors. Remove the rotors.
6. Use a plastic tire lever to carefully press the pistons back into the caliper. Repeat steps 4-6 one more time.
7. With the pistons pressed back into the caliper, install the brake pads, h-spring, pad retention bolt, and E-clip.
8. Install the wheel.
9. Squeeze the brake lever until the contact point is firm and lever throw is acceptable.
10. Center the caliper on the rotor if necessary.
11. Spin the wheel and check the brake function. The pistons should move freely and there should not be excessive brake lever throw. If
there is no improvement in the brake function, proceed with caliper service.
UWAGA
Nie stosuj płynu hamulcowego DOT ani smaru w tłoczkach zacisku podczas procedury usuwania usterki. Zastosowanie płynu
hamulcowego DOT lub smaru obniży efektywność hamowania.
Jeśli skok twojej dźwigni jest zbyt duży, może to być spowodowane przywieraniem w zacisku jednego lub większej liczby tłoczków.
Możesz spróbować poluzować tłoczki mające tendencję do przywierania, podejmując następujące kroki:
1. Unieruchom rower zaciskiem na stanowisku roboczym do pracy przy rowerze.
2. Odmontuj koło od wadliwie funkcjonującego zacisku.
3. Wyjmij z zacisku płytki cierne i sprężynę h-spring.
4. Wprowadź dwie tarcze hamulcowe do gniazda hamulca w zacisku.
5. Ściskaj dźwignię hamulca, by przesuwać tłoczki do przodu do momentu, w którym zetkną się one z tarczami. Odmontuj tarcze.
6. Użyj plastikowej łyżki do opon, by ostrożnie wcisnąć tłoczki z powrotem do zacisku. Powtórz jeszcze raz kroki 4-6.
7. Przy tłoczkach wciśniętych do zacisku zamontuj płytki cierne, sprężynę h-spring, śrubę mocującą płytek oraz zacisk E-clip.
8. Zamontuj koło.
9. Ściskaj dźwignię hamulca do momentu, w którym miejsce styku jest pewne, a skok dźwigni dostateczny.
10. Jeśli jest to konieczne, wyśrodkuj zacisk na tarczy.
11. Obracaj koło i sprawdź funkcjonowanie hamulca. Tłoczki powinny poruszać się swobodnie i nie powinien występować nadmierny
skok dźwigni hamulca. Jeśli nie nastąpi poprawa w funkcjonowaniu hamulca, rozpocznij serwisowanie zacisku.
BEMÆRK
Påfør ikke DOT-bremsevæske eller fedt på kaliberstemplerne, når der foretages procedurer i forhold til fejlfinding. Brug af DOT-
bremsevæske eller fedt vil reducere bremseevnen.
Hvis dine greb skal presses hårdt, kan det medføre, at en eller flere stempler stikker ind i kalibren. Du kan prøve at løsne de fastsiddende
stempler på følgende måde:
1. Spænd cyklen fast på et arbejdsstativ.
2. Tag hjulet ved den aktuelle kaliber af.
3. Tag bremseklodserne og h-fjederen af kalibren.
4. Sæt to bremseskiver ind i rillen på kalibren til bremseskiven.
5. Pres bremsegrebet ind for at skubbe stemplerne frem, til de rører ved bremseskiverne. Fjern bremseskiverne.
6. Brug et dækjern af plastik til forsigtigt at presse stemplerne tilbage i kalibren. Gentag trin 4-6 endnu en gang.
7. Mens stemplerne er presset tilbage ind i kalibren, monter da bremseklodserne, h-fjederen, bolten til at holde bremseklodserne og
E-klipsen.
8. Monter hjulet.
9. Pres bremsgrebet ind, indtil kontaktpunktet er fast og grebets nedtryksafstand er acceptabelt.
10. Centrer kalibren i forhold til bremseskiven, hvis det er nødvendigt.
11. Drej hjulet rundt og tjek, at bremsen virker. Stemplerne skal kunne bevæge sig frit, og bremsegrebet skal ikke have for stor vandring.
Hvis bremserne ikke fungerer bedre, fortsæt da med service af kalibren.
 Loading...