EasyManua.ls Logo

Standard Change-Makers MC Series - User Manual

Standard Change-Makers MC Series
12 pages
Print Icon
To Next Page IconTo Next Page
Loading...
8M00356
REV. 14
February 10, .2020
1
www.standardchange.com
1-800-968-6955
Technical Phone Support is from 8:00AM to 7:30PM E.S.T., Monday-Friday
Walk-in Service is from 8:00AM to 4:30PM E.S.T., Monday-Friday
Parts Department is from 8:00AM to 6:00PM E.S.T., :Monday-Friday
MC CHANGER CABINET INSTALLATION
INSTRUCTIONS
Standard Change-Makers manufactures change machines in the following cabinet styles:
1) Free standing consoles, 2) Front loading wall mount, 3) Through-the-wall rear load
and 4) Slim-line vending changer. Because physical locations vary, we do not suggest an
exact method of installation. To assure proper operation of your Standard bill changer the
following general guidelines should be observed:
1. Full swing of the door when open.
2. Wall construction: For maximum security, it is recommended that the changer be
installed on a wall made of cement block, brick or other type of masonry.
WARNING!!!
Welding the cabinet to any kind of mounting could cause damage to electrical components
within the machine
! Warping of the cabinet may also occur. Welding of any kind to the
cabinet during installation will void the manufacturer’s warranty!
If welding is ultimately necessary, all components within the machine must be removed
prior to welding! Please contact our Service Department with any questions.
3. Rear loading changers (through the wall mountings) should always open into a secure
location that has a locked door and no windows.
4. Good overhead lighting is highly recommended in the area that your changer is
located not only for your customers but for additional security.
5. Accessibility of power supply. (120 Volt/ 60 Hertz on its own grounded circuit 10
amp minimum required.)
6. Carwash locations will want to locate their changers out of reach of high-pressure
hoses.
7. The changer should be located so that any water runoff from the roof of the building
does not run down the face of the changer. A protective awning or shelter is highly
recommended for all outdoor installation sites.
Question and Answer IconNeed help?

Do you have a question about the Standard Change-Makers MC Series and is the answer not in the manual?

Overview

This document provides installation instructions and technical specifications for MC Changer Cabinet machines manufactured by Standard Change-Makers, Inc.

Function Description

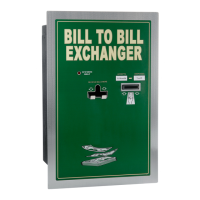
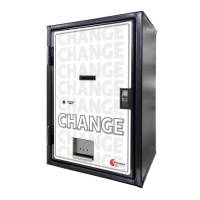
The MC Changer Cabinet is a change machine designed to convert monetary bills into coins. It comes in various cabinet styles: free-standing consoles, front-loading wall mounts, through-the-wall rear loads, and slim-line vending changers. The machine is intended for use in various environments, including protected outdoor locations, and can be integrated with other vending machines.

Important Technical Specifications

  • Operating Voltage: 105 VAC – 135 VAC
  • Power Consumption: 80W (min) - 360W (max). One-hopper machines require a maximum of 60 Watts of momentary power, two-hopper machines require 80 Watts, and Dual machines with a second supply may require up to 160 Watts momentarily. Ancillary items like a heater kit (e.g., 100 Watt heating element) can increase total consumption, but the maximum wattage for the entire machine, including ancillary items, should not exceed 360 Watts.
  • Operating Temperature: 0-60°C (32-140°F).
  • Electrical Service: 15A - Dedicated Run.
  • Power Supply: Equipped with a highly efficient "switching power supply" capable of delivering steady output power despite large input voltage fluctuations (100VAC to 135VAC). This supply only uses power when needed, minimizing heat build-up.
  • Mounting Bolts: Use ½ inch diameter bolts for cabinet mounting.
  • Conduit Fittings: Cabinet is sized for 1-inch conduit fittings for permanent wiring.
  • Power Cable Feed: Should not exceed 100 Feet in length for temporary hookups.
  • Bill Acceptor/Dispenser Operating Temperature: Most OEM bill acceptors and dispensers operate properly between 0°C (32°F) and 50°C (122°F) ambient temperature.

Usage Features

  • Cabinet Styles: Available as free-standing consoles, front-loading wall mounts, through-the-wall rear loads, and slim-line vending changers, offering flexibility for different physical locations.
  • Door Swing: Requires full swing of the door when open for service access.
  • Security: For maximum security, installation on a wall made of cement block, brick, or other masonry is recommended. Rear-loading changers should open into a secure location with a locked door and no windows.
  • Lighting: Good overhead lighting is recommended for customer convenience and additional security.
  • Power Supply Accessibility: Requires a 120 Volt/60 Hertz grounded circuit with a 10 amp minimum. A dedicated electrical line is recommended to reduce line interference.
  • Outdoor Installation: Can be used in protected outdoor locations. An awning, canopy, marquee, or other protective screen is recommended to prevent weather damage. Watertight electrical conduit must be used if the power cord is exposed to weather.
  • ADA Compliance: Installation height must comply with ADA standards for accessibility. Controls (coin cup, insertion slots, bill acceptor slots) should not be higher than 48” (1220 mm) or less than 15” (230 mm) from the floor for Forward Reach, and not exceed 54" (1370 mm) or less than 9” (200 mm) for Side Reach. A 30” (760mm) by 48” (1220mm) clear floor space is required in front of the machine for wheelchair access.
  • Environmental Considerations:
    • Moderate Environments (indoors): Minimum 0°C (32°F), maximum 41°C (106°F) inside the machine.
    • Extended Environments (outdoors): Recommended for Rear Load models. Canopy or cover strongly recommended to protect from dust/dirt, direct sunlight, and rainfall.
    • Cold Climates: Optional Heater Kit recommended for sustained temperatures below 0°C (32°F).
    • Hot Climates: Optional Outdoor Rated Power Supply recommended for sustained temperatures above 41°C (106°F), especially in Southern and Southwestern US.
    • Carwash Locations: Locate changers out of reach of high-pressure hoses.
    • Water Runoff: Position the changer so that water runoff from the roof does not run down its face. A protective awning or shelter is highly recommended for outdoor sites.

Maintenance Features

  • Installation Guidelines: General guidelines are provided to ensure proper operation, as exact installation methods vary by location.
  • Welding Warning: Welding the cabinet to any mounting could damage electrical components and warp the cabinet, voiding the manufacturer's warranty. If welding is necessary, all internal components must be removed first.
  • Mounting Surface: Ensure the cabinet is level and the mounting surface is flat to prevent distortion. Shims may be needed for uneven floors.
  • Cleanliness: Ensure the inside of the cabinet and changer components are free of metal shavings after mounting.
  • Packing Material Removal: Remove all packing material and straps, including items with yellow tags, from inside the cabinet.
  • Outdoor Hole Sealing: Any open mounting holes in the top or sides of the cabinet must be plugged with appropriately sized bolts or screws, with threads coated in silicone or RTV sealer to prevent water intrusion and potential electrical shock hazards. Holes in the bottom should be left open for drainage.
  • Power Cord Removal (Rear Load): For easier installation, the power cord can be temporarily removed by detaching its retaining plate and pulling it into the cabinet.
  • Watertight Seal (Rear Load): Use silicone or RTV caulking on the backside of the front plate and around the faceplate-to-cabinet joint to form a tight weather-proof seal when sliding the changer through a wall opening.
  • Electrical Hook-up: Electrical connections should be performed by a qualified electrician, checking local building codes. The machine must be connected to a properly grounded electrical outlet (3rd wire ground back to main service panel).
  • Grounding: Proper grounding is crucial for safe and reliable operation. Improper grounding can cause erratic operation and be unsafe.
  • Electrical Checks: Before operation, perform voltage, polarity, and noise potential checks on the electrical supply using a volt-ohmmeter.
  • Test Operation: After installation, fill hoppers, insert bills, and count dispensed coins to ensure proper payout and operation.
  • Humidity Control: A cabinet heating kit can help keep humidity low for bill dispensers in environments with daily temperature transitions.

Standard Change-Makers MC Series Specifications

General IconGeneral
ModelMC Series
CategoryCash Counters & Coin Sorters
CapacityVaries by model (see individual model specifications)
DimensionsVaries by model (see individual model specifications)
WeightVaries by model (see individual model specifications)
Hopper CapacityVaries by model (see individual model specifications)
Dispensing SpeedVaries by model (see individual model specifications)
ColorVaries by model

Related product manuals