3
ENGLISH
OPERATION
Instructions for Use
WARNING: Always observe the safety instructions and
applicableregulations.
WARNING: To reduce the risk of serious personal
injury, turn tool off and disconnect tool from power
source before making any adjustments or removing/
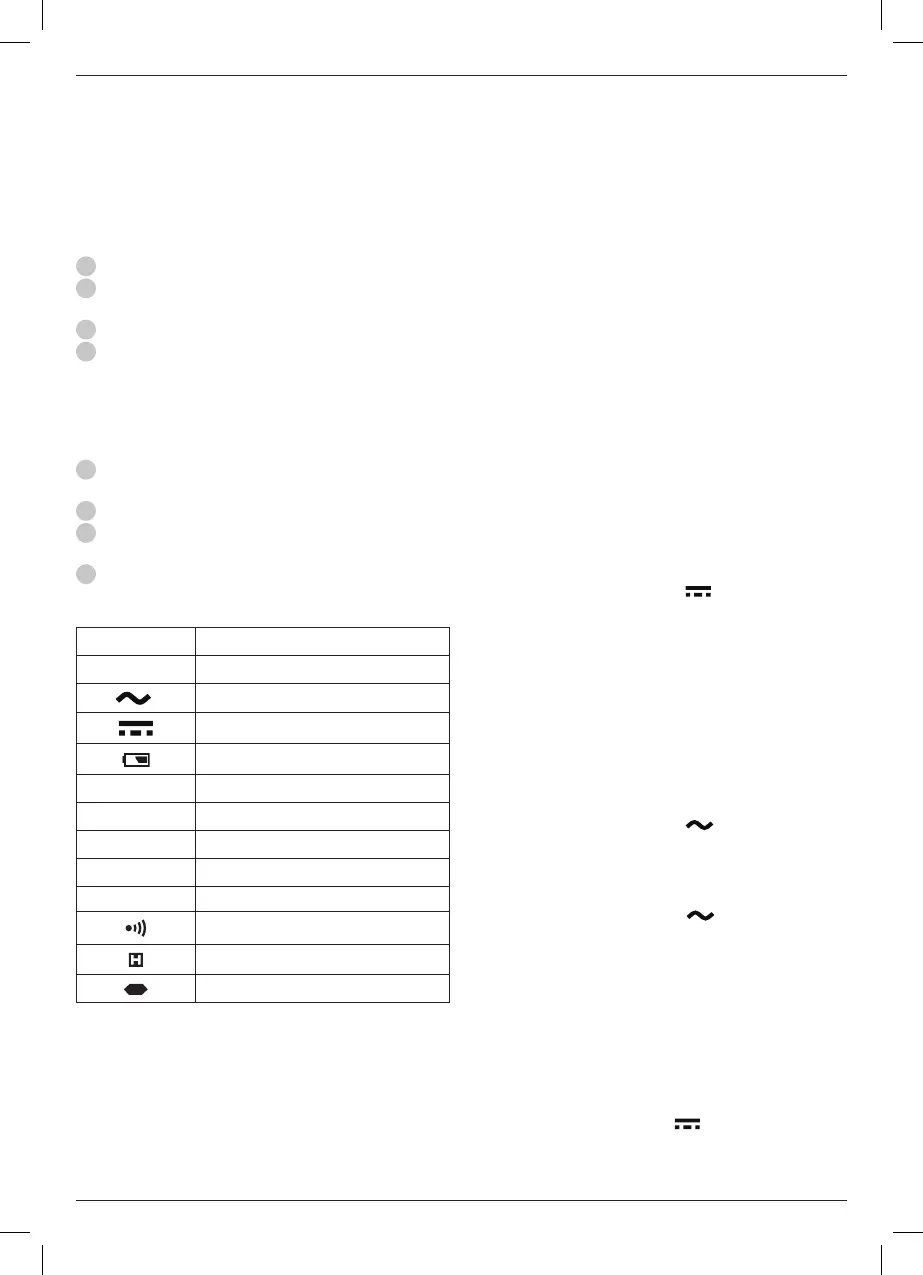
Display (Fig. B)
Symbol Description
AUTO
Auto-range
`
AC voltage/current
DC voltage/current
Low Battery
%
Percentage (duty cycle)
Hz
Hertz (frequency)
V
Volts (Voltage)
A
Amps (Current)
Ω, kΩ, MΩ
Ohms (resistance)
Continuity
Display Hold
Polarity Indicator (Negative)
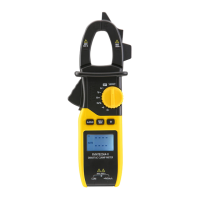
Description (Fig. A)
WARNING: Never modify the power tool or any part of it.
Damage or personal injury couldresult.
1
Current Clamp For measuring AC/DC current.
2
Safety barrier Helps to keep hands from touching
conductors while measuring current.
3
Rotary Switch Used to select function and range.
4
MAX/MIN Press the key to show the maximum reading
value among measuring data, and the “MAX” symbol
appears on the display, prees the button again, the “MIN”
symbol appears on the display and will show the minimum
reading value among measuring data, press the key third
time to return to normal mode.
5
Backlight Press the key to turn on the backlight. Press the
key again to manually turn off the backlight.
6
Display Max. display value: 5999
7
Input Jack Connection for the live (red) test lead for
voltage, resistance, capacitance, diodes and continuity.
8
COM Jack
The normal function of the product may be disturbed by strong
Electro-Magnetic Interference. If so, simply reset the product to
resume normal operation by following the instruction manual.
In case the function could not resume, please use the product in
other location.
Using the Meter
SMART Function Measurement
Move the rotary switch to the “SMART” position. the default
mode is “AC Current”, “DC Current”, “AC Voltage” ,“DC Voltage”
“Resistance” or “Contina ity”, Connect the test leads across the
circuit or load to be measured, It will Automatic judgement on
the LCD display. When used the meter to measure the AC/DC
current, the meter also can display the measurement (for
example DCV or ACV or ohms or continuity) that measured from
the jaw of the meter at the same time.
Auto Power Off
If the meter is not used for approx. 15 min., the meter will
automatically turn itself off to conserve battery power. To turn
the meter back on after auto off , press the “A-HOLD” button.
DC Voltage
CAUTION: Use extra caution when measuring high
voltages to avoid electric shock or damage.
WARNING: Do not attempt to measure voltages above
600V DC to prevent injury or damage to the meter.
1. Insert the red test lead in the “INPUT” jack and the black lead
in the “COM” jack.
2. Move the rotary switch to the “V ” position.
The default mode is DC voltage. Connect the test leads
across the circuit or load to be measured.
3. Read measured voltage on the display.
AC Voltage
CAUTION: Use extra caution when measuring high
voltages to avoid electric shock or damage.
WARNING: Do not attempt to measure voltages above
600V DC to prevent injury or damage to the meter.
1. Insert the red test lead in the “INPUT” jack and the black lead
in the “COM” jack.
2. Move the rotary switch to the “V ” position. Connect the
test leads across the circuit or load to be measured.
3. Read measured voltage on the display.
AC Current
1. Move the rotary switch to the “A ” position with the
proper range.
2. Press the trigger, insert the pincers red black pencil line into
the red and black air of the digital multimeter, open the
clamp and insert one conduc tor inside the jaws only clamp
one conductor multiple conductors with different current
directions will cancel out readings.
3. Read measured current and the frequency value on the LCD
display.
DC Current
1. Move the rotary switch to the “ ” position with the
proper range.
installing attachments or accessories. An accidental
start-up can cause injury.
 Loading...